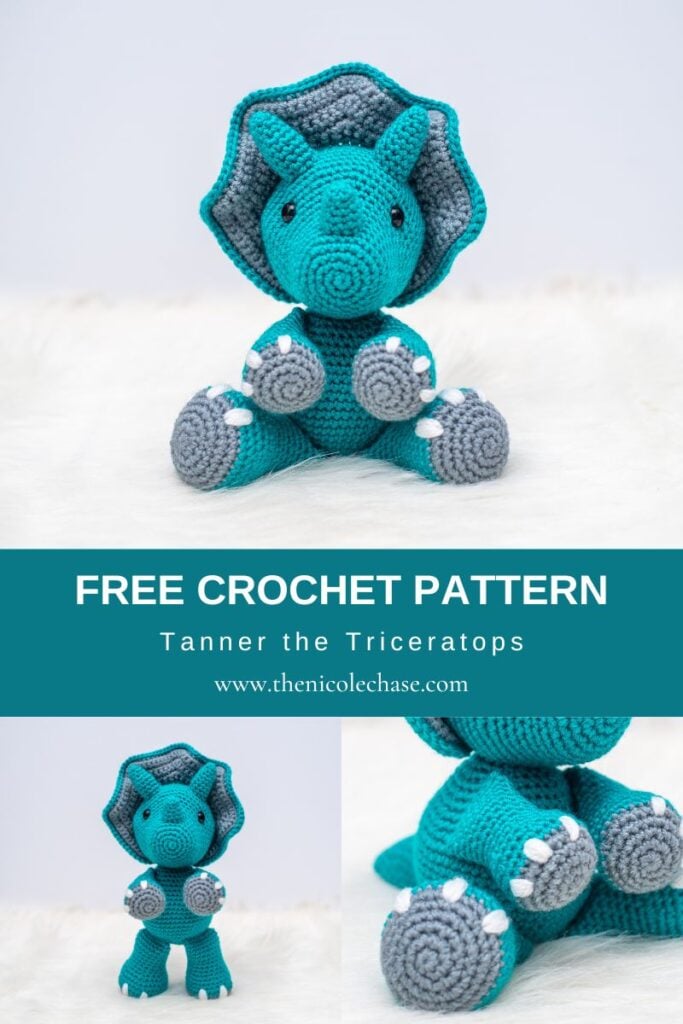
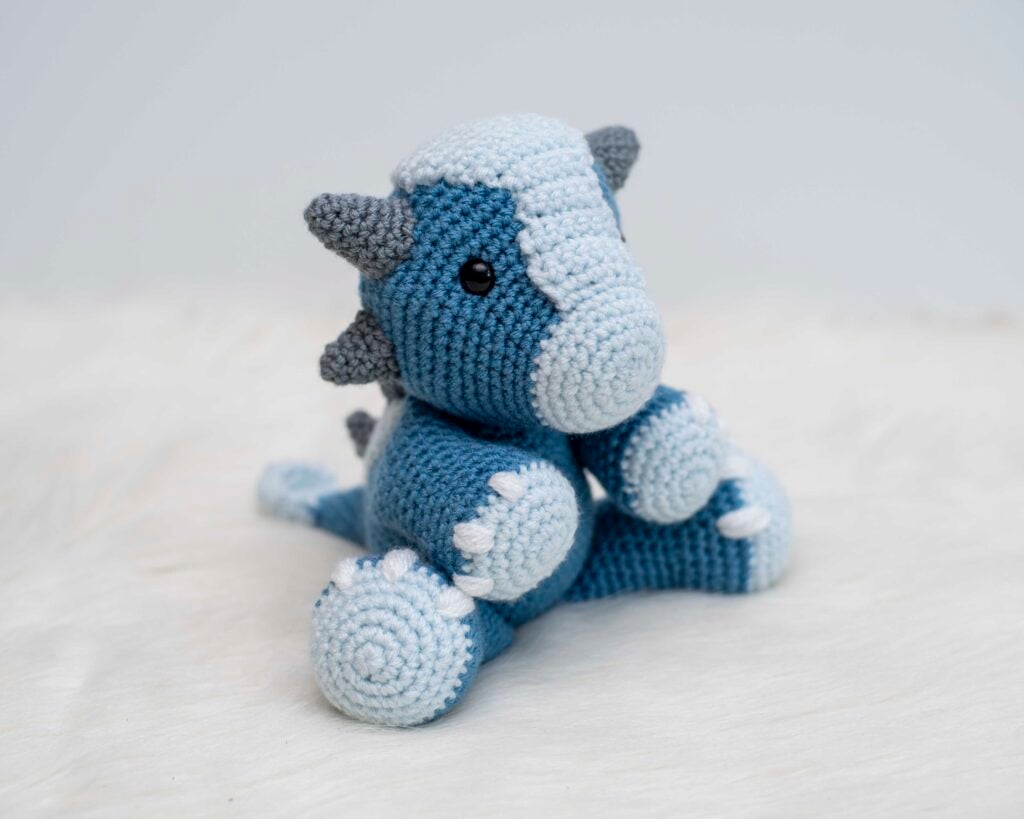
Tanner the Triceratops – Free Dinosaur Crochet Pattern
This post may contain affiliate links. If you make a purchase through links on our site, we may earn a commission.
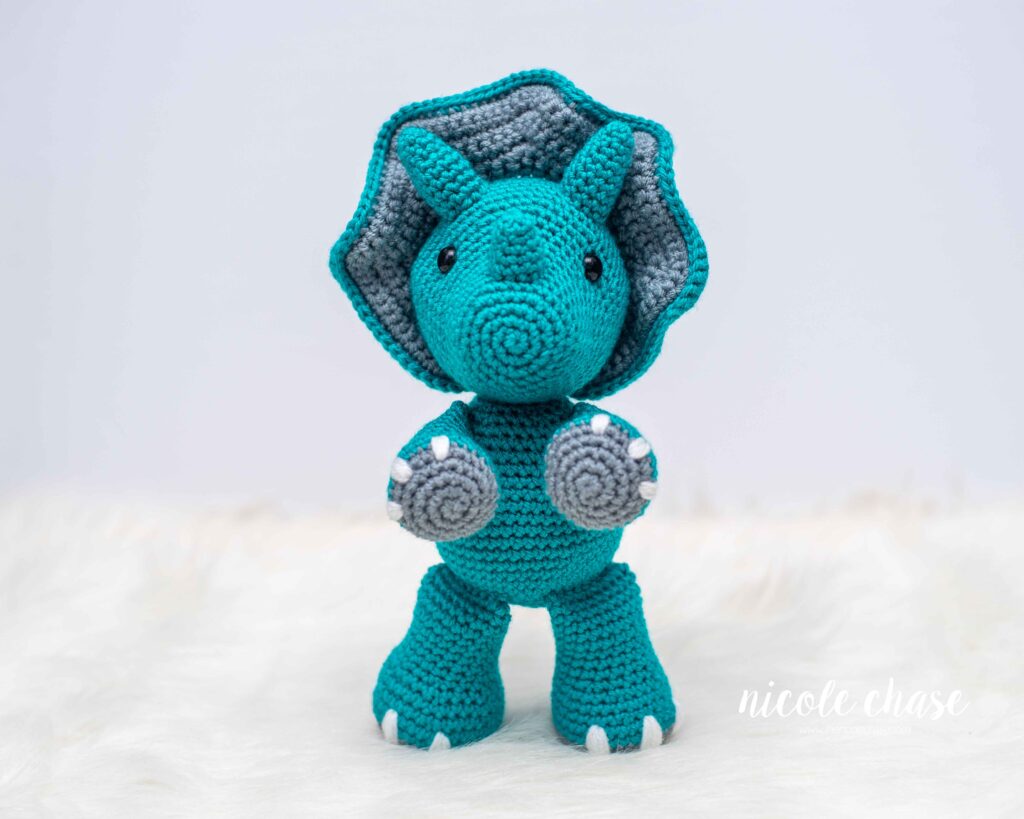
Dinosaurs are so popular these days, and my son’s dino obsession is what inspired this adorable crochet triceratops design: Tanner the Triceratops! This free triceratops crochet pattern is perfect for beginners and experienced crocheters alike!
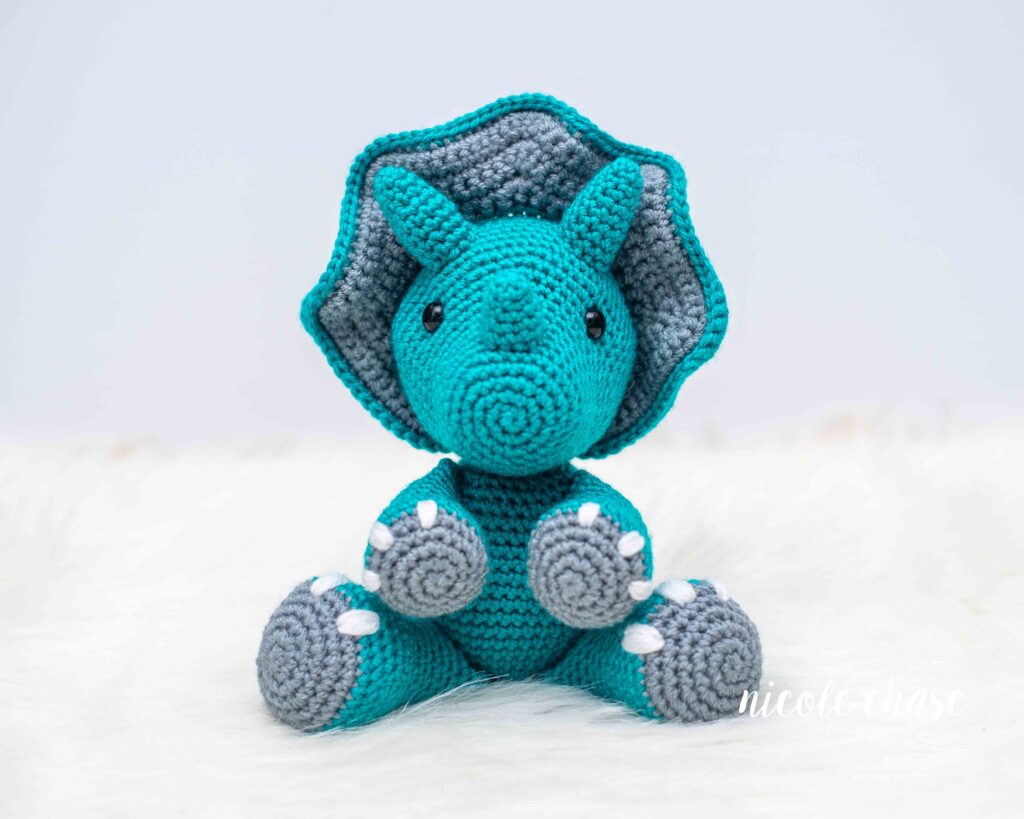
This beginner friendly crochet dinosaur amigurumi is about 10″ tall while sitting and 13″ tall while standing when worked up in a similar yarn and hook to what I’ve used here. Most of the pieces of this free triceratops crochet pattern are worked in the round and then the pieces are sewn together. Tanner the Triceratops also includes a bit of embroidery for the nails.
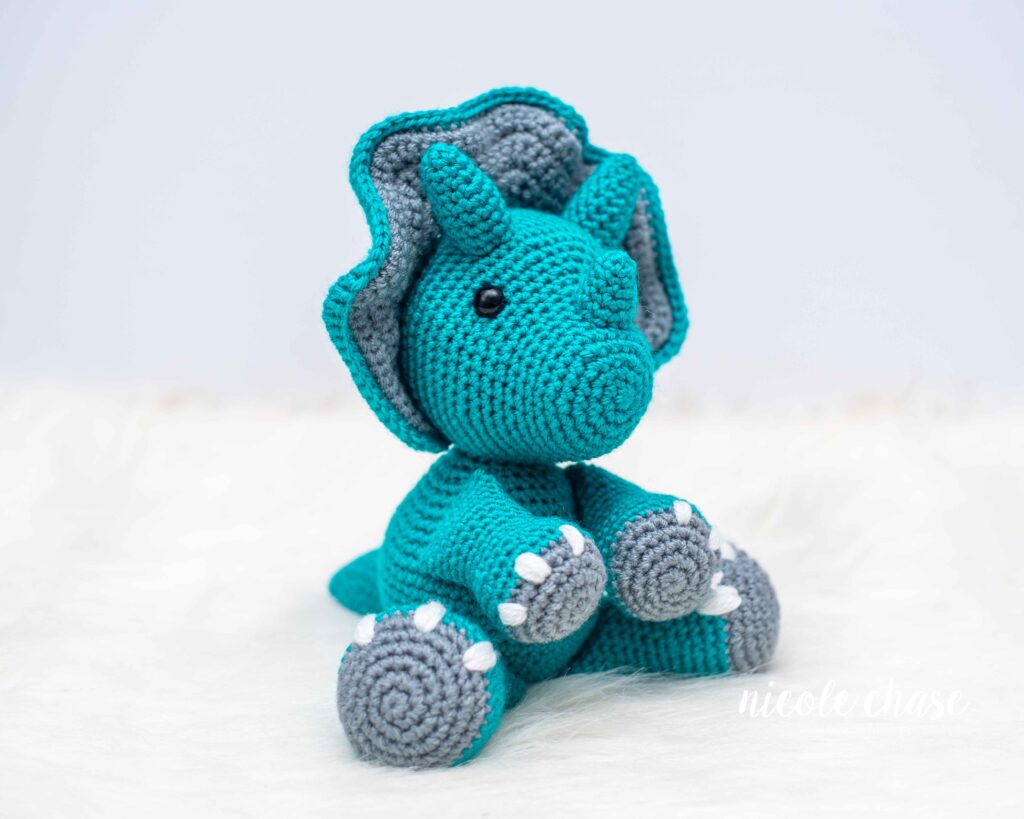
Table of Contents
I hope you enjoy this free crochet pattern available here on my blog! An ad-free, formatted PDF version of this crochet pattern is also available for purchase here:
If you like this free triceratops crochet pattern, you may be interested in my full collection of amigurumi crochet dinosaur patterns. You can find all of my dinosaur crochet patterns here.
Pin this crochet triceratops pattern for later.
Add Tanner the Triceratops crochet pattern to your project queue and favorite this pattern on Ravelry here.
I would classify this crochet pattern as “advanced beginner”. It would be helpful to have had some experience with amigurumi before creating this project.
I used WeCrochet’s Brava Worsted yarn to make Tanner the Triceratops, but I’ve seen so many people make this free dinosaur crochet pattern in a variety of different yarns and he always turns out great!
Free Crochet Pattern for Tanner the Triceratops

Pattern Specifics
Measurements: Approximately 8.5” tall (sitting) or 11.5” tall (standing)
Gauge: Not necessary for this pattern; see notes
Hook Size: 4.0mm (G) crochet hook
Other Tools: tapestry needle, stitch markers, scissors
Yarn Weight: Medium (4), Worsted
Yarn Used: WeCrochet/Knit Picks Brava Worsted
Yardage: color A (teal): 218 yds, color B (gray): 59 yds, color C (white): 4 yds
Other Materials: poly-fil stuffing, 12mm safety eyes
Stitch Abbreviations
st = stitch
sl st = slip stitch
SC = single crochet
SC2tog = single crochet 2 stitches together (invisible decrease is recommended)
FSC = foundation single crochet
Special Stitches
SC2tog (using invisible decrease method): Insert hook into front loop of the first stitch. Insert hook into front loop of second stitch. Yarn over. Draw through the first two loops on hook. Yarn over. Draw through both loops on hook.
Notes
- Checking your gauge is not required for this pattern. Use a hook that is smaller than the size recommended for your yarn weight. This will ensure that your stuffing will not show through the stitches.
- All pieces, with the exception of the frill, are worked in the round. Use a stitch marker to indicate the beginning of each round.
- Invisible decreases are recommended. Please see “Special Stitches”.
- Safety eyes and noses pose a choking risk for babies; therefore, if making this toy for a baby, I recommend using yarn, felt, or embroidered details.
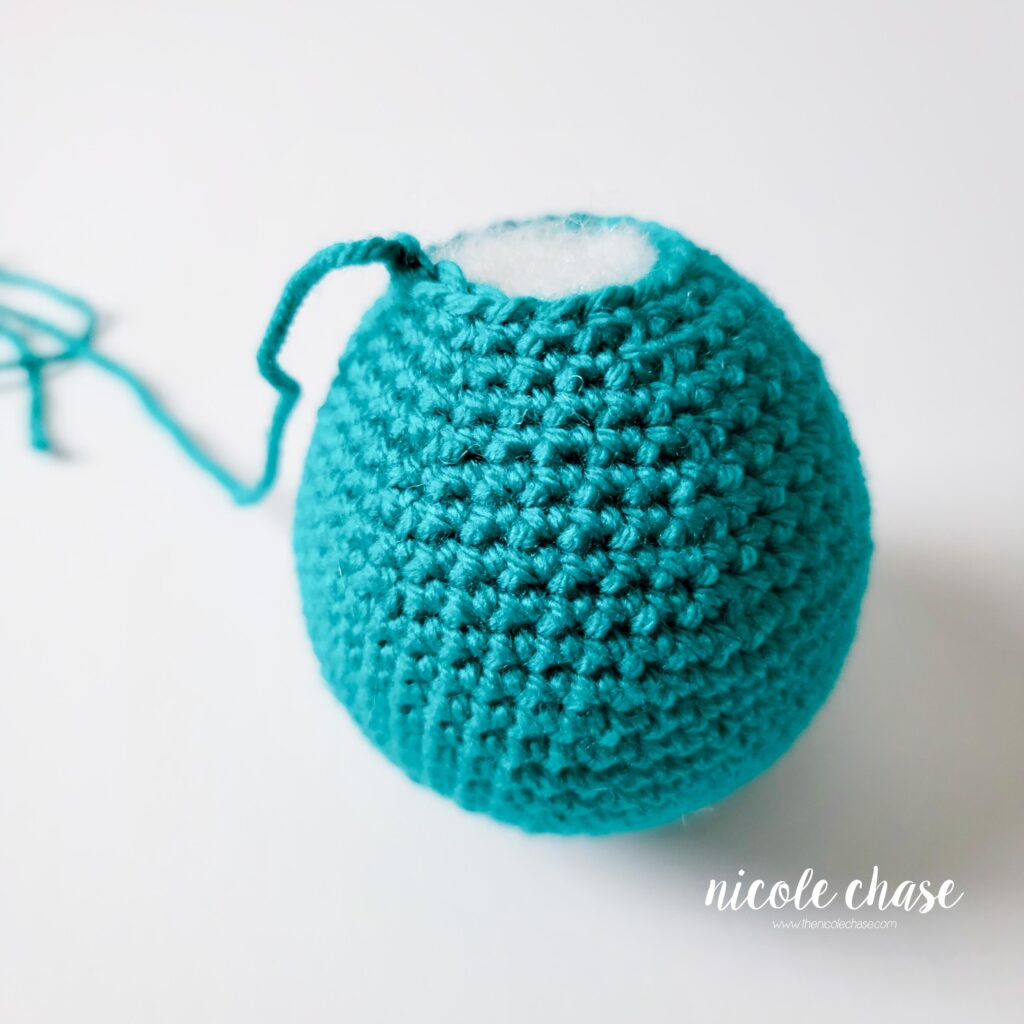
- Body, head, legs, arms, horns, and tail require stuffing. Stuff as you work it to ensure each piece is completely filled. Do not add stuffing to the frill.
- See tutorial photos.
Pattern
Using 4.0mm (G) crochet hook:
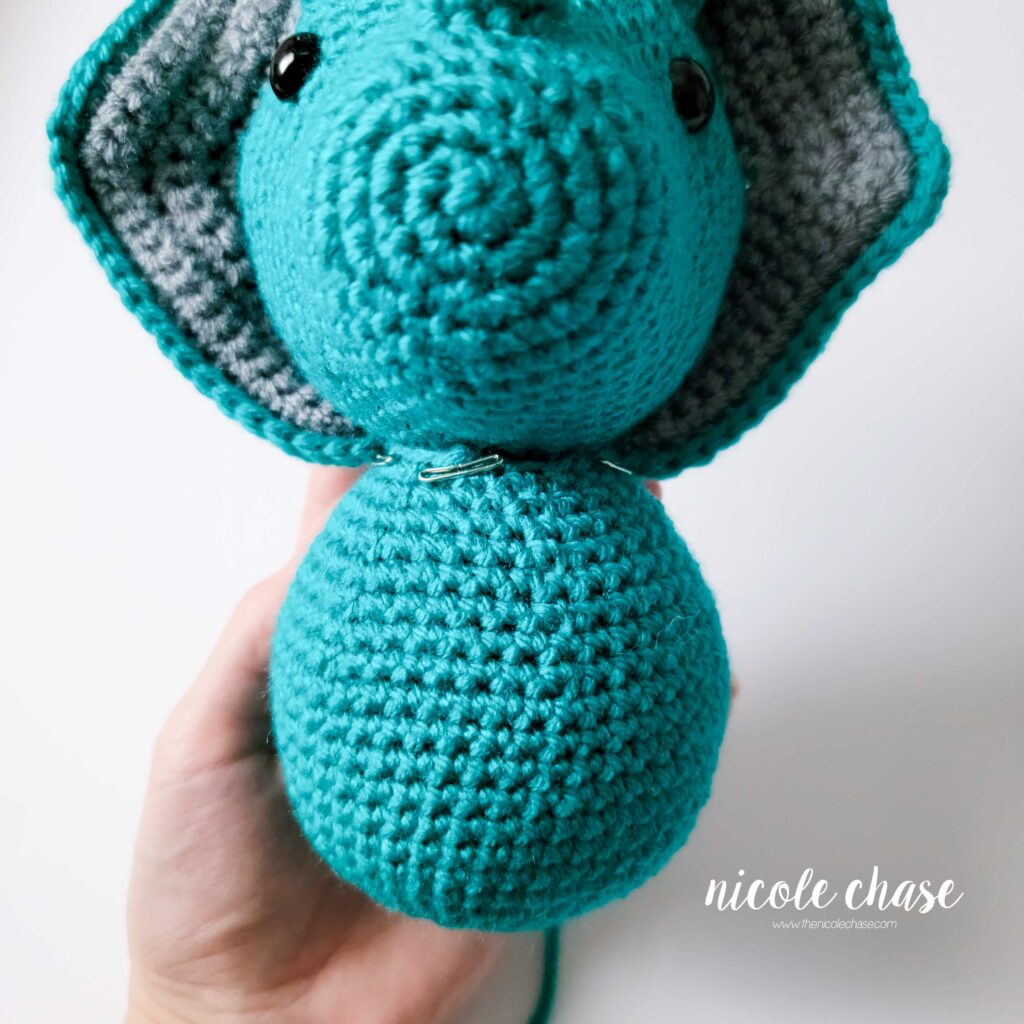
Body
Using color A (shown as teal):
R1: Begin with 6 SC in a magic ring. (6 sts)
R2: 2 SC in each st around. (12 sts)
R3: *2 SC in next st, 1 SC in next st. Repeat from * around. (18 sts)
R4: *2 SC in next st, 1 SC in each of the next 2 sts. Repeat from * around. (24 sts)
R5: *2 SC in next st, 1 SC in each of the next 3 sts. Repeat from * around. (30 sts)
R6: *2 SC in next st, 1 SC in each of the next 4 sts. Repeat from * around. (36 sts)
R7: *2 SC in next st, 1 SC in each of the next 5 sts. Repeat from * around. (42 sts)
R8: *2 SC in next st, 1 SC in each of the next 6 sts. Repeat from * around. (48 sts)
R9-16: 1 SC in each st around. (48 sts)
R17: *SC2tog, 1 SC in each of the next 6 sts. Repeat from * around. (42 sts)
R18: 1 SC in each st around. (42 sts)
R19: *SC2tog, 1 SC in each of the next 5 sts. Repeat from * around. (36 sts)
R20: 1 SC in each st around. (36 sts)
R21: *SC2tog, 1 SC in each of the next 4 sts. Repeat from * around. (30 sts)
R22: 1 SC in each st around. (30 sts)
R23: *SC2tog, 1 SC in each of the next 3 sts. Repeat from * around. (24 sts)
R24: *SC2tog, 1 SC in each of the next 2 sts. Repeat from * around. (18 sts).
Cut yarn, leaving long strand for sewing. Fasten off.
Fill with stuffing.
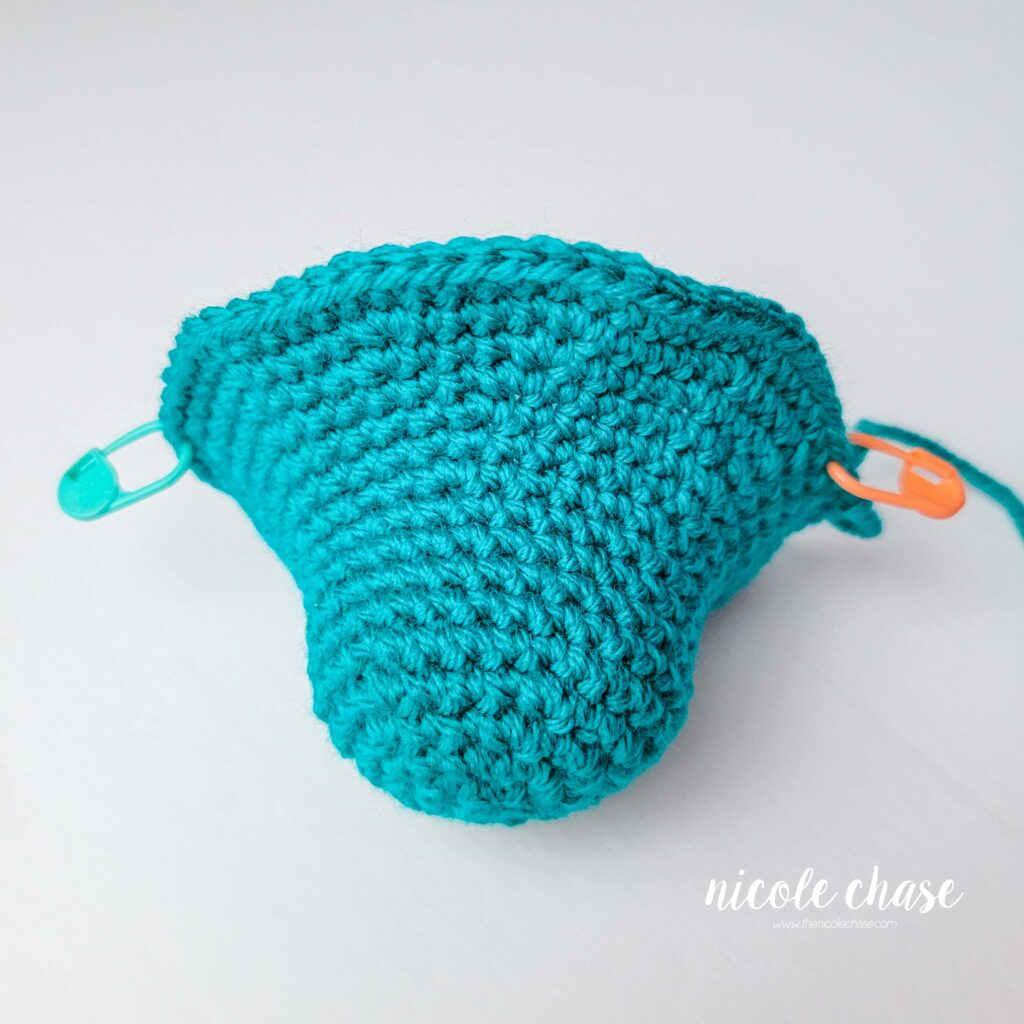
Head
Using color A (shown as teal):
R1: Begin with 6 SC in a magic ring. (6 sts)
R2: 2 SC in each st around. (12 sts)
R3: *2 SC in next st, 1 SC in next st. Repeat from * around. (18 sts)
R4: *2 SC in next st, 1 SC in each of the next 2 sts. Repeat from * around. (24 sts)
R5: *2 SC in next st, 1 SC in each of the next 3 sts. Repeat from * around. (30 sts)
R6-10: 1 SC in each st around. (30 sts)
R11: *2 SC in next st, 1 SC in each of the next 4 sts. Repeat from * around. (36 sts)
R12: 1 SC in each st around. (36 sts)
R13: *2 SC in next st, 1 SC in each of the next 5 sts. Repeat from * around. (42 sts)
R14: *2 SC in next st, 1 SC in each of the next 6 sts. Repeat from * around. (48 sts)
R15: *2 SC in next st, 1 SC in each of the next 3 sts. Repeat from * an additional 5 times. 1 SC in each of the next 24 sts around. (54 sts)
R16: *2 SC in next st, 1 SC in each of the next 4 sts. Repeat from * an additional 5 times. 1 SC in each of the next 24 sts around. (60 sts)
R17: 1 SC in each of the next 32 sts around. Add a st marker to the last worked st. 1 SC in each of the next 28 sts around. (60 sts)
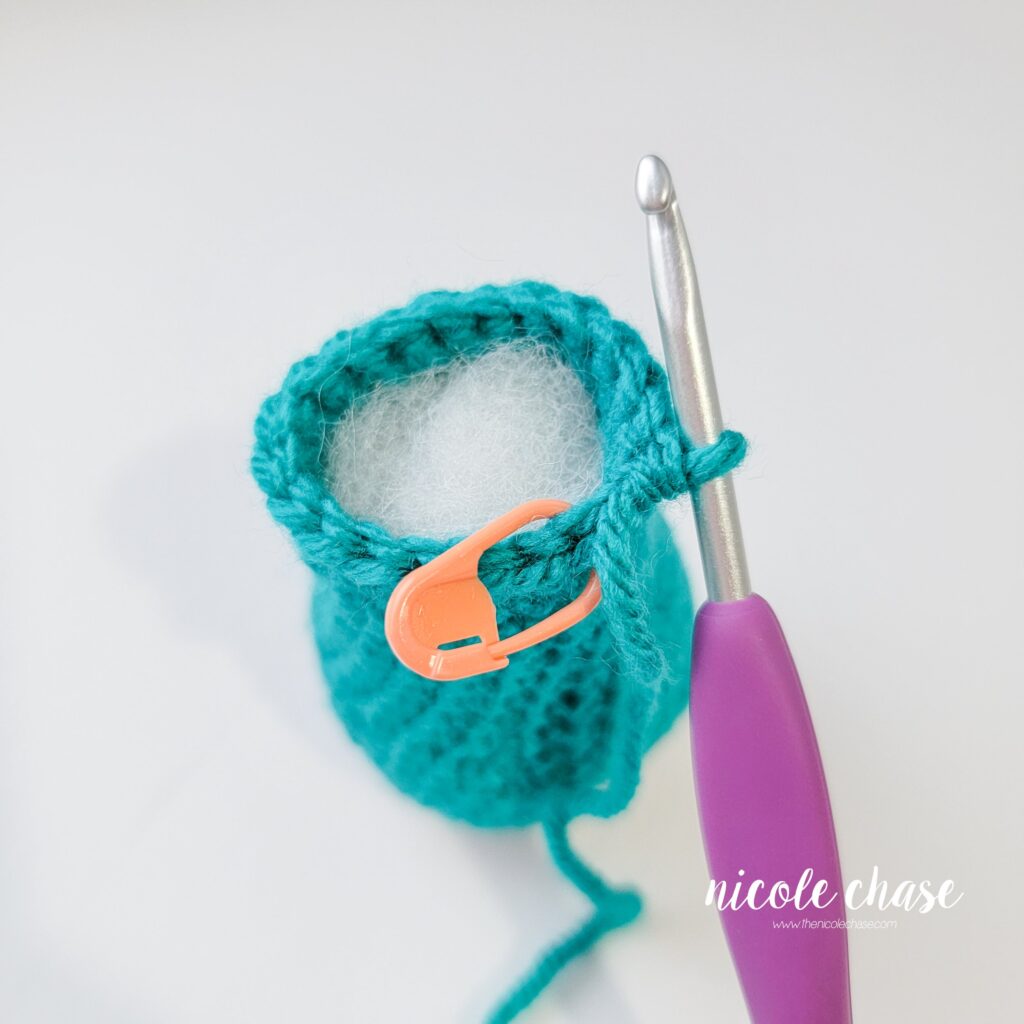
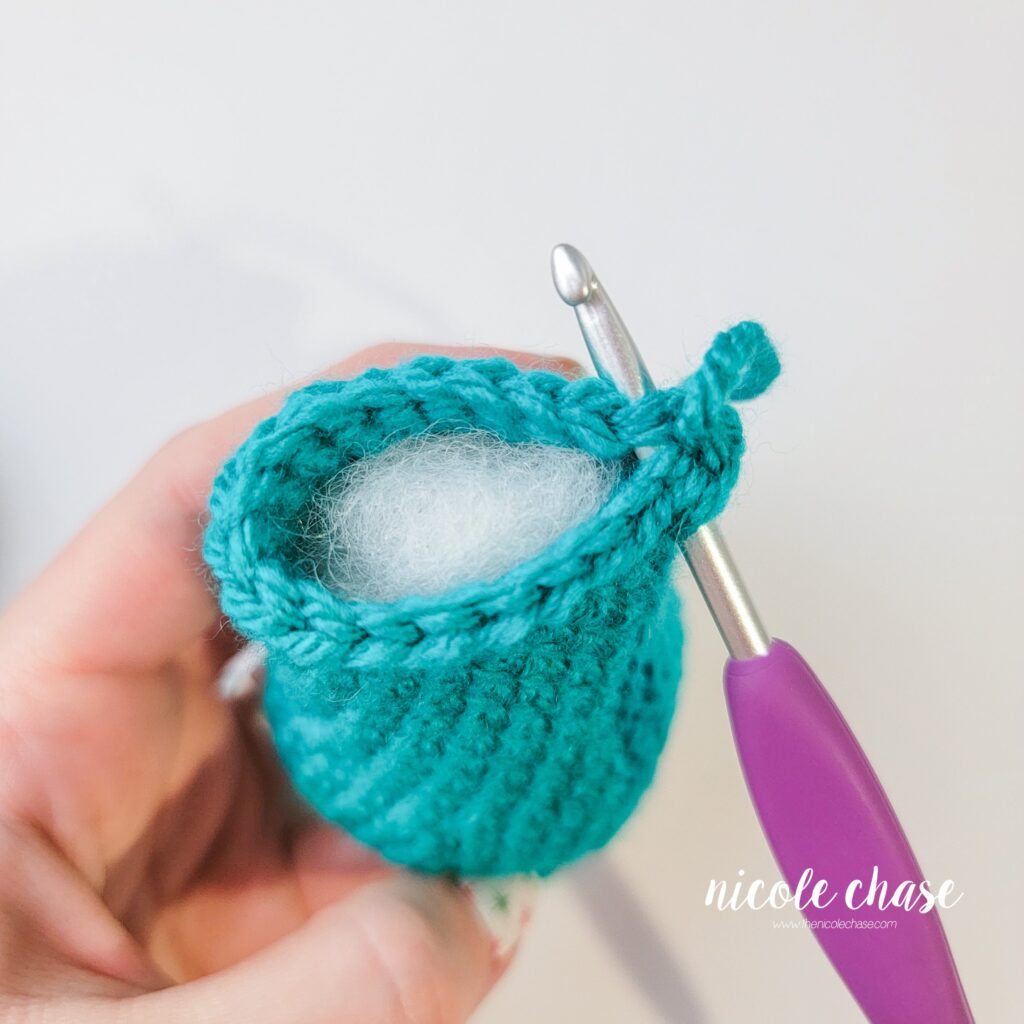
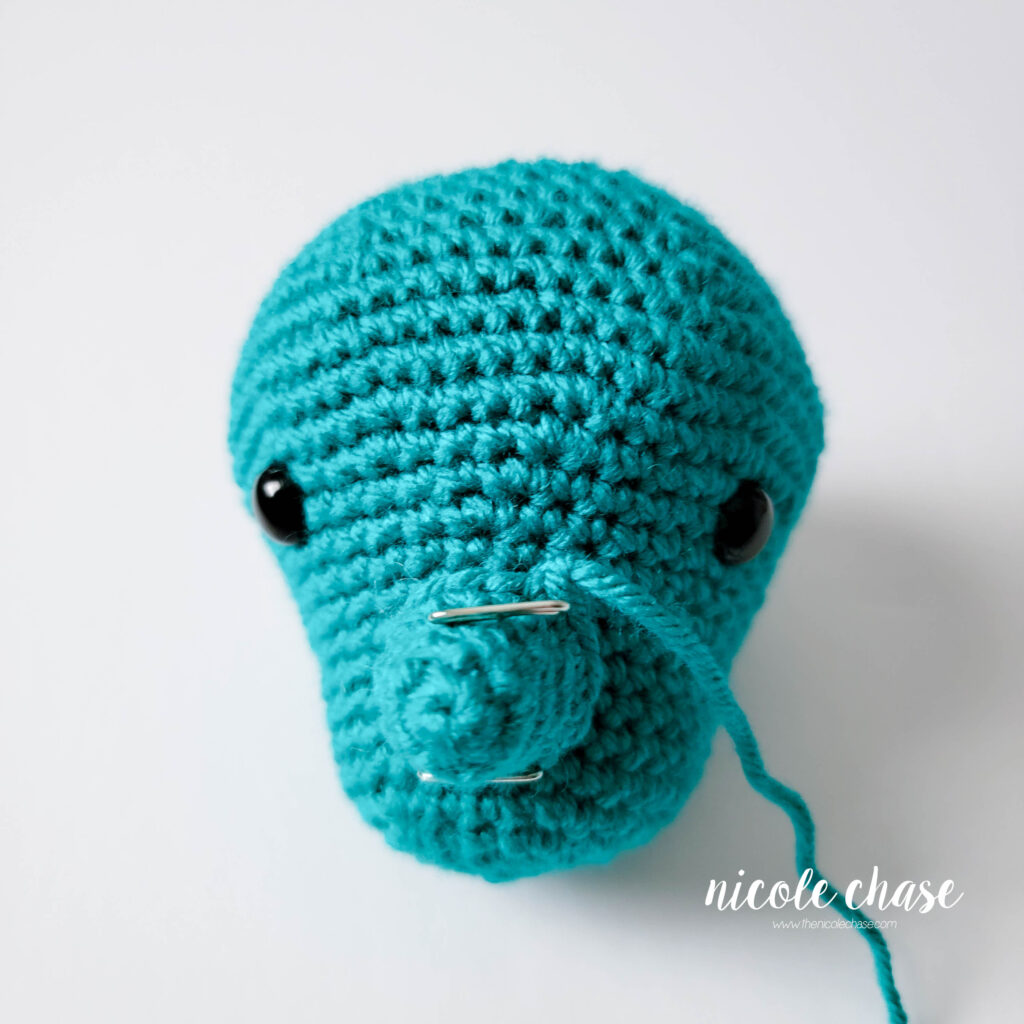
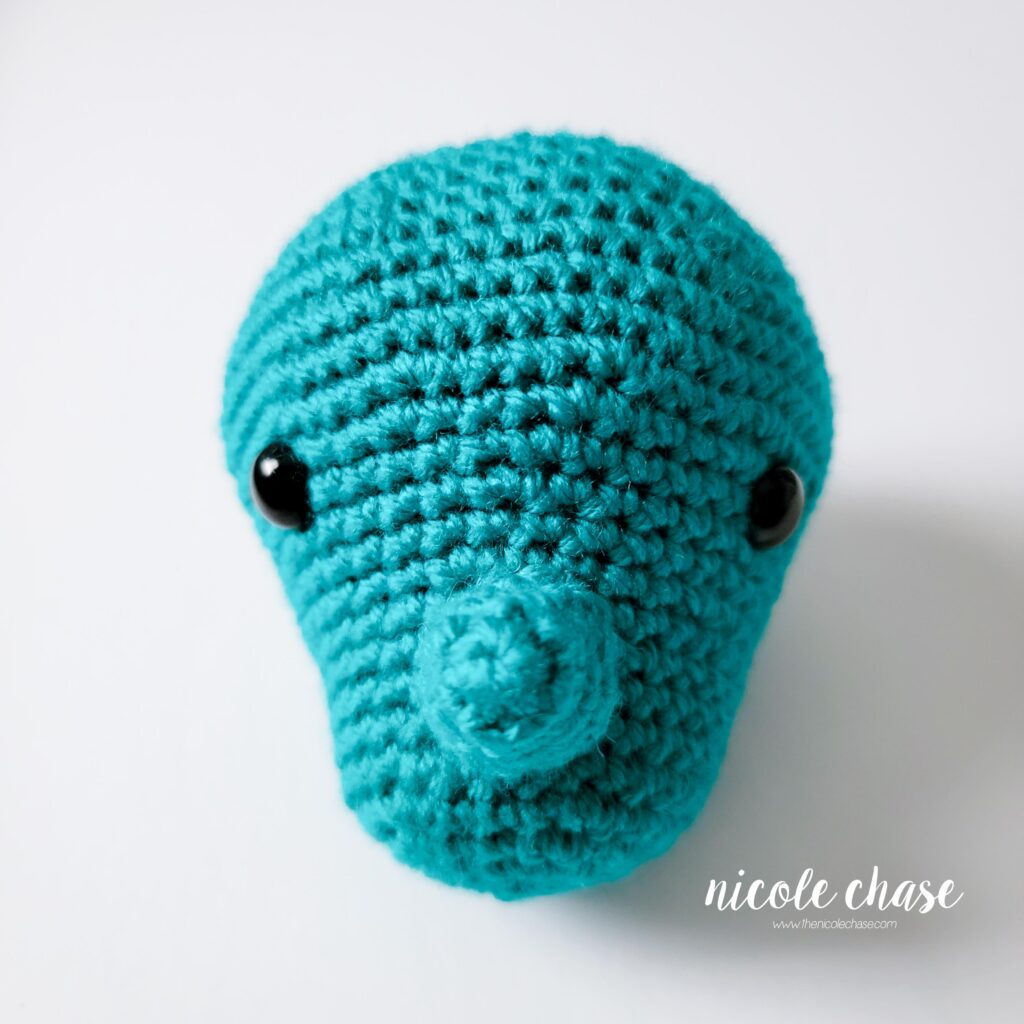
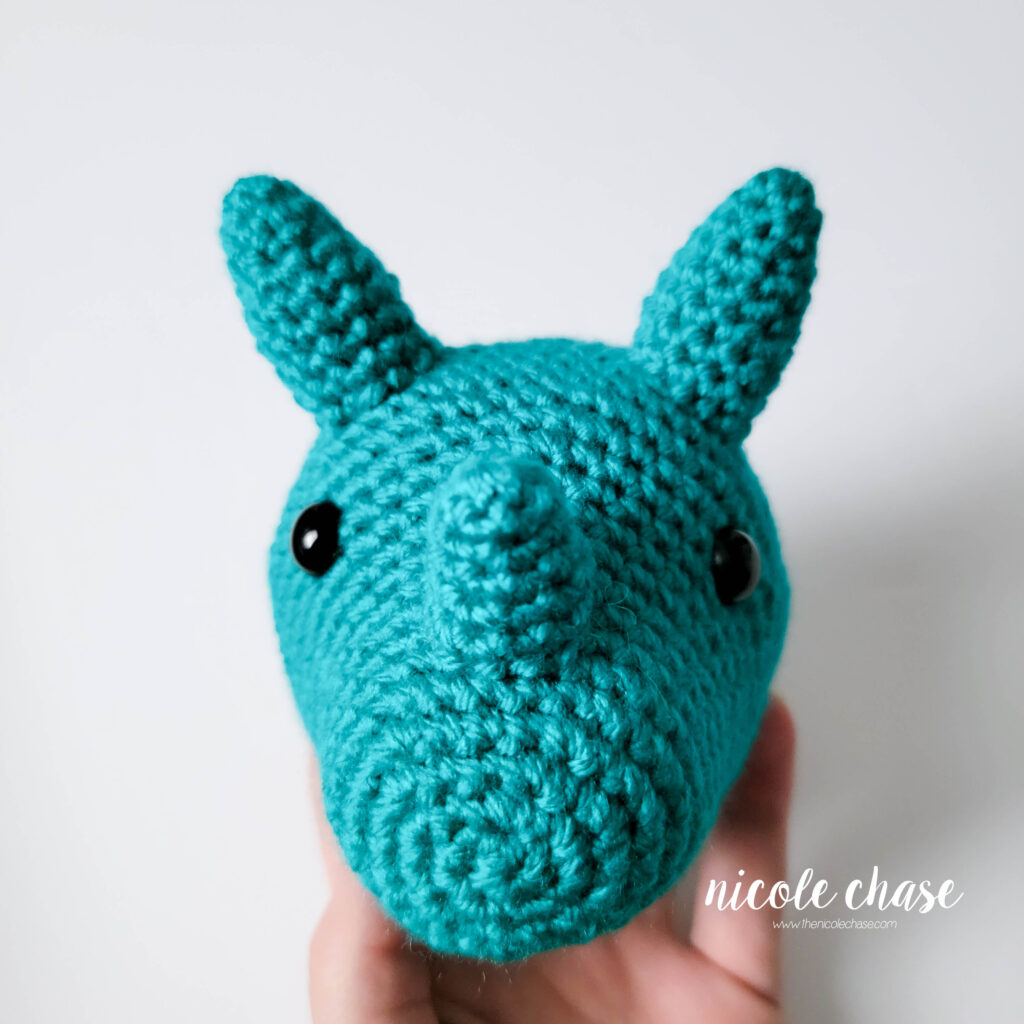
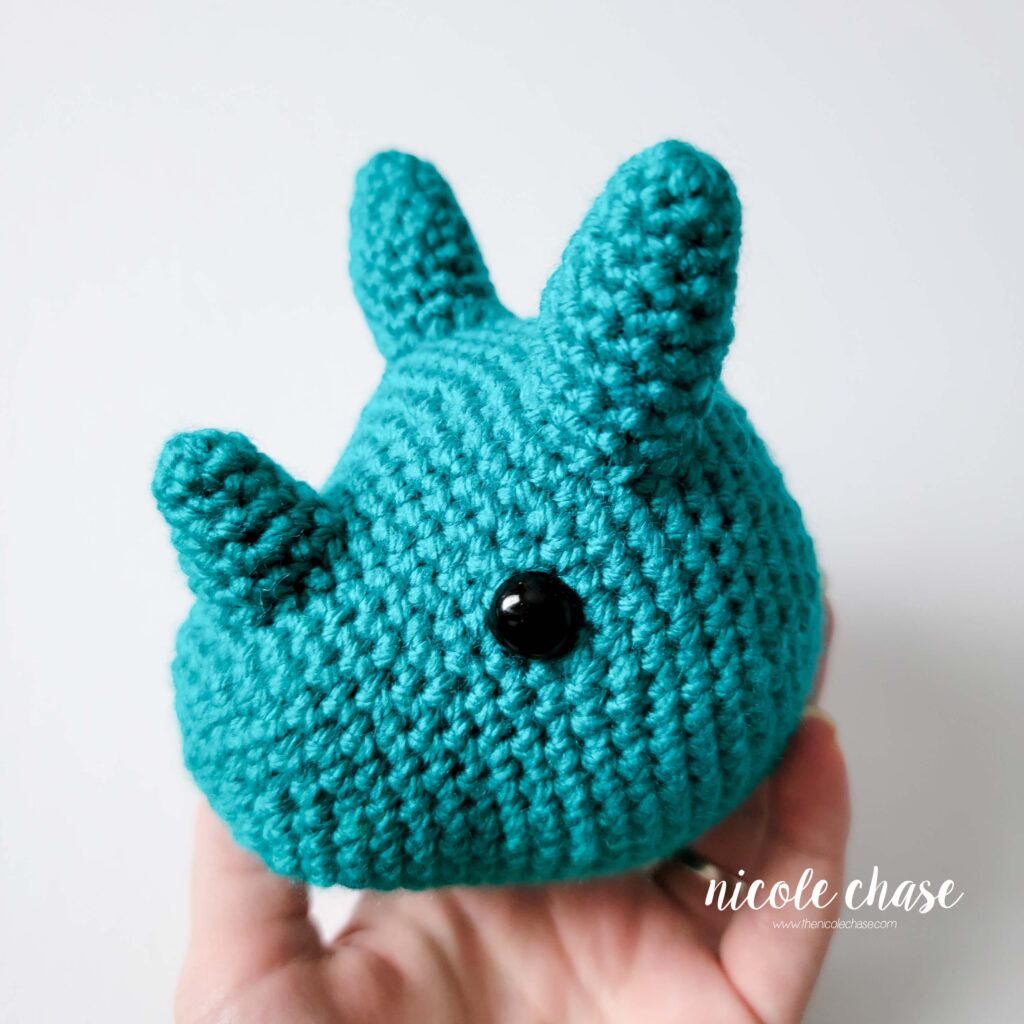
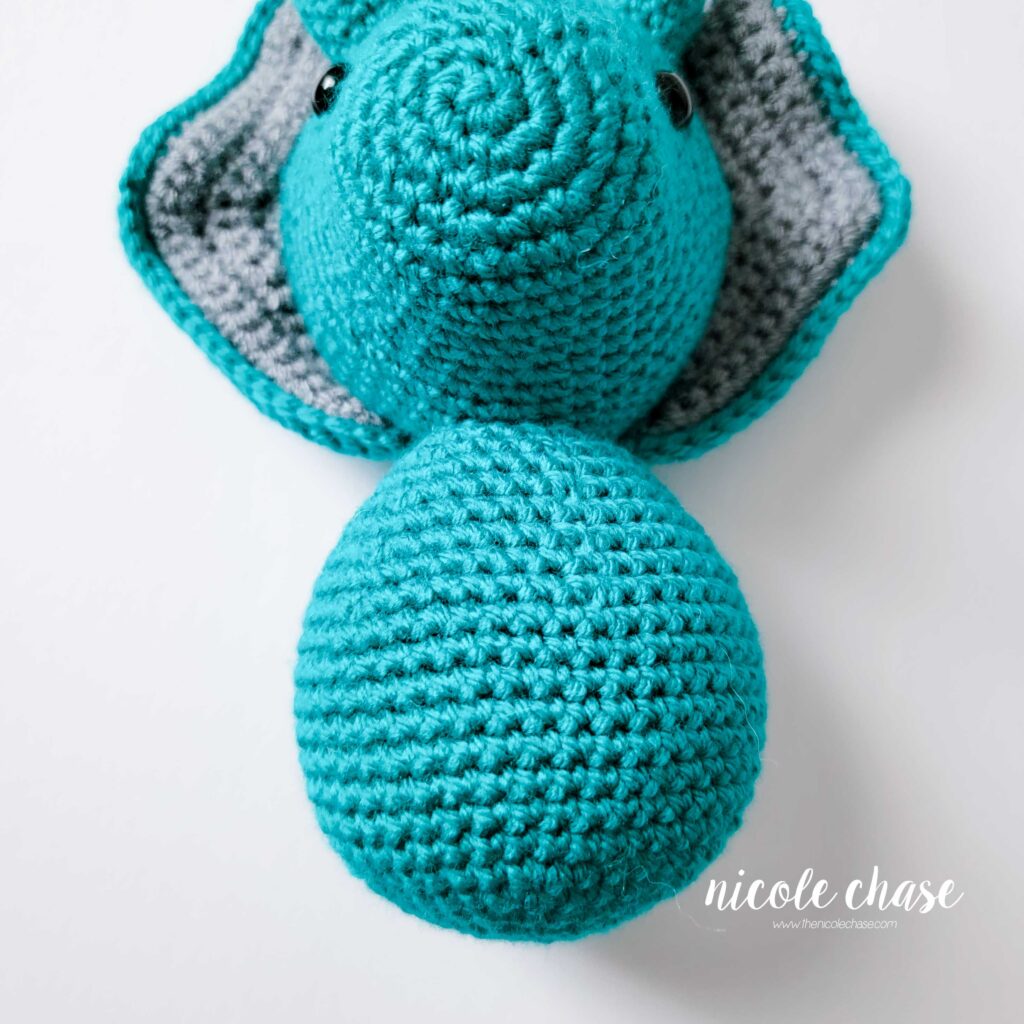
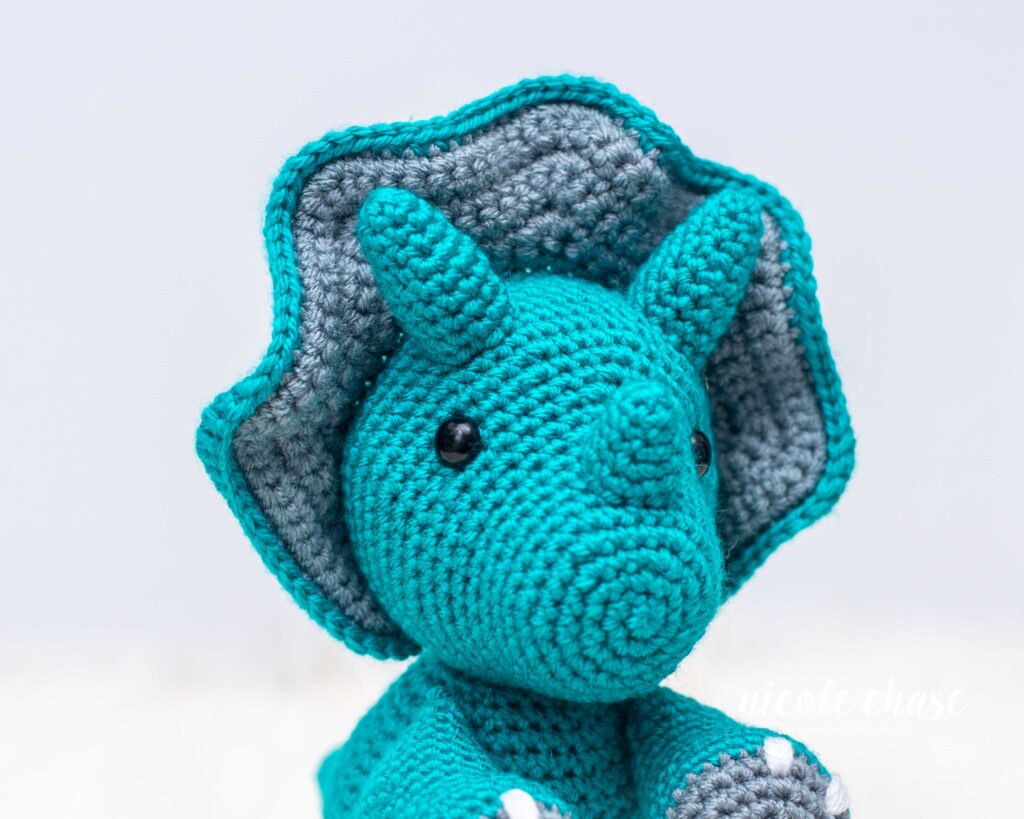
The added st marker, and the st marker at the beginning of this round helps to indicate the front of the face. The 28 sts between the two st markers sit flat and indicate the bottom of the head. If using safety eyes, insert eyes between R14 and R15, with 14 sts between. Embroider around eyes for additional detail, if desired. You can now remove your second st marker. See tutorial photos.
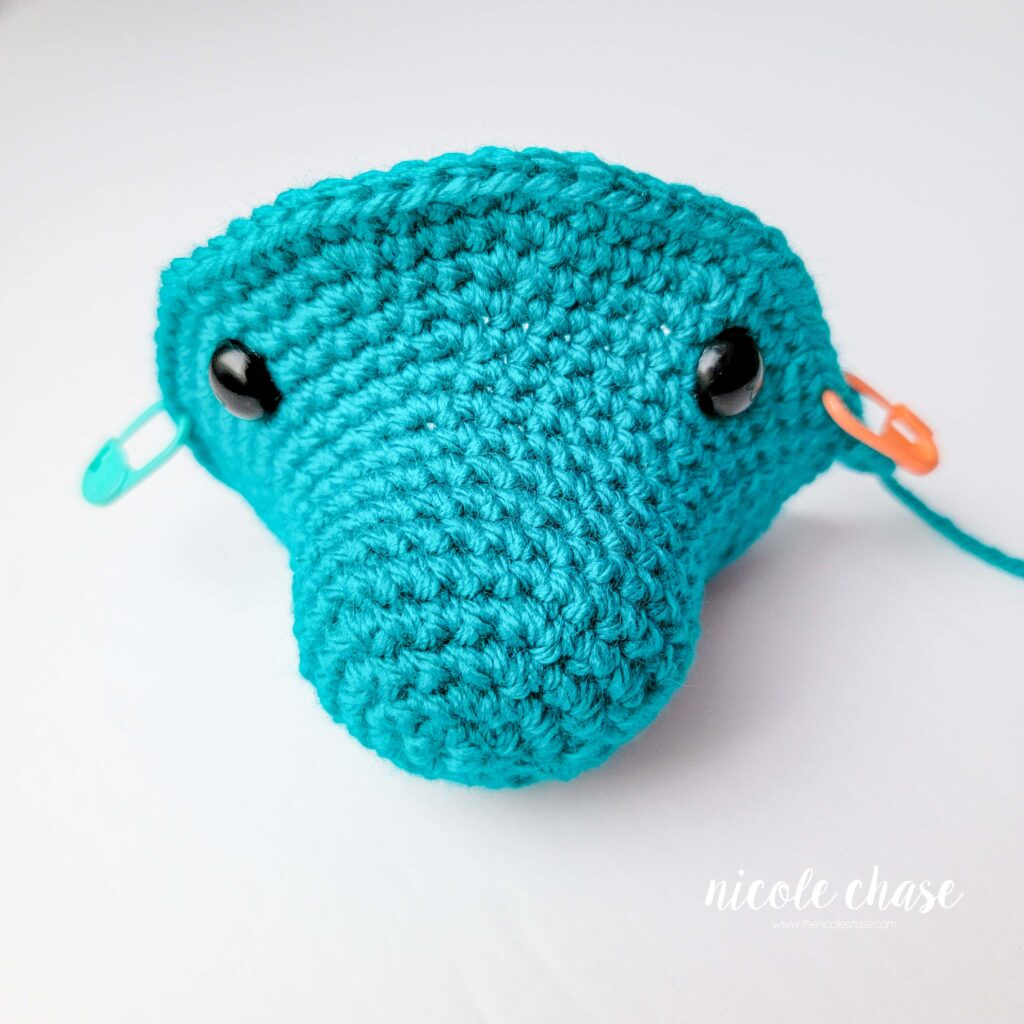
R18-19: 1 SC in each st around. (60 sts)
R20: *SC2tog, 1 SC in each of the next 8 sts. Repeat from * around. (54 sts)
R21: * SC2tog, 1 SC in each of the next 7 sts. Repeat from * around. (48 sts)
R22: 1 SC in each st around. (48 sts)
R23: *SC2tog, 1 SC in each of the next 6 sts. Repeat from * around. (42 sts)
R24: *SC2tog, 1 SC in each of the next 5 sts. Repeat from * around. (36 sts)
R25: 1 SC in each st around. (36 sts)
R26: *SC2tog, 1 SC in each of the next 4 sts. Repeat from * around. (30 sts)
R27: *SC2tog, 1 SC in each of the next 3 sts. Repeat from * around. (24 sts)
R28: *SC2tog, 1 SC in each of the next 2 sts. Repeat from * around. (18 sts)
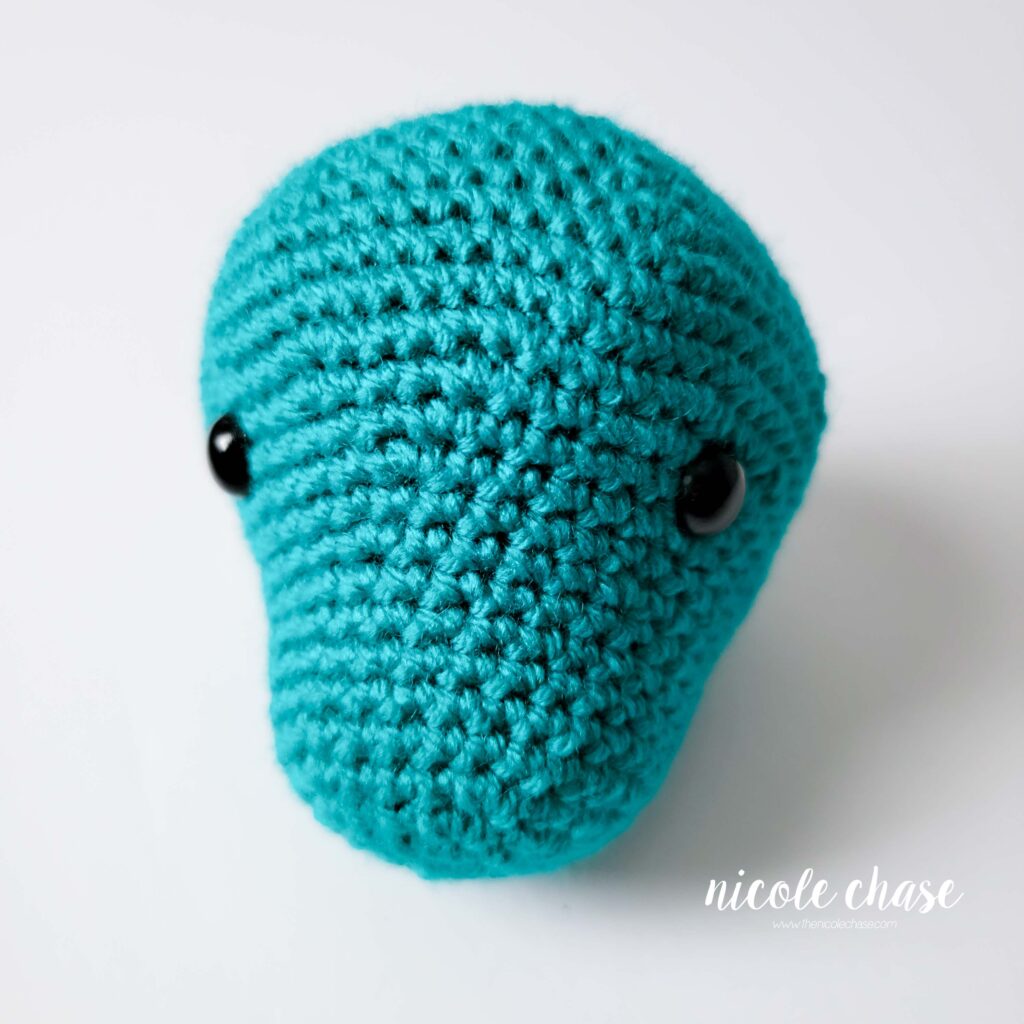
Fill with stuffing.
R29: *SC2tog, 1 SC in the next st. Repeat from * around. (12 sts)
R30: *SC2tog. Repeat from * around. (6 sts)
Cut yarn, weave yarn in and out of remaining sts. Pull tight to close. Tie off and weave in ends.
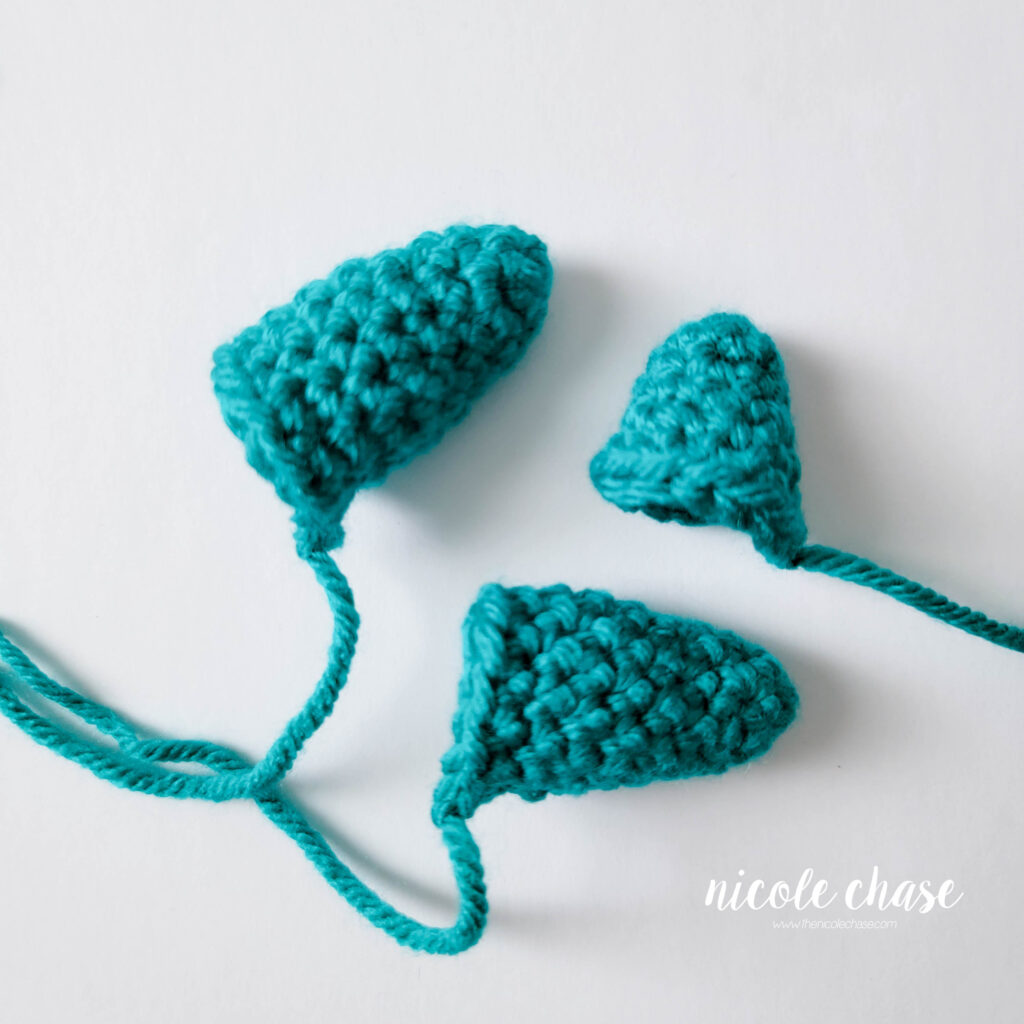
Small Horn
Using color A (shown as teal):
R1: Begin with 6 SC in a magic ring. (6 sts)
R2: 1 SC in each st around. (6 sts)
R3: 2 SC in next st, 1 SC in next st. Repeat around. (9 sts)
R4: 1 SC in each st around. (9 sts)
R5: 2 SC in next st, 1 SC in each of the next 2 sts. Repeat around. (12 sts)
R6: 1 SC in each st around. (12 sts)
Leave long tail for sewing. Fasten off.
Fill with stuffing.
Large Horns (make 2)
Using color A (shown as teal):
R1: Begin with 6 SC in a magic ring. (6 sts)
R2: 1 SC in each st around. (6 sts)
R3: 2 SC in next st, 1 SC in next st. Repeat around. (9 sts)
R4: 1 SC in each st around. (9 sts)
R5: 2 SC in next st, 1 SC in each of the next 2 sts. Repeat around. (12 sts)
R6-9: 1 SC in each st around. (12 sts)
Leave long tail for sewing. Fasten off.
Fill with stuffing.
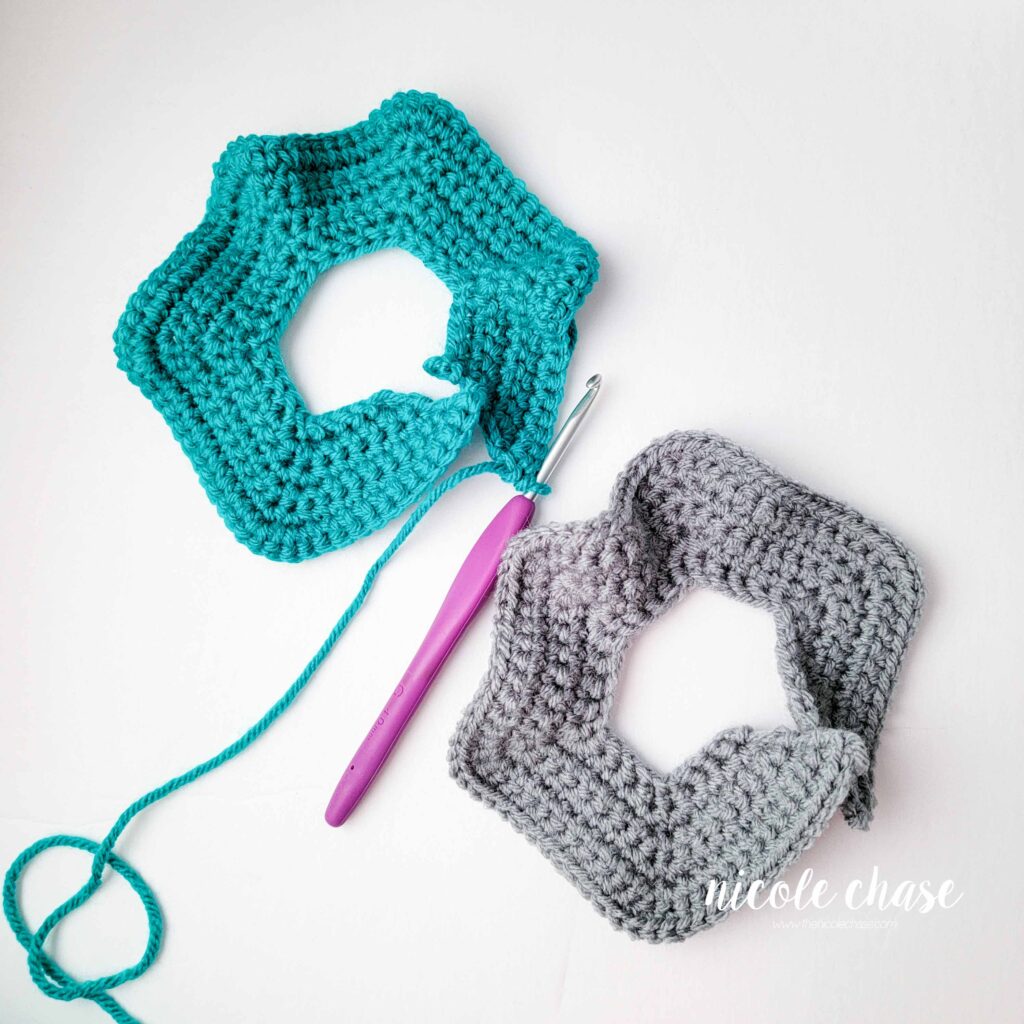
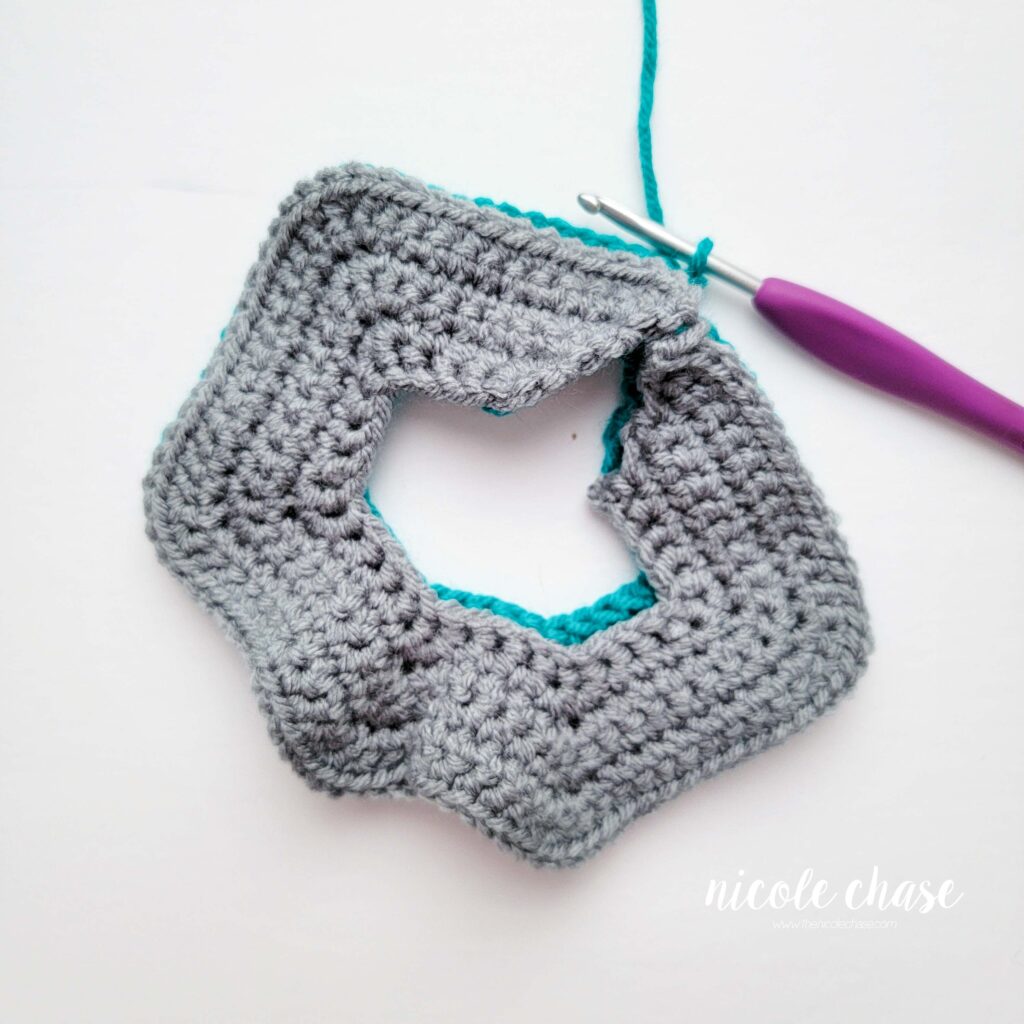
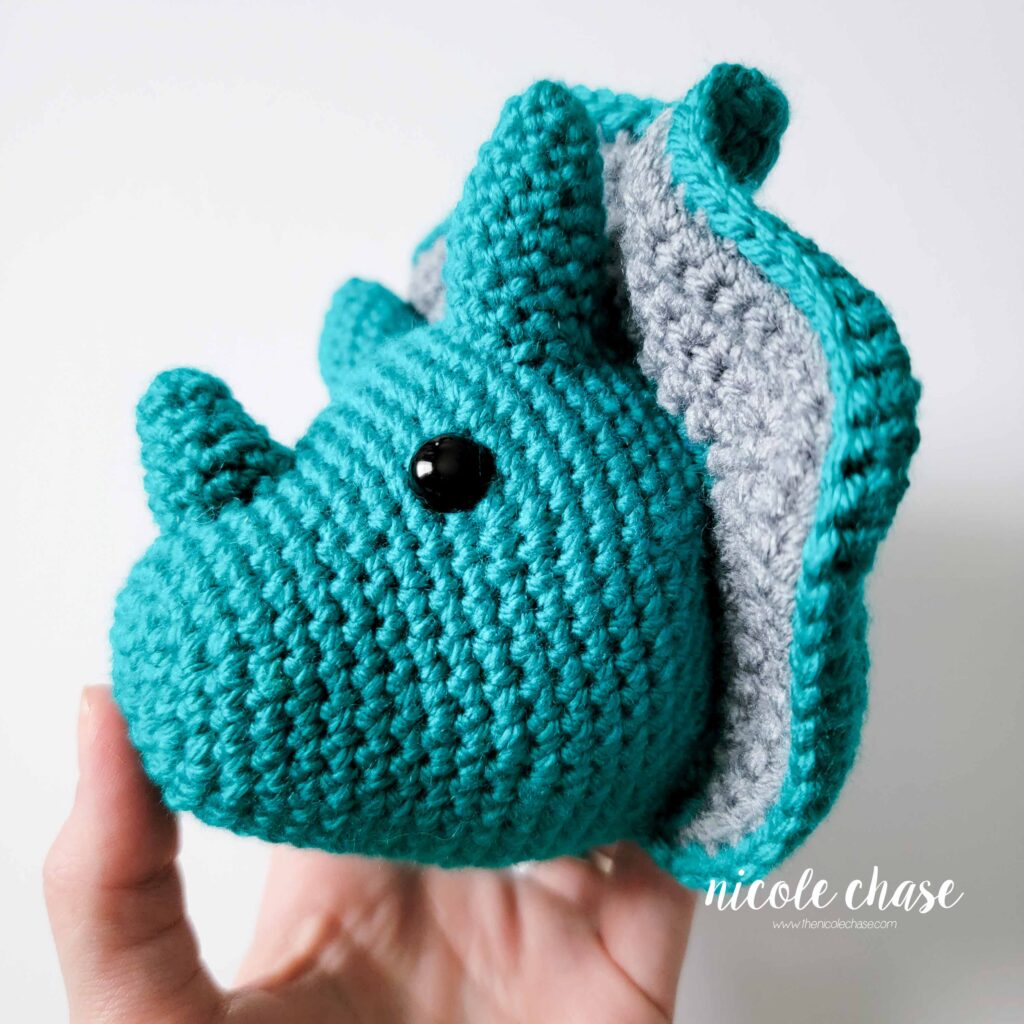
Frill Front
This video is also available on YouTube. Watch this video: Frill for Tanner the Triceratops Crochet Tutorial on YouTube.
NOTE: When working the frill, be sure to complete the entire repeat. The repeat both starts and ends with 2SC. Therefore, when working the full sequence of stitches, followed by the same sequence of stitches, the row will look something like this like this: (2SC, 1SC, 1SC, 1SC, 2SC), (2SC, 1SC, 1SC, 1SC, 2SC), (2SC, 1 SC, 1 SC, 1SC, 2 SC), and so on.
*** NOTE: The foundation single crochet stitch is preferred; however, you could alternatively replace R1 with: Ch 31, SC in second ch from hook and each ch to end. (30 sts), and then proceed as written with R2.
Using color B (shown as gray):
R1: 30 FSC***. (30 sts)
R2: Ch 1, turn. *2 SC in next st, 1 SC in each of the next 3 sts, 2 SC in next st. Repeat from * across. (42 sts)
R3: Ch 1, turn. *2 SC in next st, 1 SC in each of the next 5 sts, 2 SC in next st. Repeat from * across. (54 sts)
R4: Ch 1, turn. *2 SC in next st, 1 SC in each of the next 7 sts, 2 SC in next st. Repeat from * across. (66 sts)
R5: Ch 1, turn. *2 SC in next st, 1 SC in each of the next 9 sts, 2 SC in next st. Repeat from * across. (78 sts)
R6: Ch 1, turn. *2 SC in next st, 1 SC in each of the next 11 sts, 2 SC in next st. Repeat from * across. (90 sts)
Fasten off.
Frill Back
Using color A (shown as teal):
R1: 30 FSC. (30 sts)
R2: Ch 1, turn. *2 SC in next st, 1 SC in each of the next 3 sts, 2 SC in next st. Repeat from * across. (42 sts)
R3: Ch 1, turn. *2 SC in next st, 1 SC in each of the next 5 sts, 2 SC in next st. Repeat from * across. (54 sts)
R4: Ch 1, turn. *2 SC in next st, 1 SC in each of the next 7 sts, 2 SC in next st. Repeat from * across. (66 sts)
R5: Ch 1, turn. *2 SC in next st, 1 SC in each of the next 9 sts, 2 SC in next st. Repeat from * across. (78 sts)
R6: Ch 1, turn. *2 SC in next st, 1 SC in each of the next 11 sts, 2 SC in next st. Repeat from * across. (90 sts)
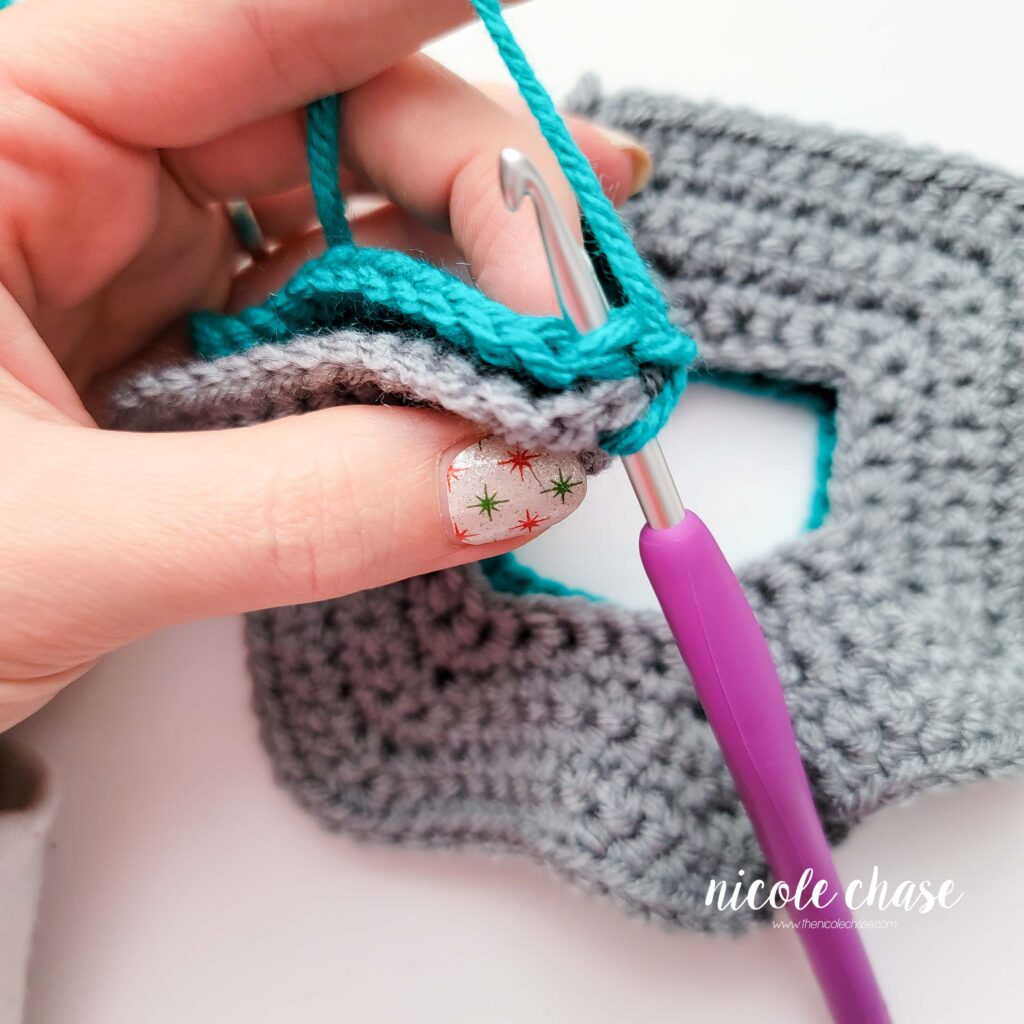
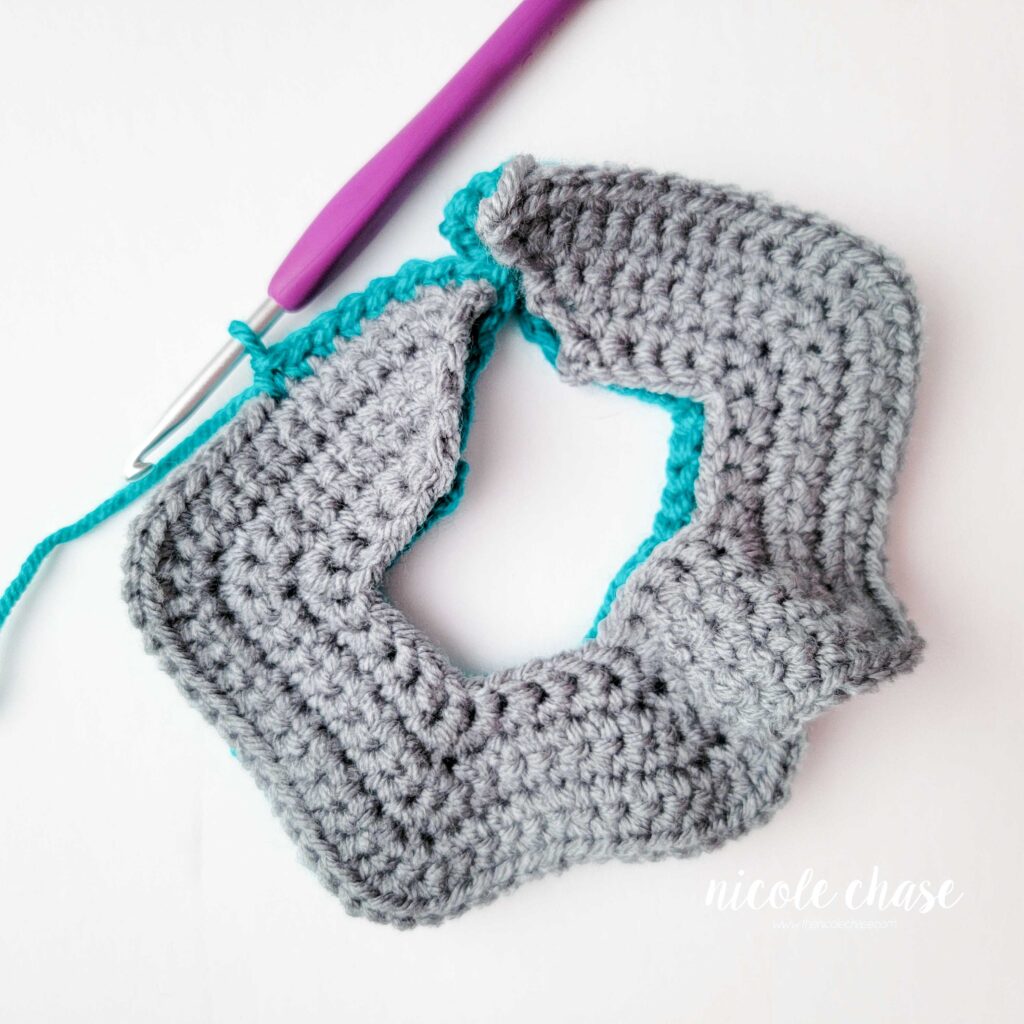
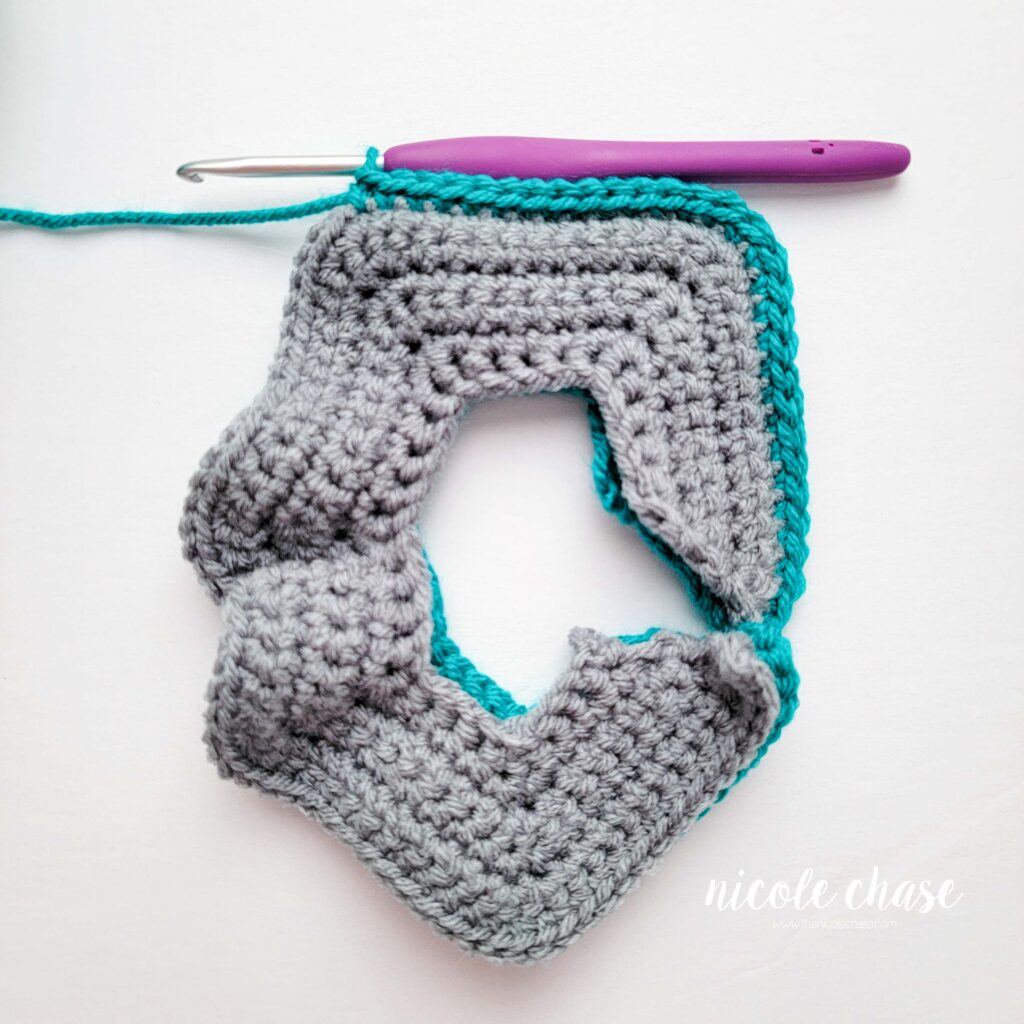
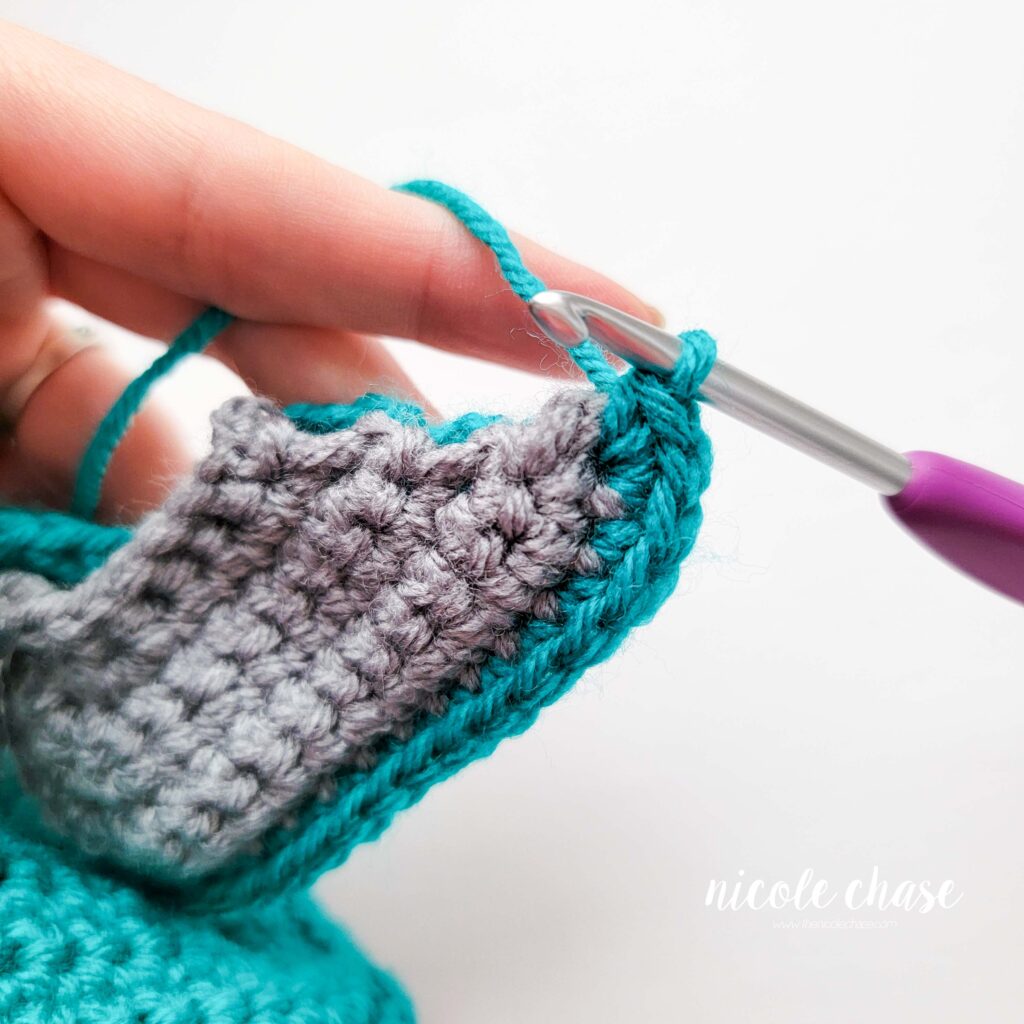
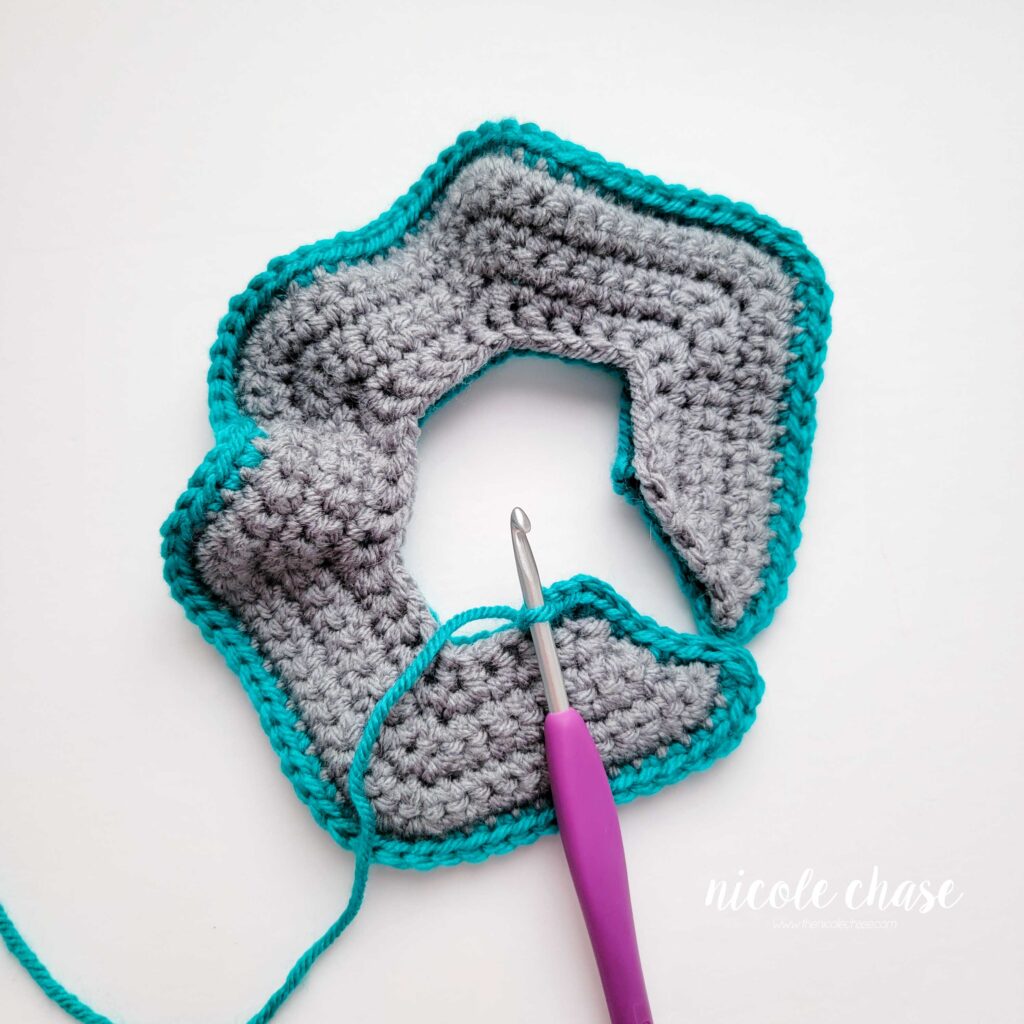
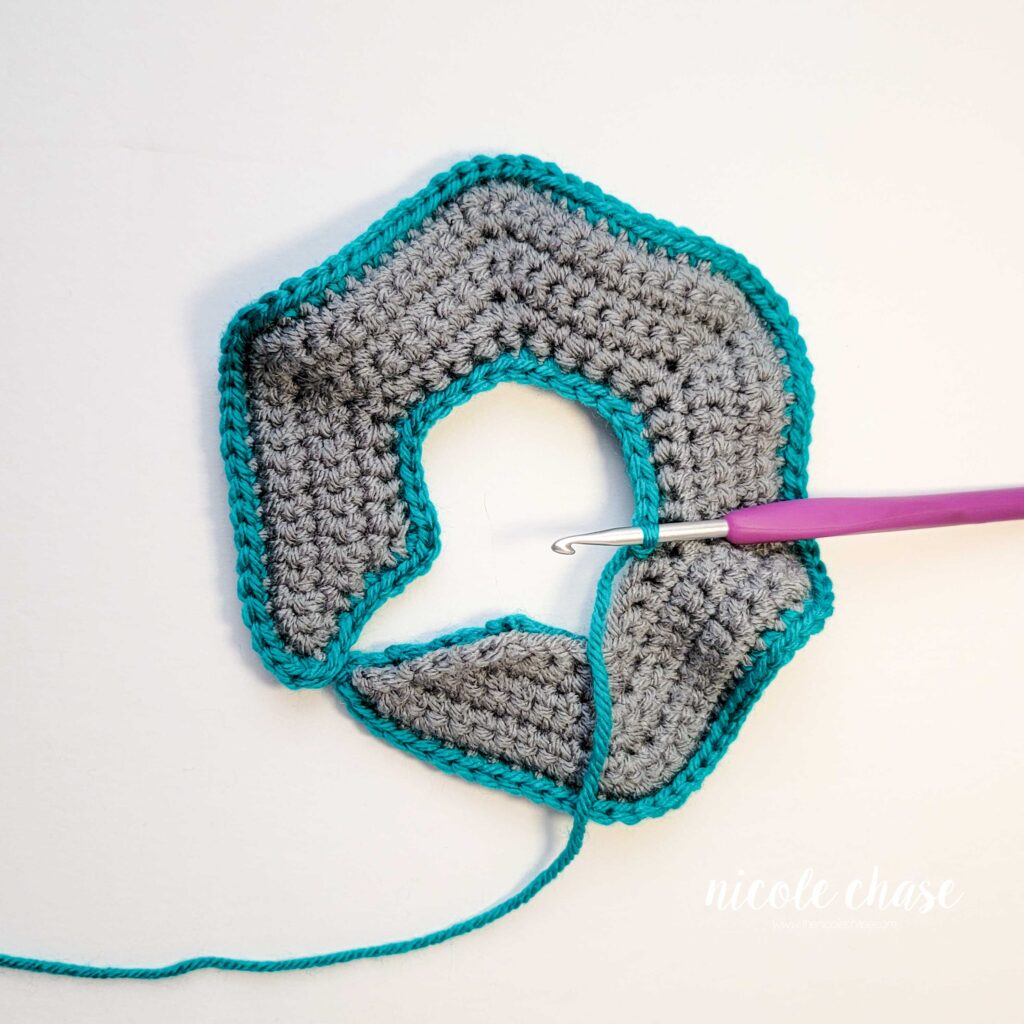
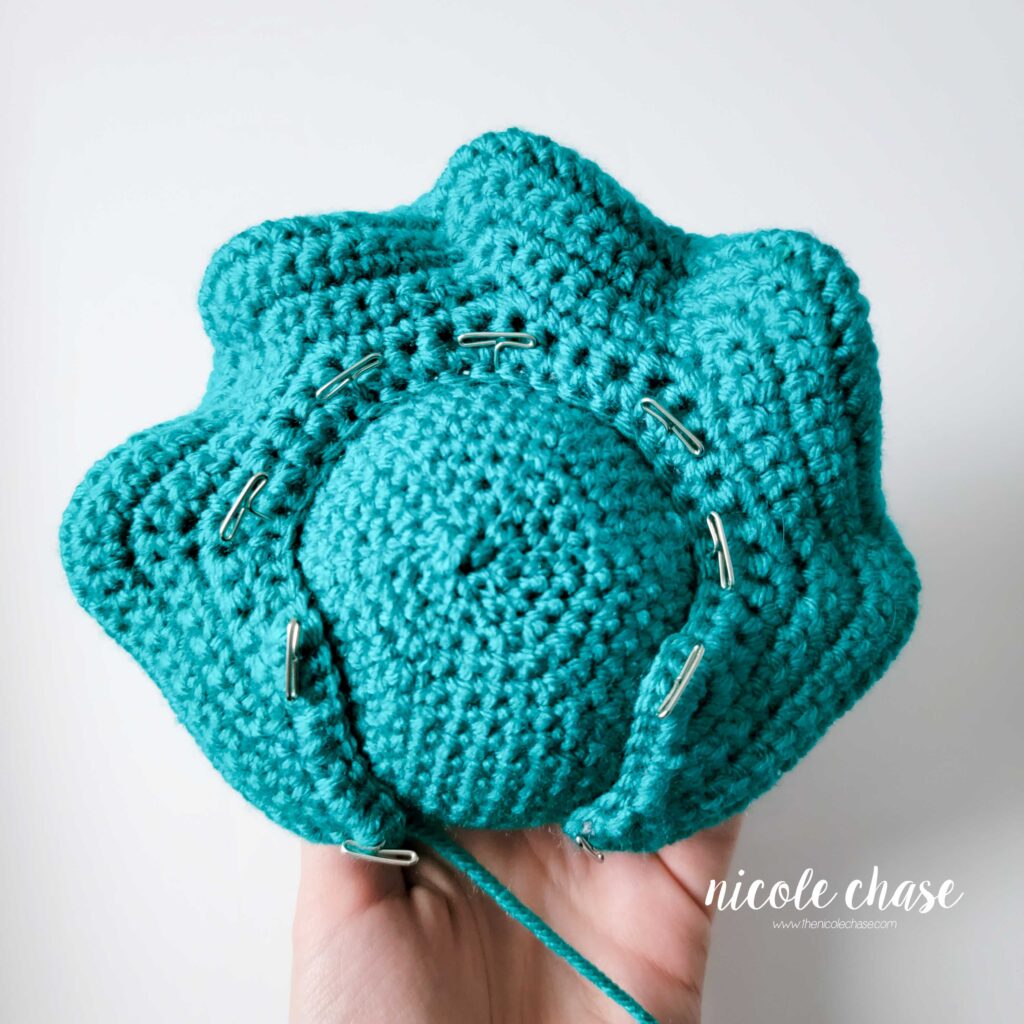
R7: Ch 1, turn. Hold the Frill Front against the Frill Back. Working through each layer, SC around the entire Frill to beginning, working 1 SC in each st, and 3 SC when rounding each of the four corners. See tutorial photos.
Cut yarn, leaving long strand for sewing. Fasten off.

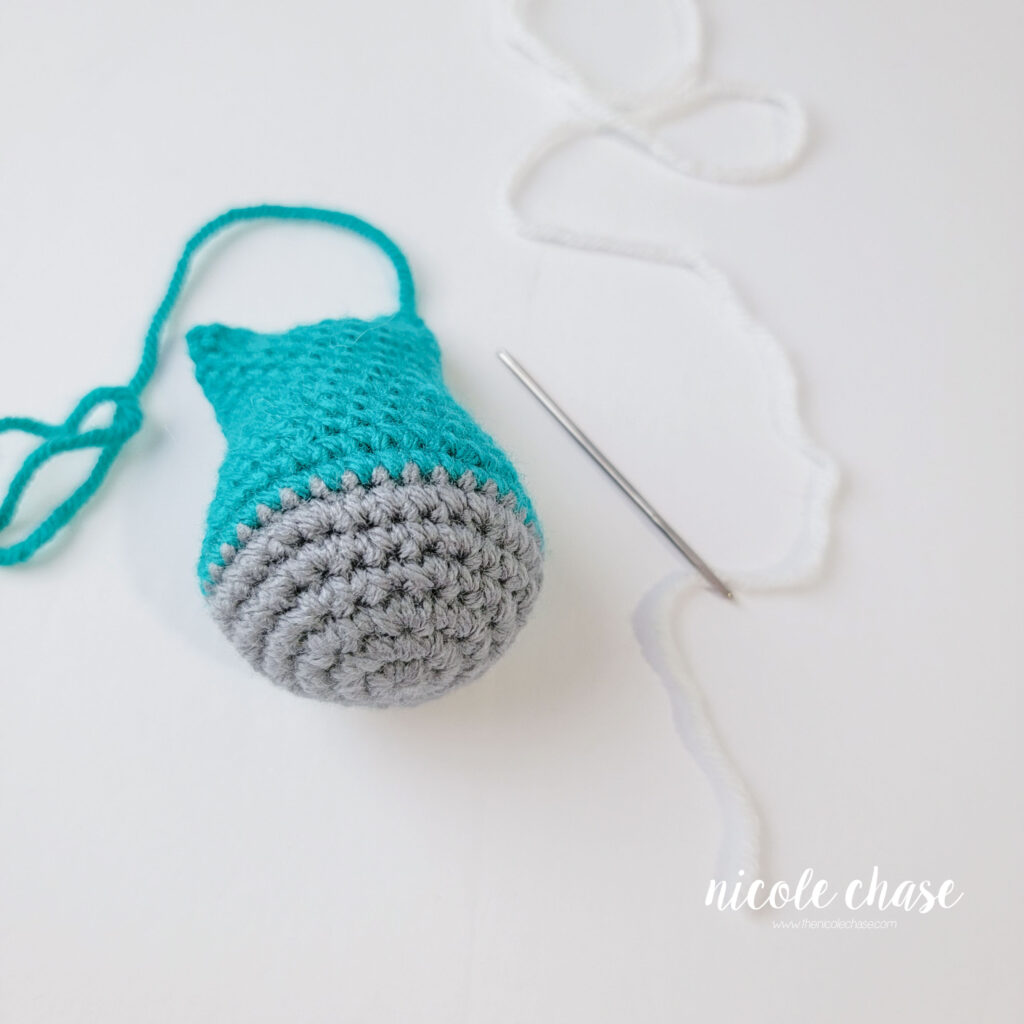
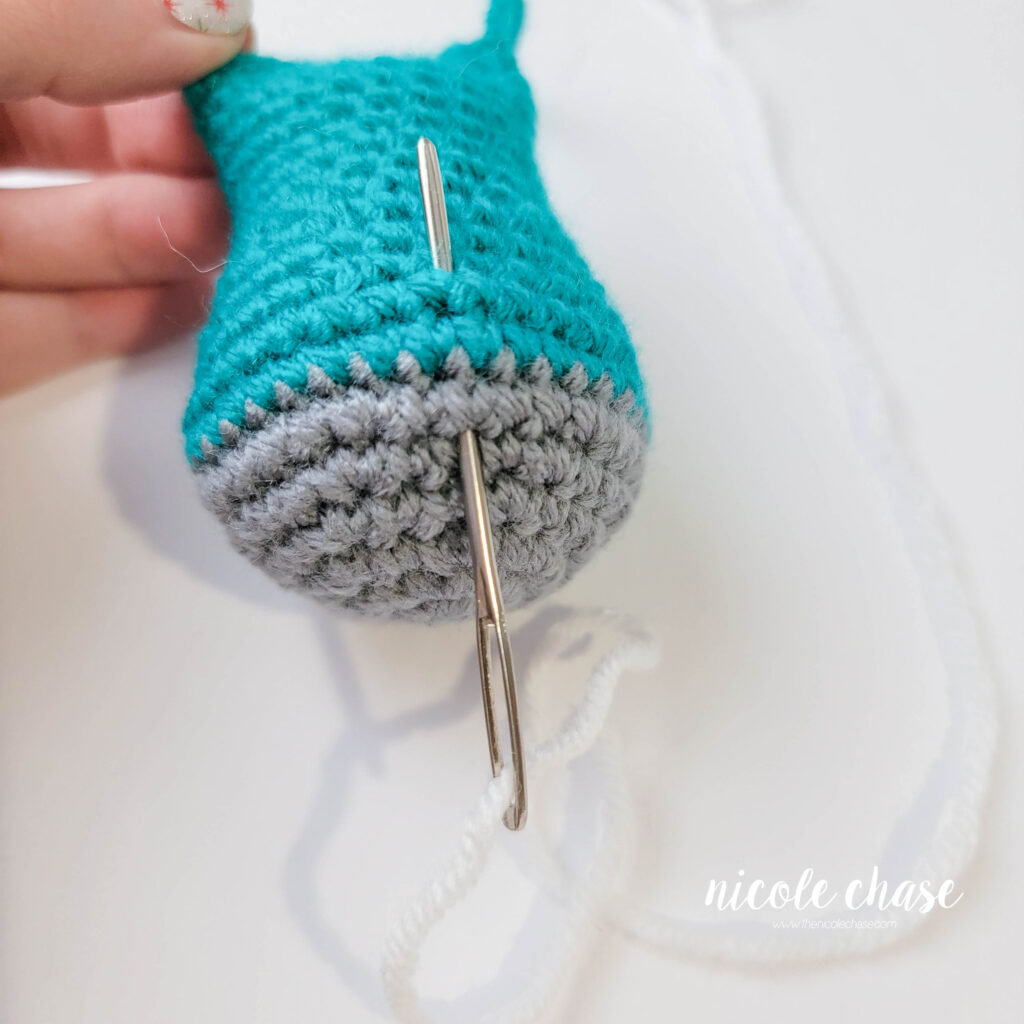
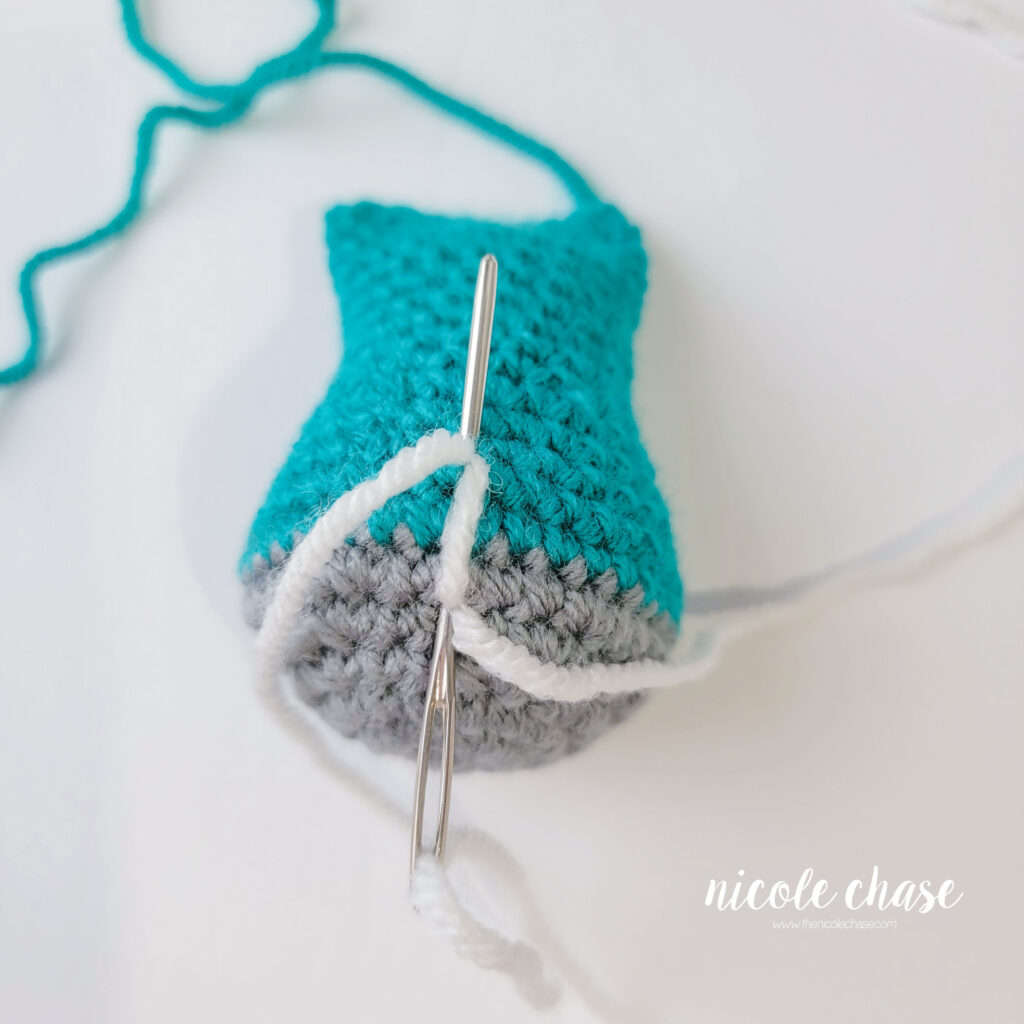
Legs (make 2)
Using color B (shown as gray):
R1: Begin with 6 SC in a magic ring. (6 sts)
R2: 2 SC in each st around. (12 sts)
R3: *2 SC in next st, 1 SC in next st. Repeat from * around. (18 sts)
R4: *2 SC in next st, 1 SC in each of the next 2 sts. Repeat from * around. (24 sts)
R5: *2 SC in next st, 1 SC in each of the next 3 sts. Repeat from * around. (30 sts)
R6: *2 SC in next st, 1 SC in each of the next 4 sts. Repeat from * around. (36 sts)
Using color A (shown as teal):
R7-8: 1 SC in each st around. (36 sts)
R9: *SC2tog, 1 SC in each of the next 4 sts. Repeat from * around. (30 sts)
R10: 1 SC in each st around. (30 sts)
R11: *SC2tog, 1 SC in each of the next 3 sts. Repeat from * around. (24 sts)
R12: *SC2tog, 1 SC in each of the next 4 sts. Repeat from * around. (20 sts)
R13-20: 1 SC in each st around. (20 sts)
Fill with stuffing.
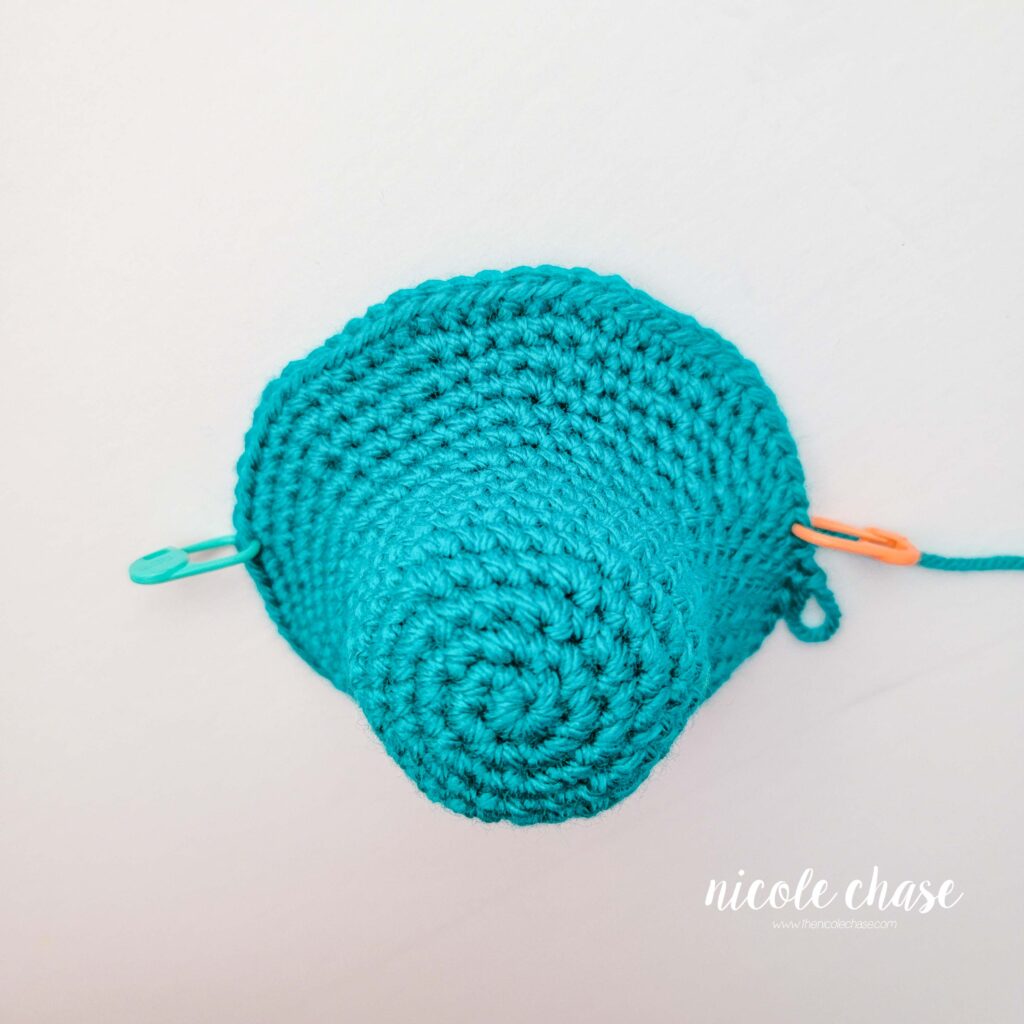
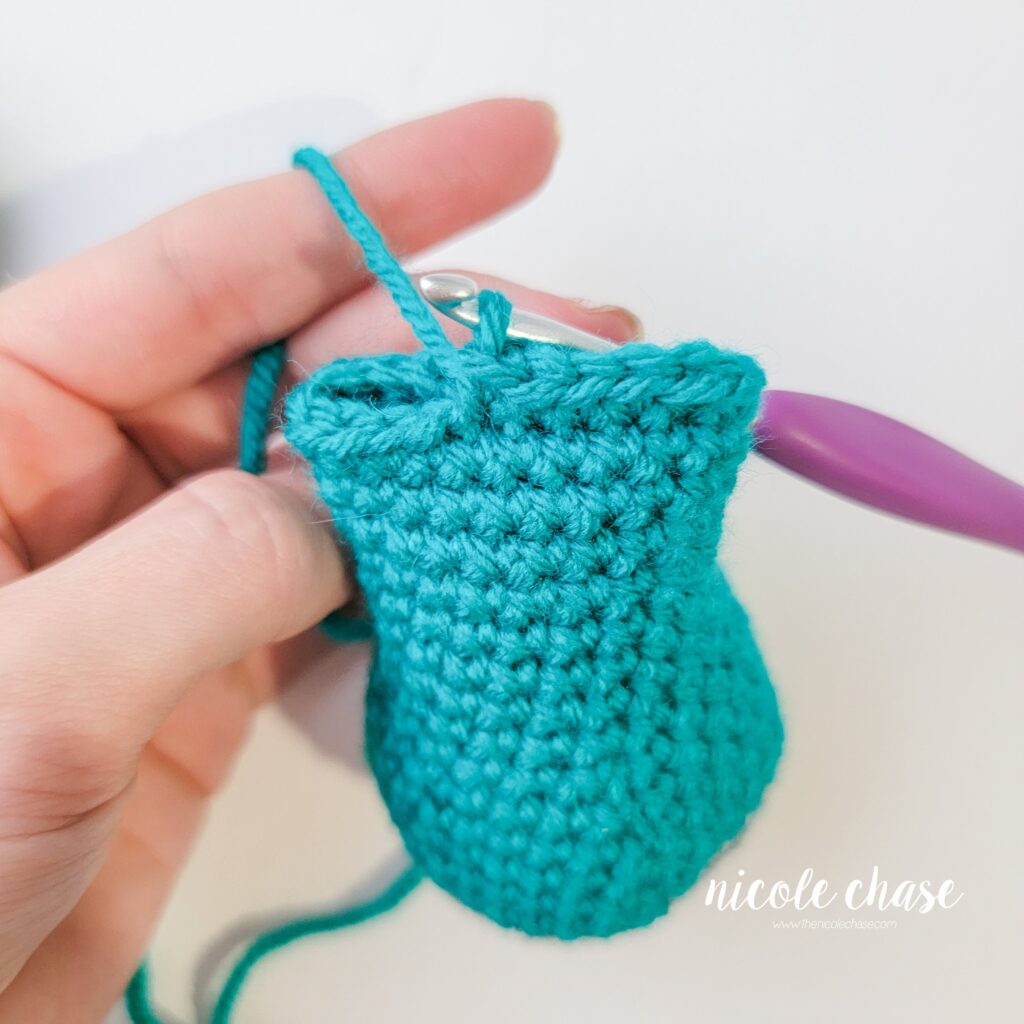
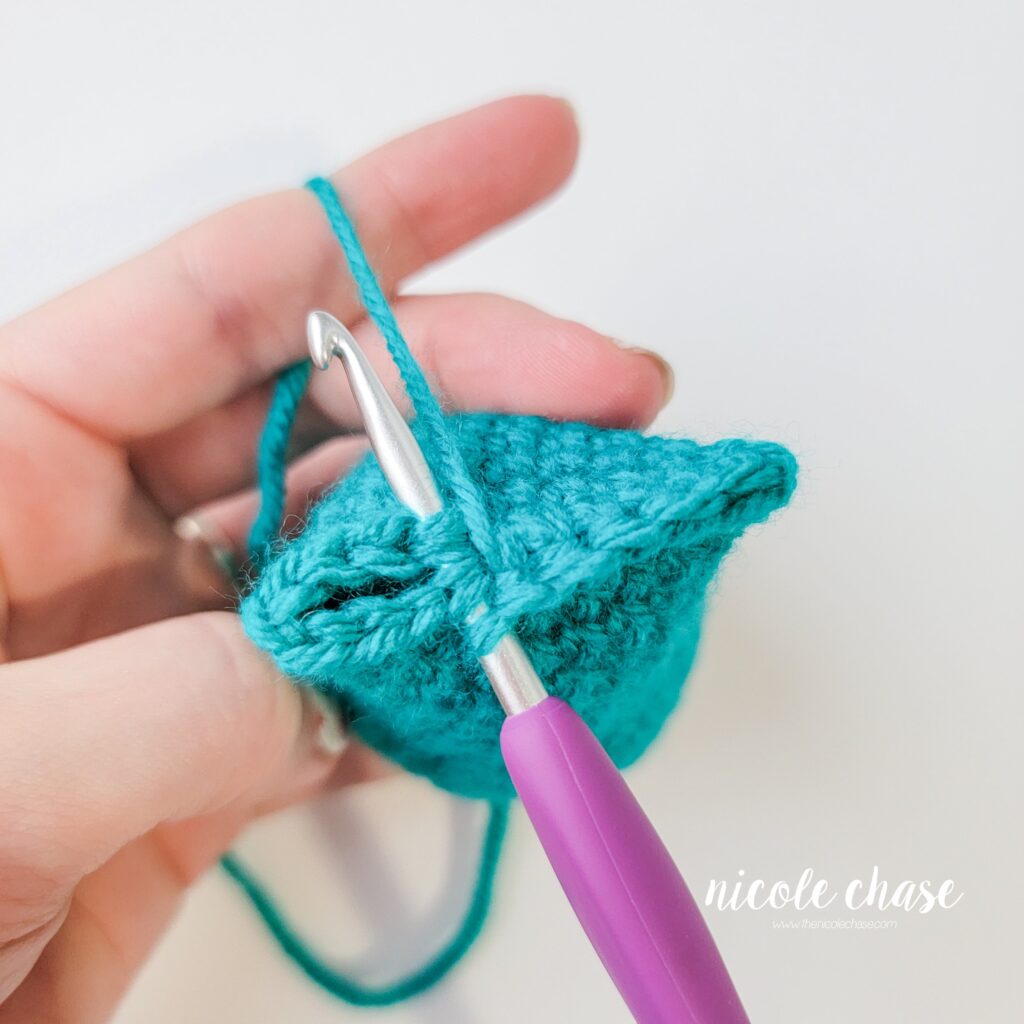
R21: Fold the leg closed. Working through both sides, 1 SC in each st across, leaving 1 unworked st on each side. See tutorial photos. (9 sts)
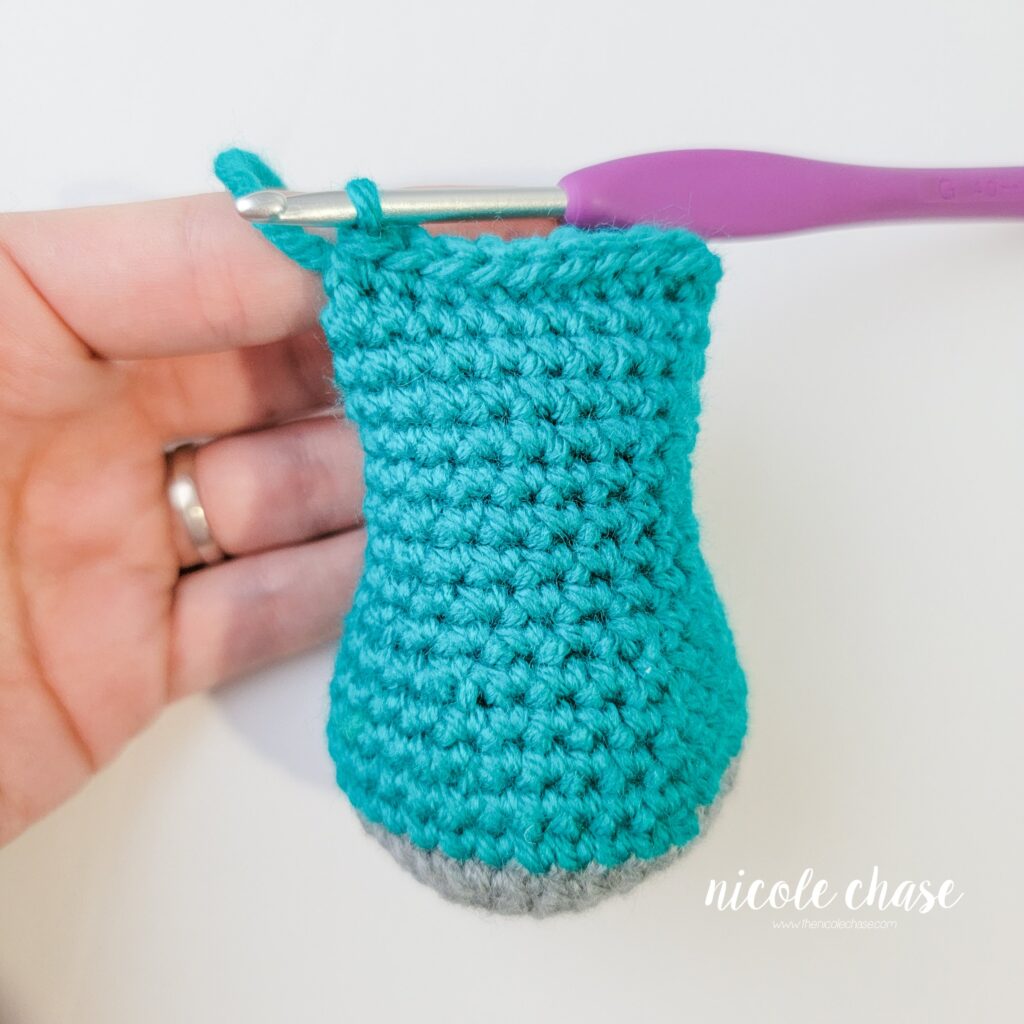
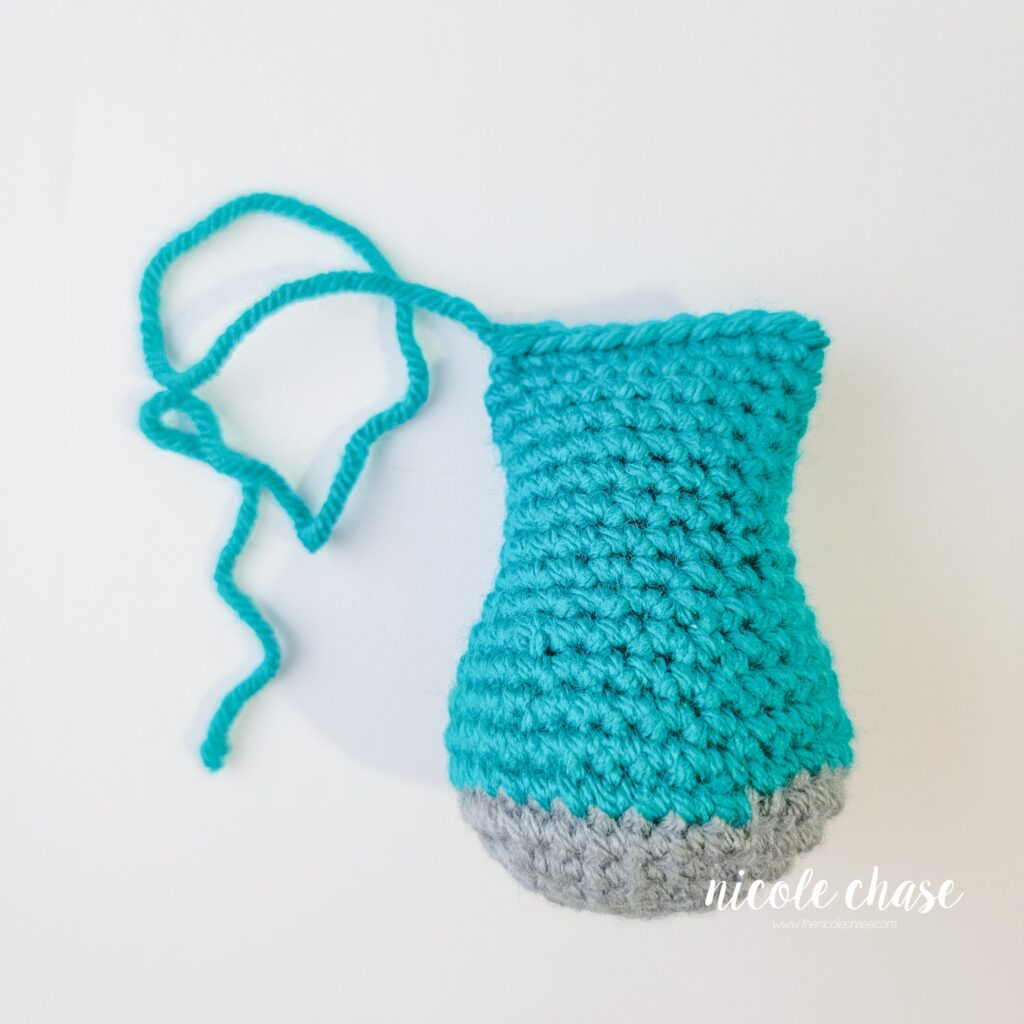
Cut yarn, leaving long strand for sewing.
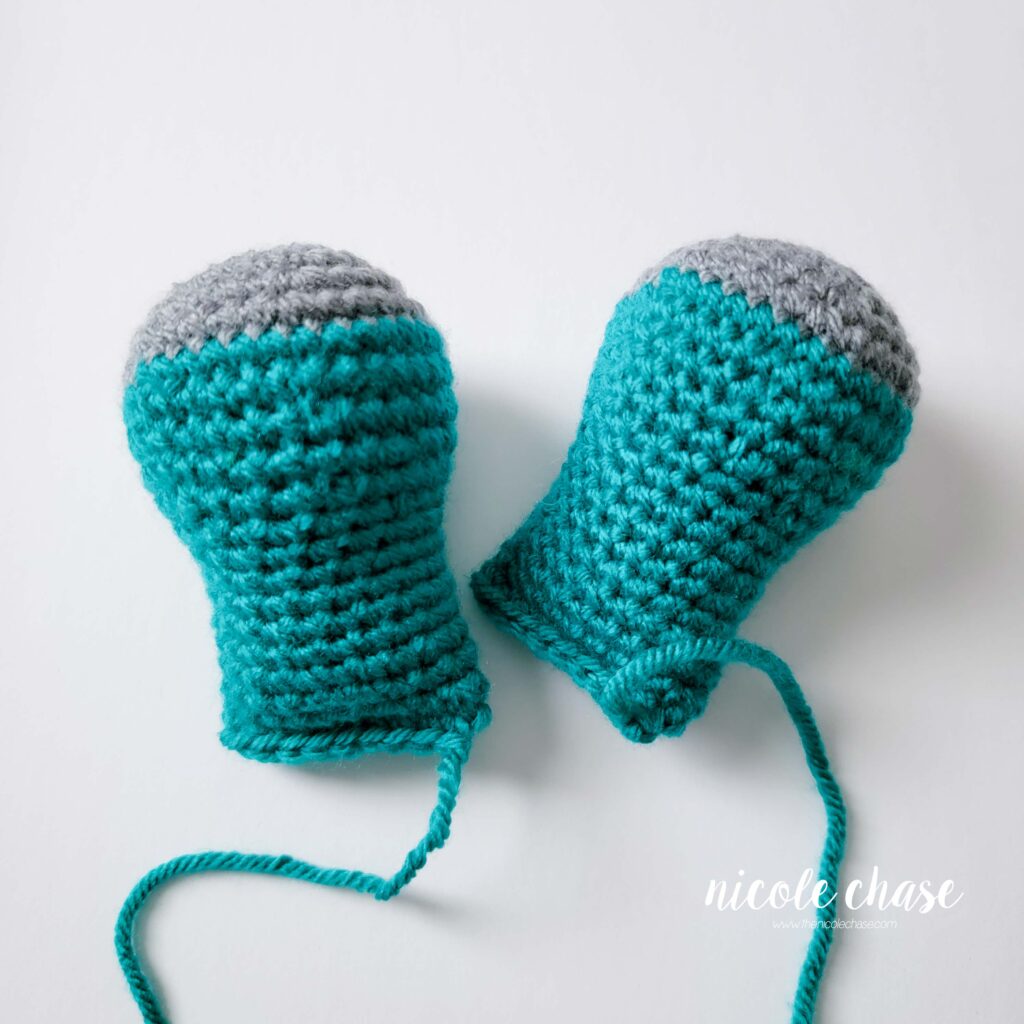
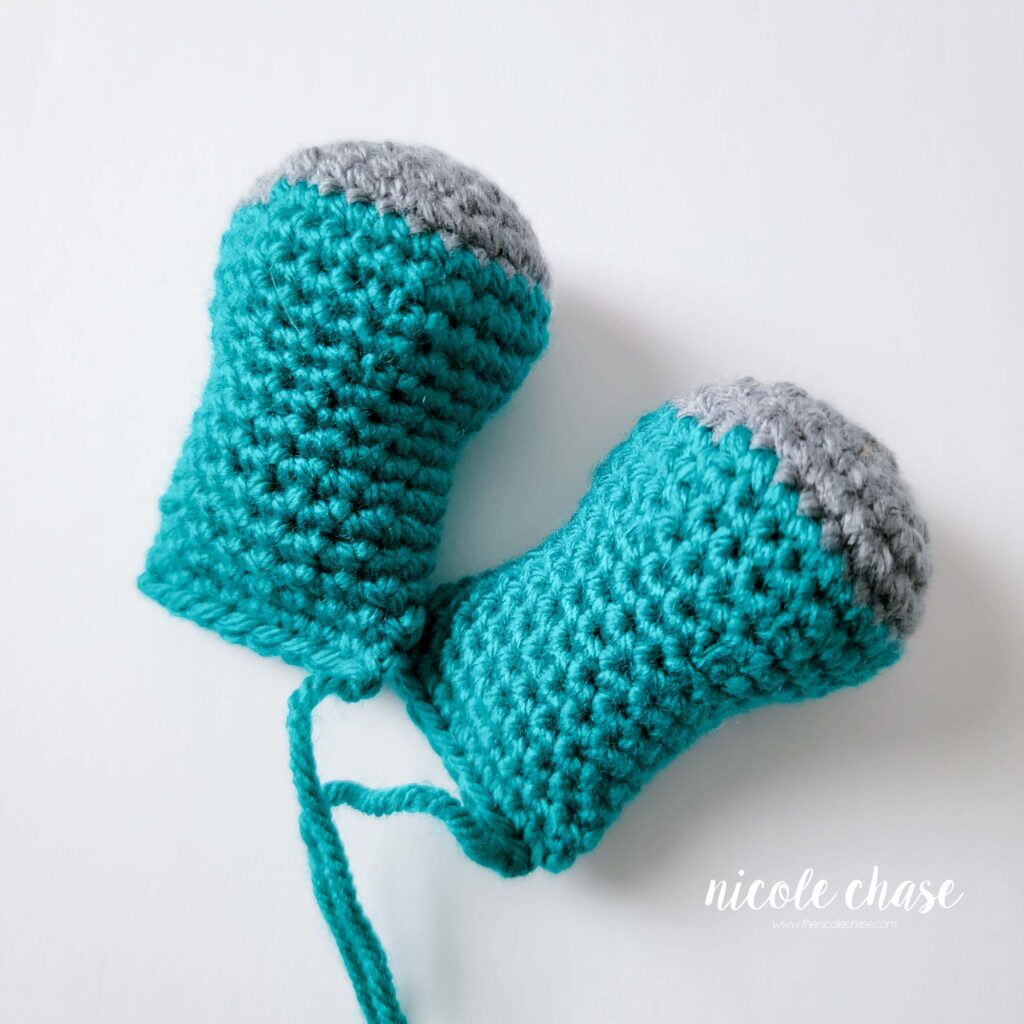
Arms (make 2)
Using color B (shown as gray):
R1: Begin with 6 SC in a magic ring. (6 sts)
R2: 2 SC in each st around. (12 sts)
R3: *2 SC in next st, 1 SC in next st. Repeat from * around. (18 sts)
R4: *2 SC in next st, 1 SC in each of the next 2 sts. Repeat from * around. (24 sts)
R5: *2 SC in next st, 1 SC in each of the next 3 sts. Repeat from * around. (30 sts)
Using color A (shown as teal):
R6-7: 1 SC in each st around. (30 sts)
R8: *SC2tog, 1 SC in each of the next 3 sts. Repeat from * around. (24 sts)
R9: 1 SC in each st around. (24 sts)
R10: *SC2tog, 1 SC in each of the next 2 sts. Repeat from * around. (18 sts)
R11-18: 1 SC in each st around. (18 sts)
Fill with stuffing.
R19: Fold the arm closed. Working through both sides, 1 SC in each st across, leaving 1 unworked st on each side. See tutorial photos. (8 sts)
Cut yarn, leaving long strand for sewing.
Tail
Using color A (shown as teal):
R1: Begin with 6 SC in a magic ring. (6 sts)
R2: 1 SC in each st around. (6 sts)
R3: *2 SC in next st, 1 SC in next st. Repeat from * around. (9 sts)
R4: 1 SC in each st around. (9 sts)
R5: *2 SC in next st, 1 SC in each of the next 2 sts. Repeat from * around. (12 sts)
R6-7: 1 SC in each st around. (12 sts)
R8: *2 SC in next st, 1 SC in each of the next 3 sts. Repeat from * around. (15 sts)
R9: 1 SC in each st around. (15 sts)
R10: *2 SC in next st, 1 SC in each of the next 4 sts. Repeat from * around. (18 sts)
R11-12: 1 SC in each st around. (18 sts)
R13: *2 SC in next st, 1 SC in each of the next 2 sts. Repeat from * around. (24 sts)
R14-15: 1 SC in each st around. (24 sts)
Cut yarn, leaving long strand for sewing. Fasten off.
Fill with stuffing.
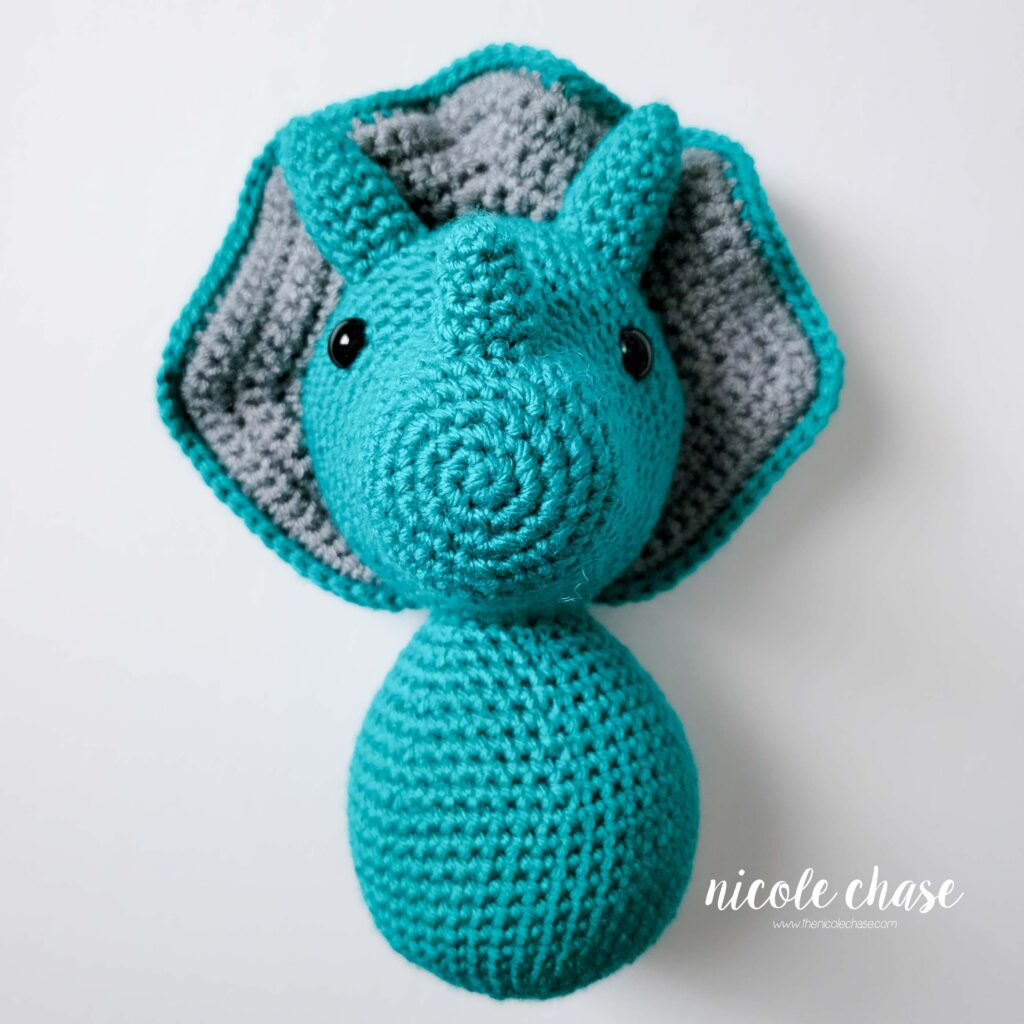
Assembly & Finishing
See tutorial photos.
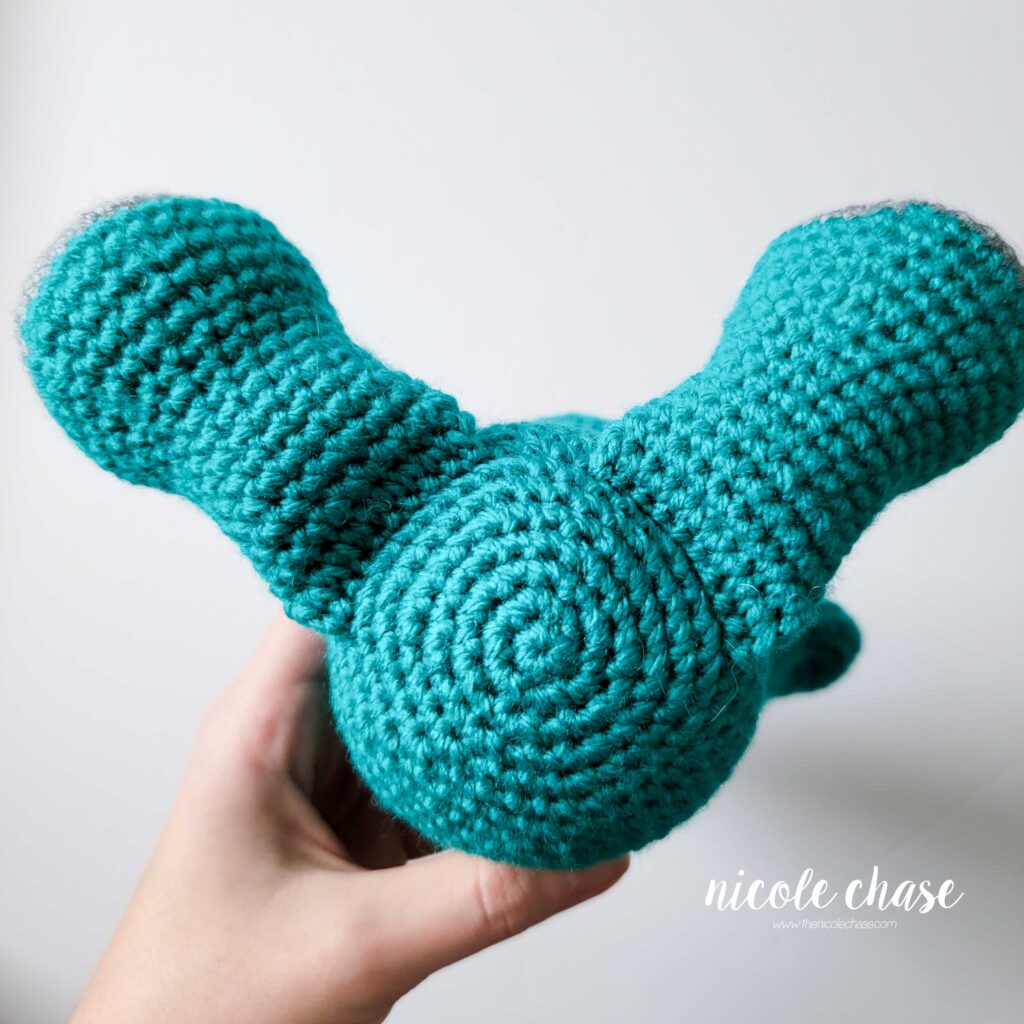
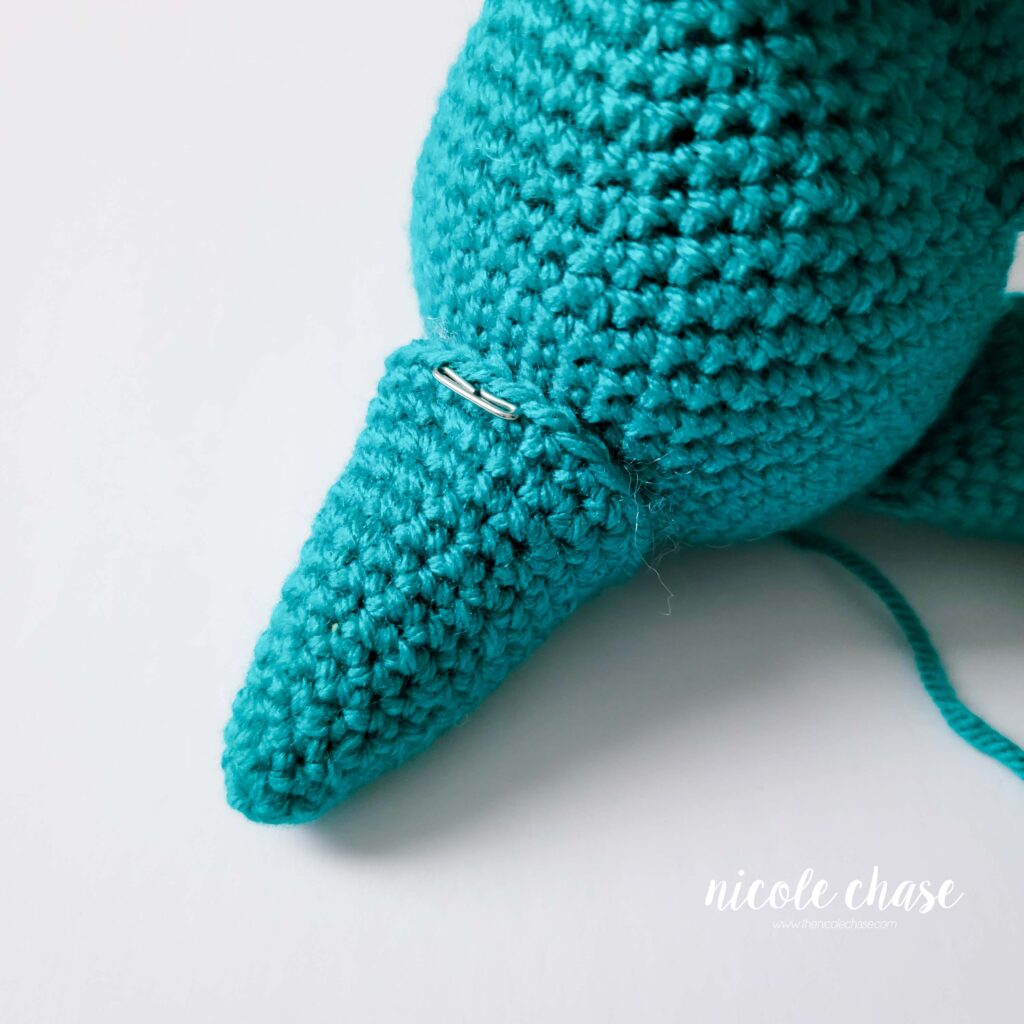
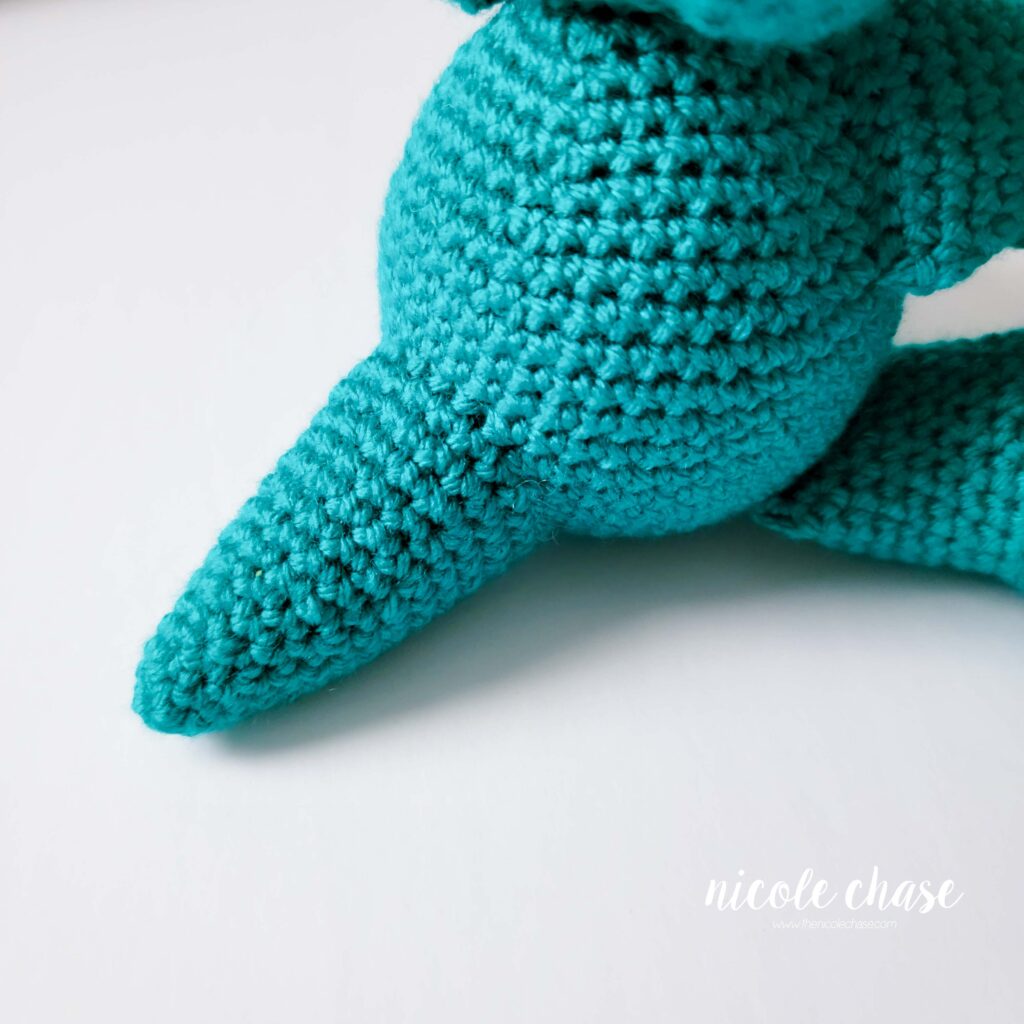
Attach small horn over R6-9, on the top middle of snout. Attach large horns between R17-21 on the top of the head.
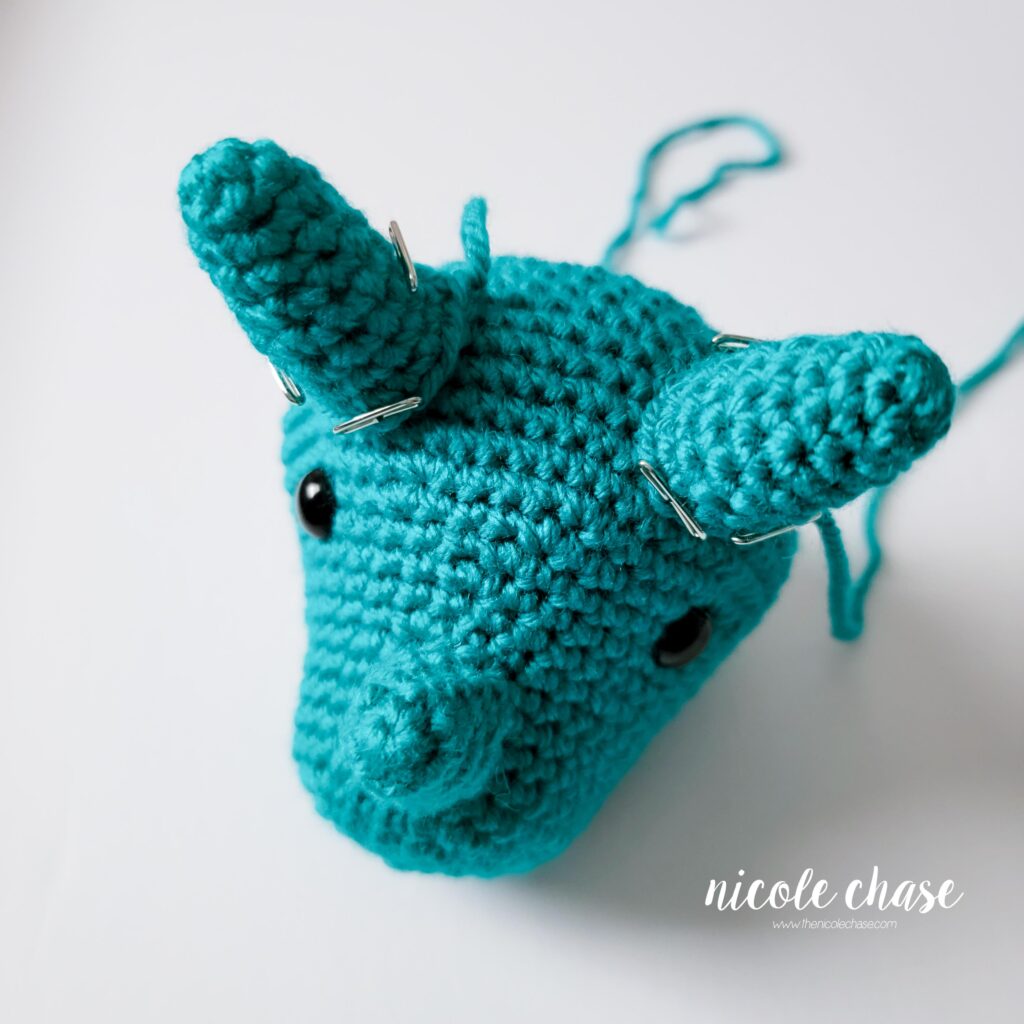
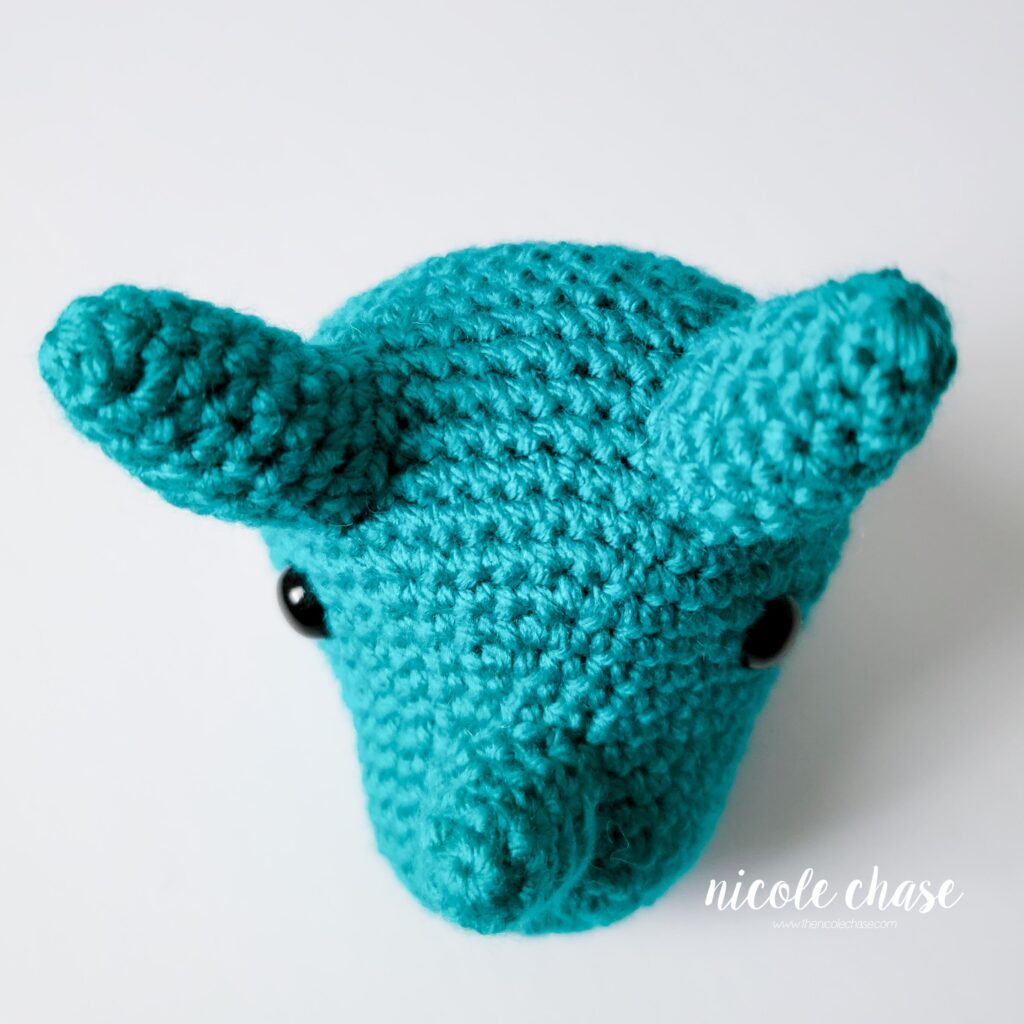
Attach frill around the head, directly behind the large horns, at approximately R22.


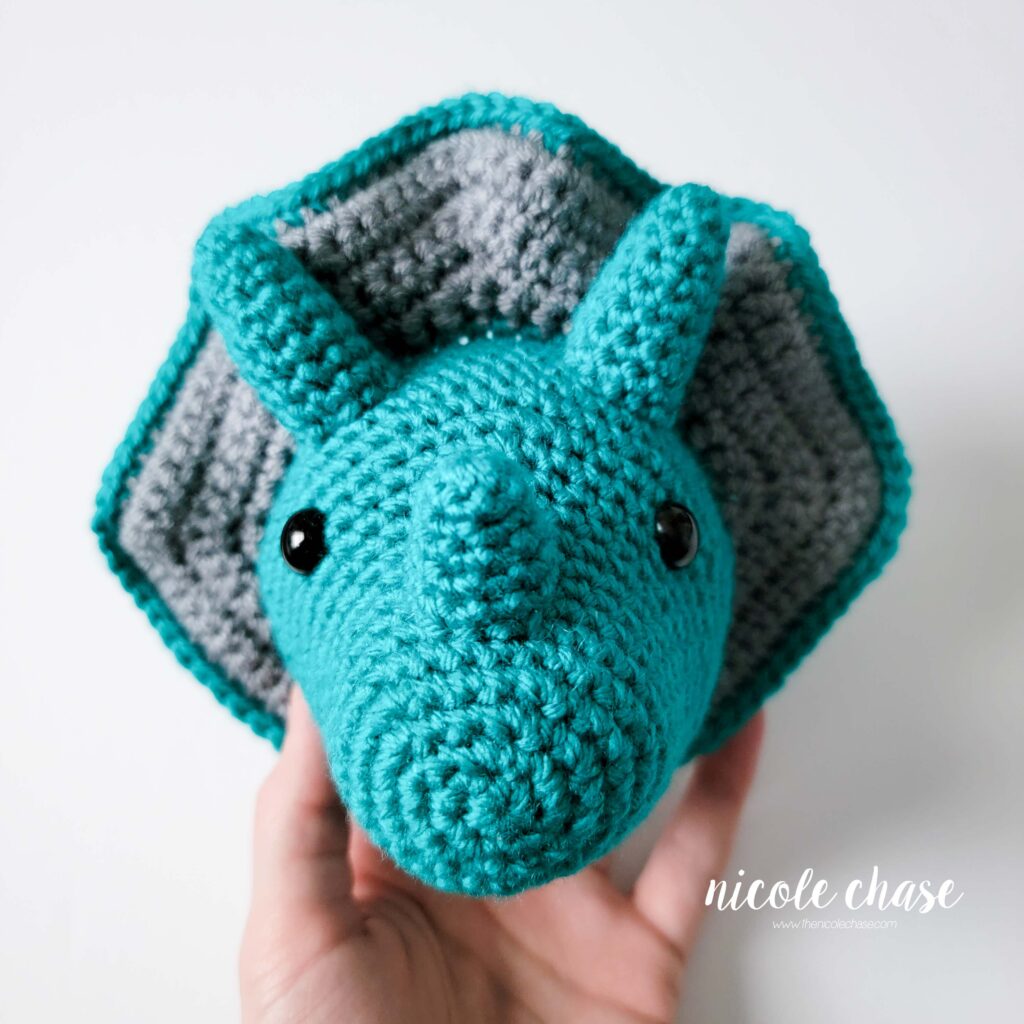
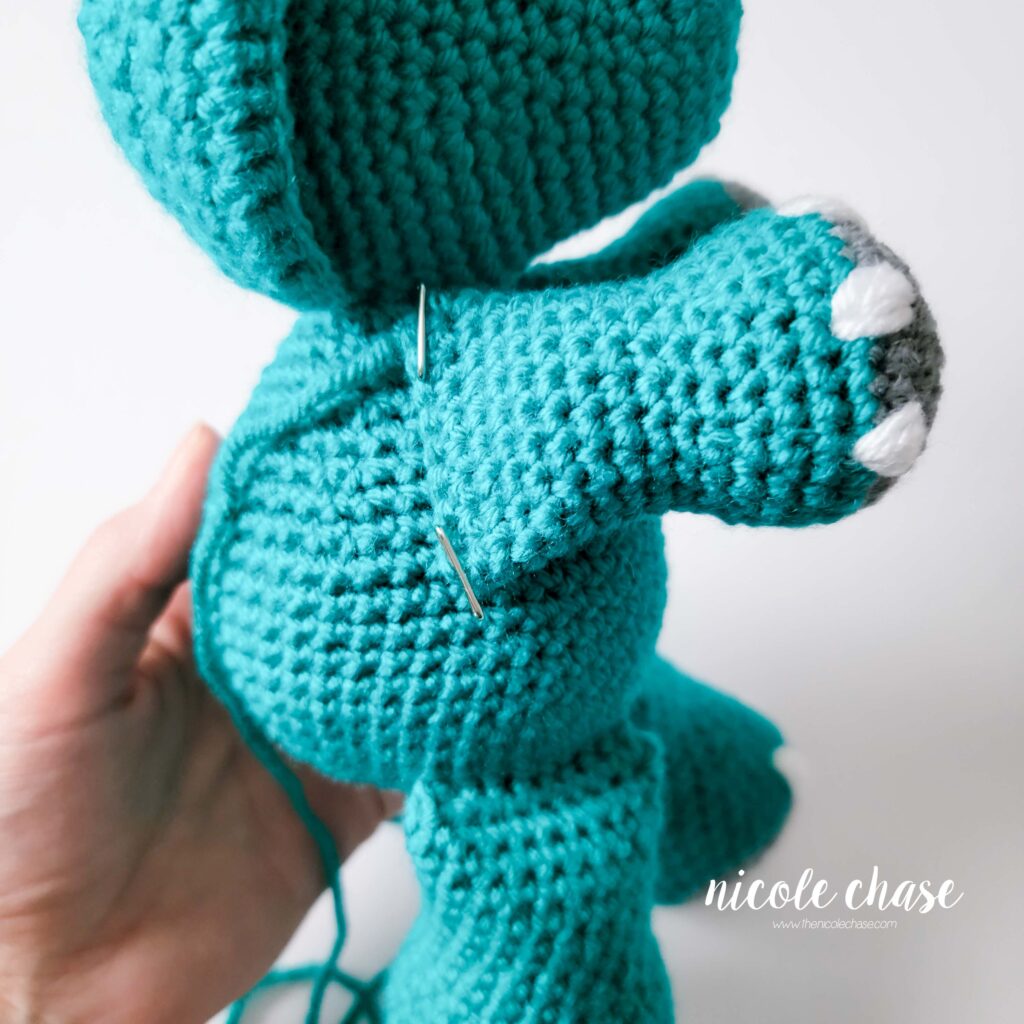
Attach head to body so that the frill is upright, in line with the body, and the nose is facing straight out; attaching body to approximately R14-19 of the bottom of the head.

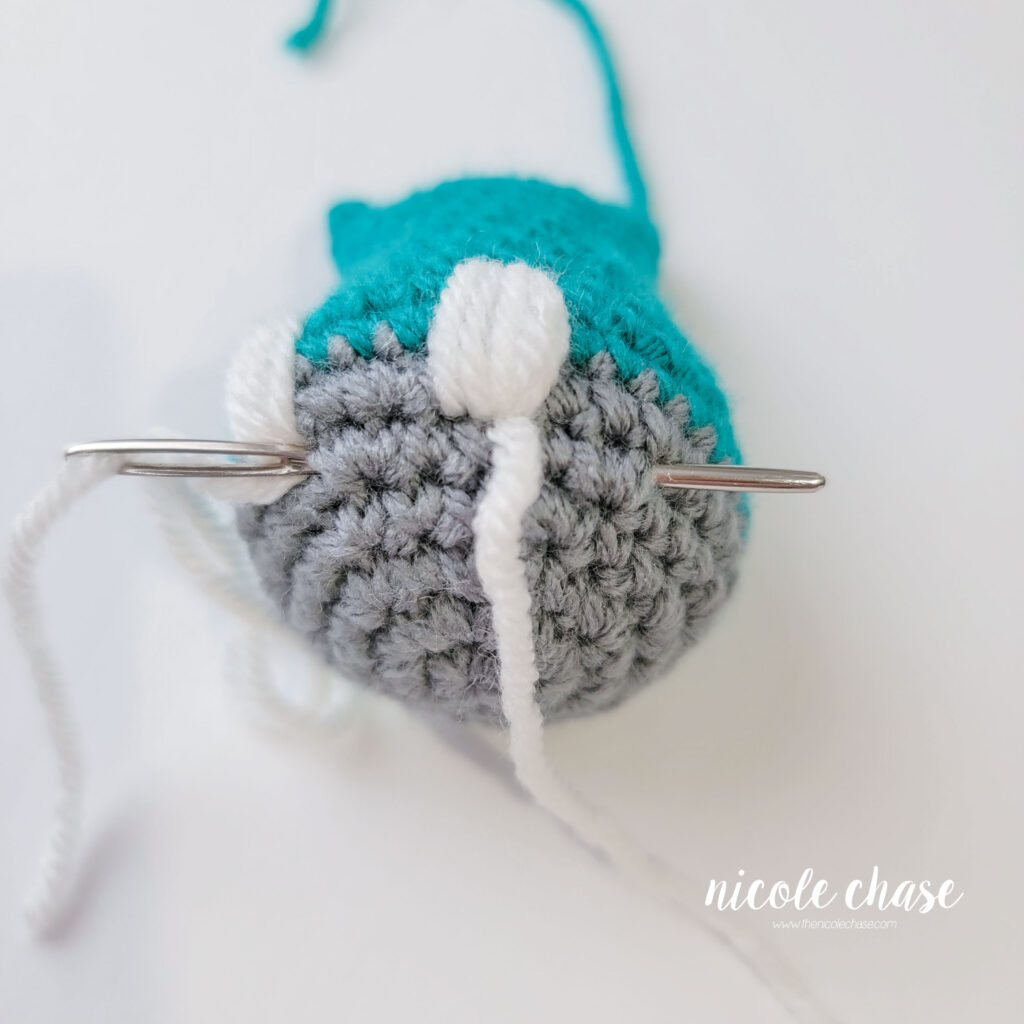
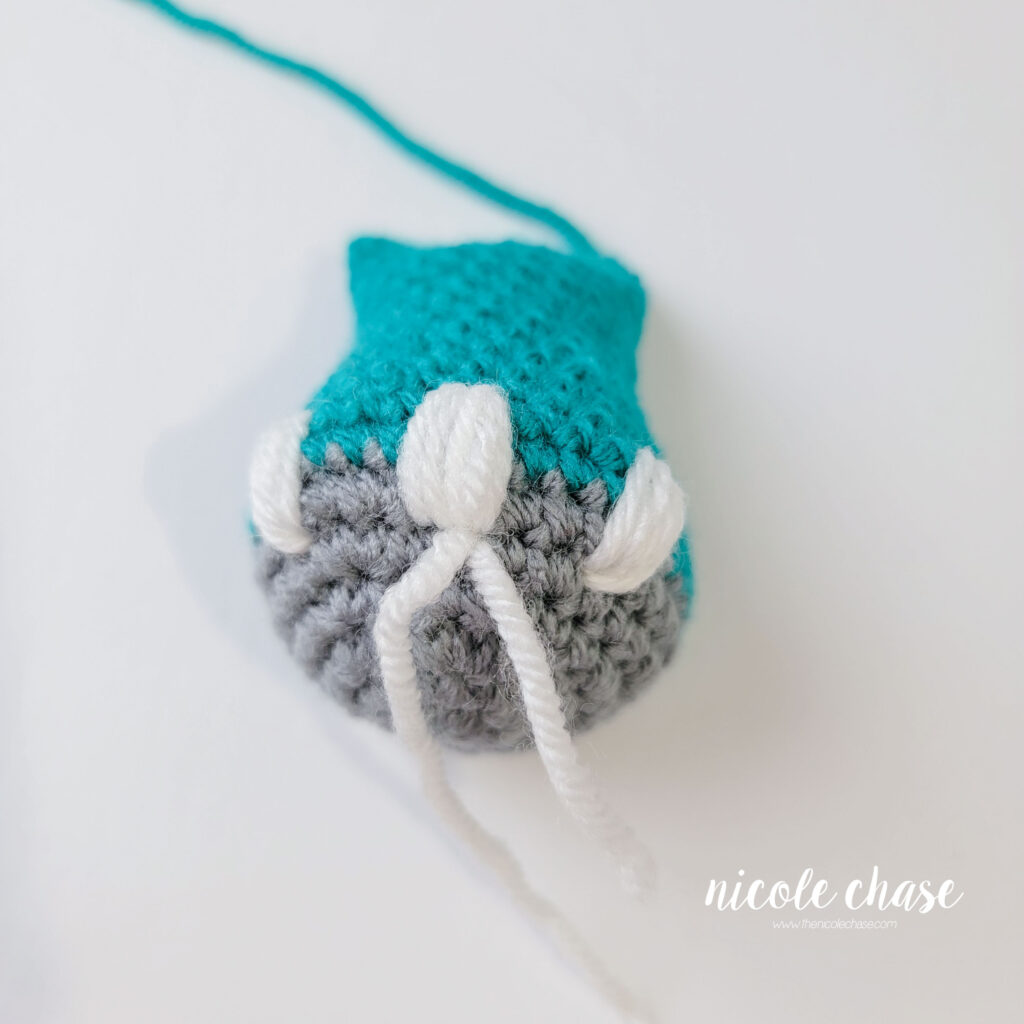
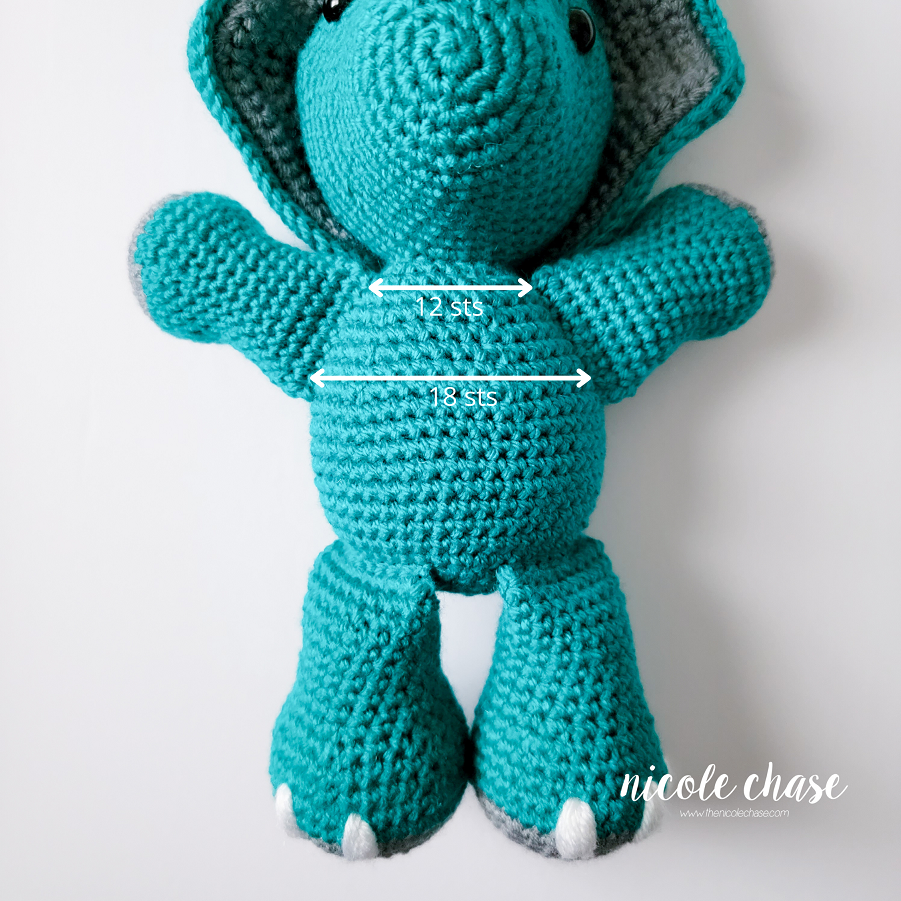
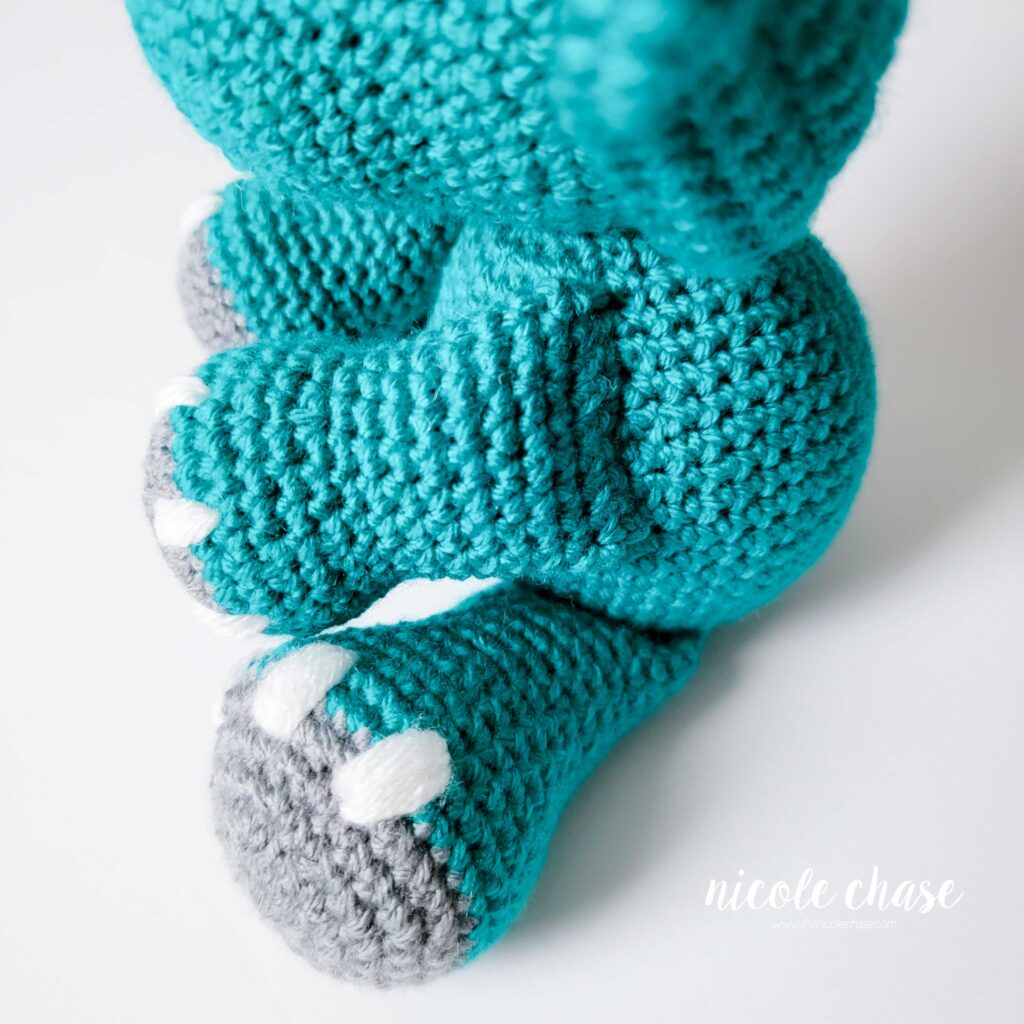
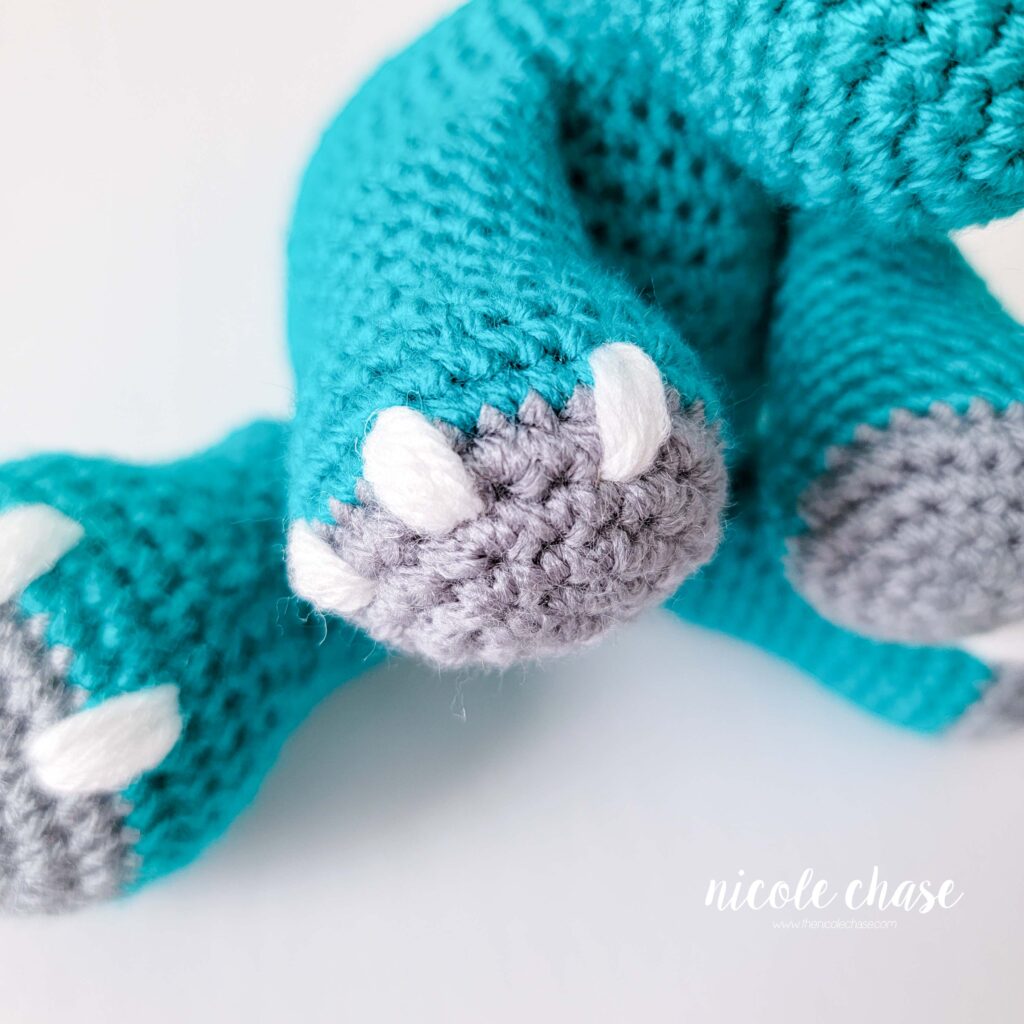
Attach legs over R7-8 of body, with 4 sts showing between.
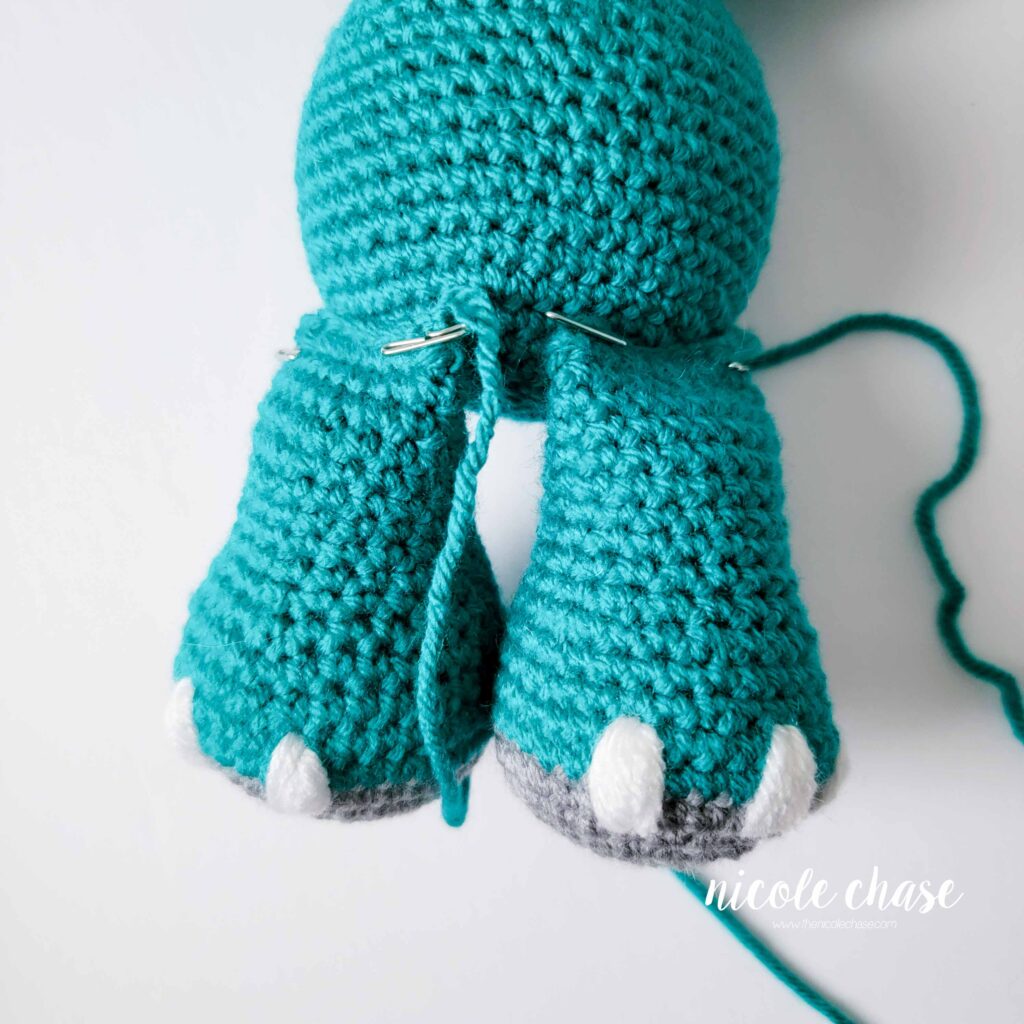
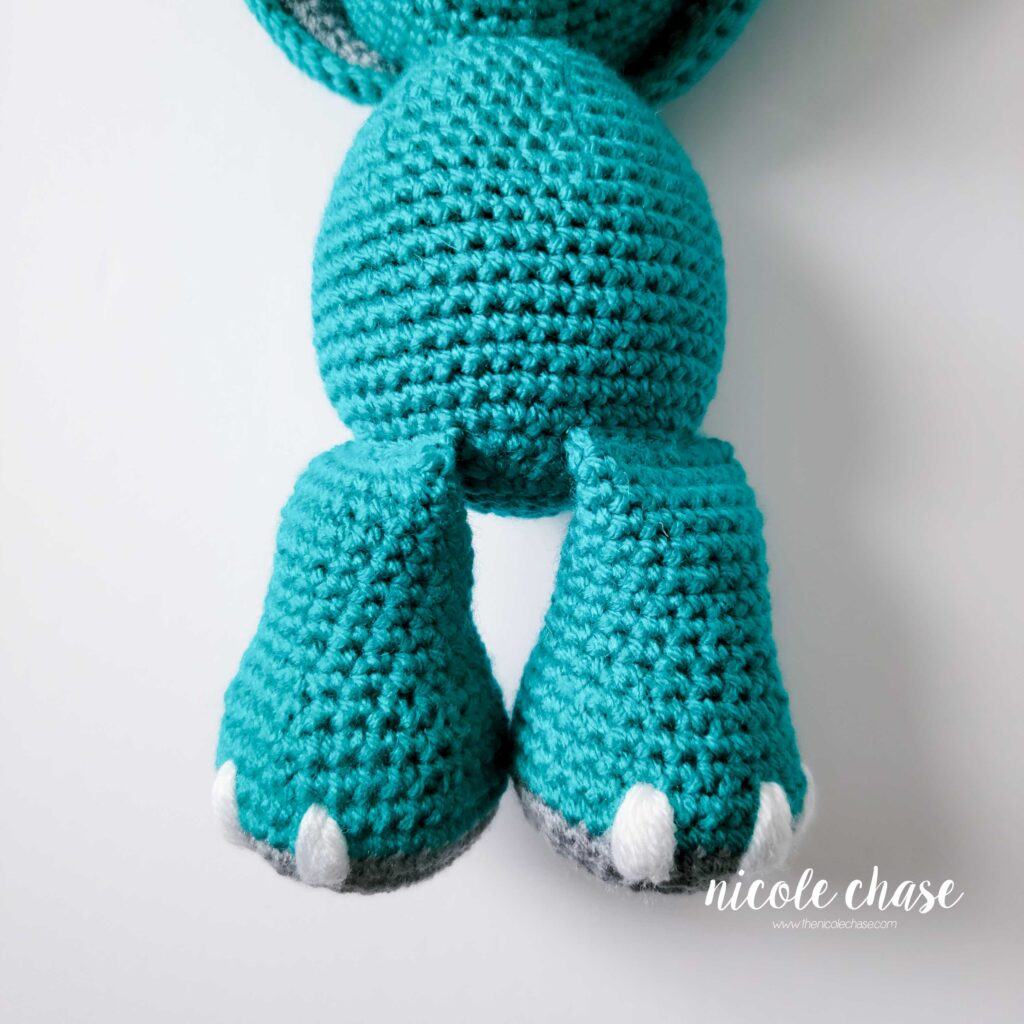
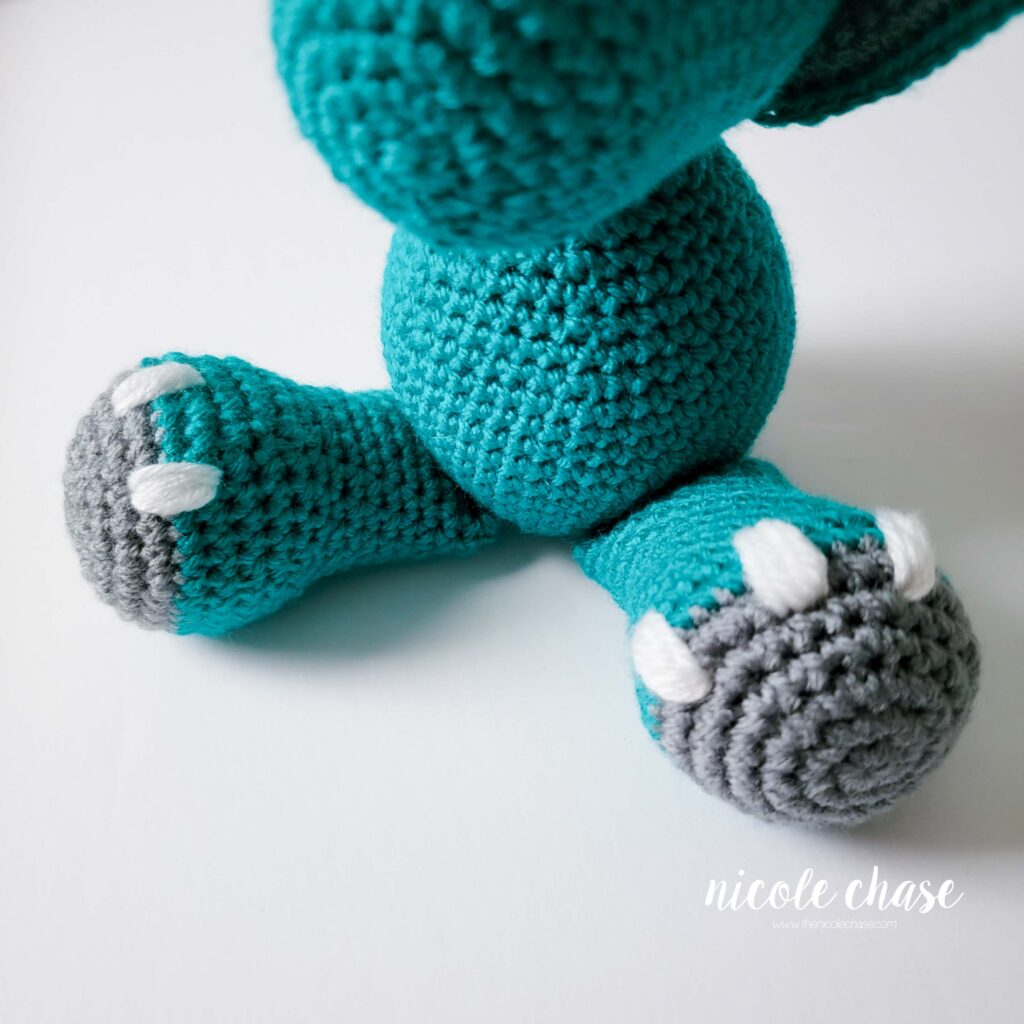
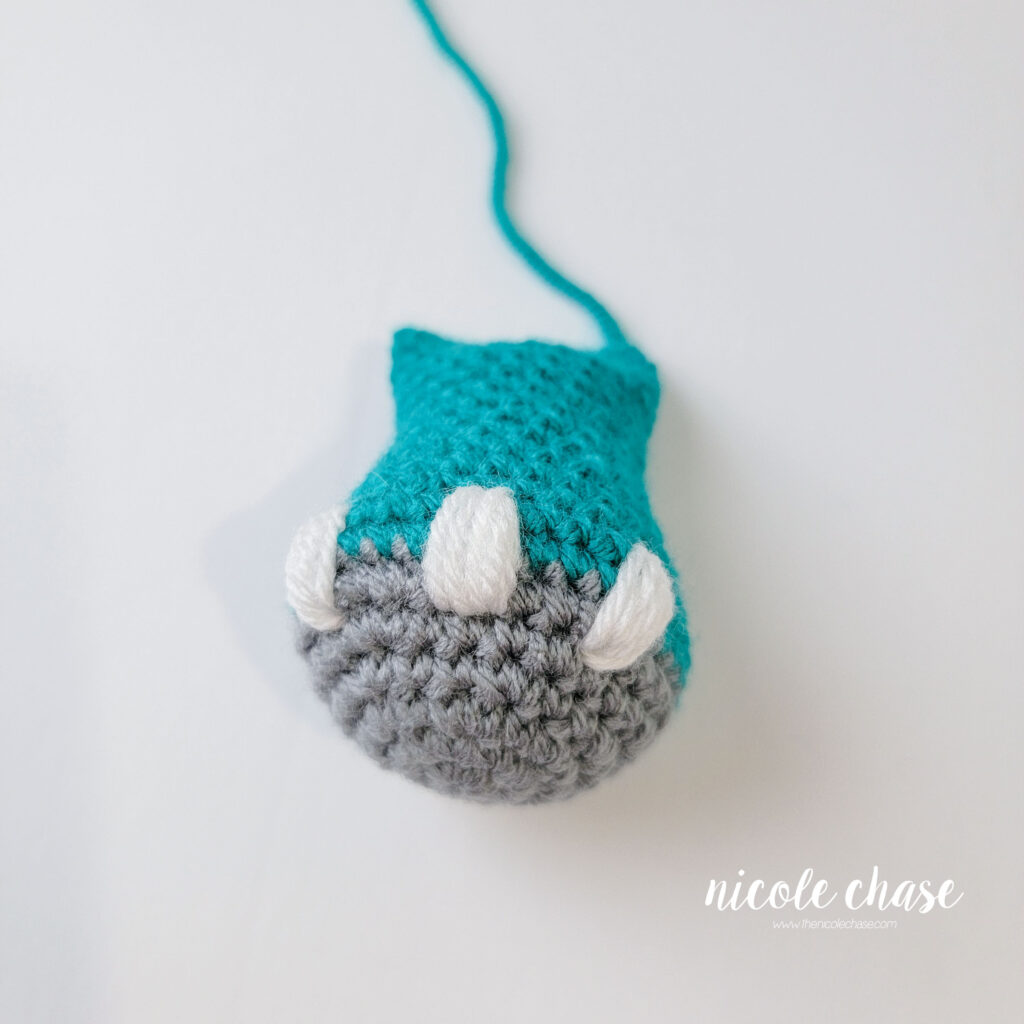
Embroider 3 nails on each leg, over R6-8, leaving about 2 sts between each nail.
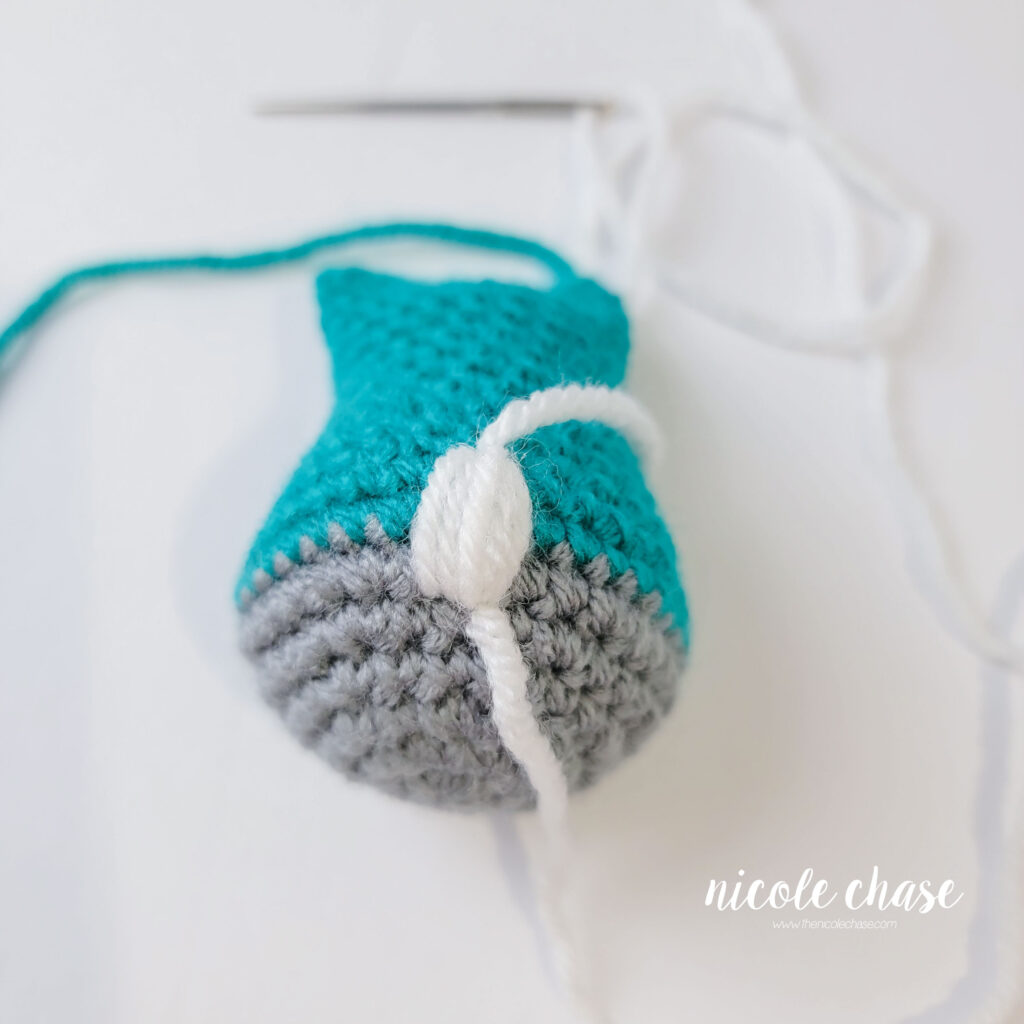
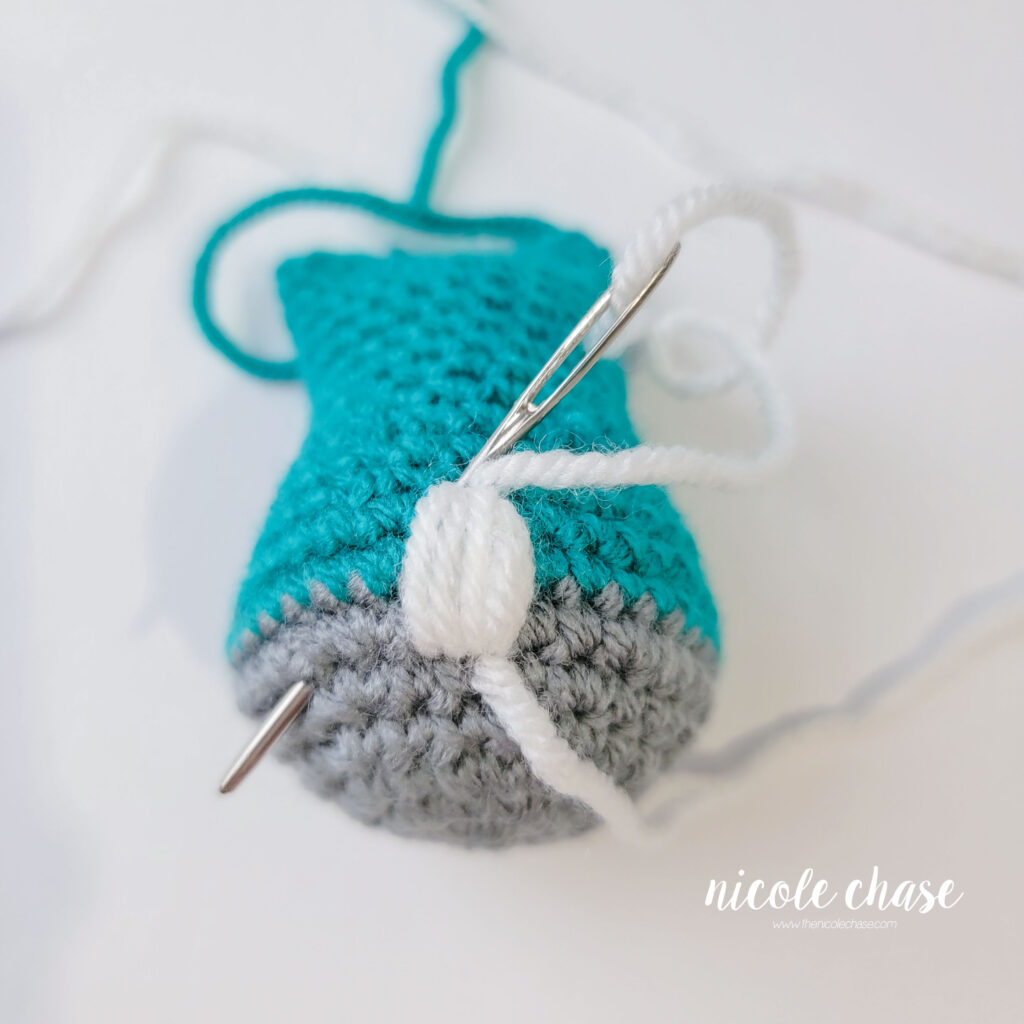

Attach arms over R16-23 on each side of the body. At the top of the arms, leave approximately 12 sts between each arm across the front of the body. At the bottom of the arms, leave approximately 18 sts between each arm across the front of the body.
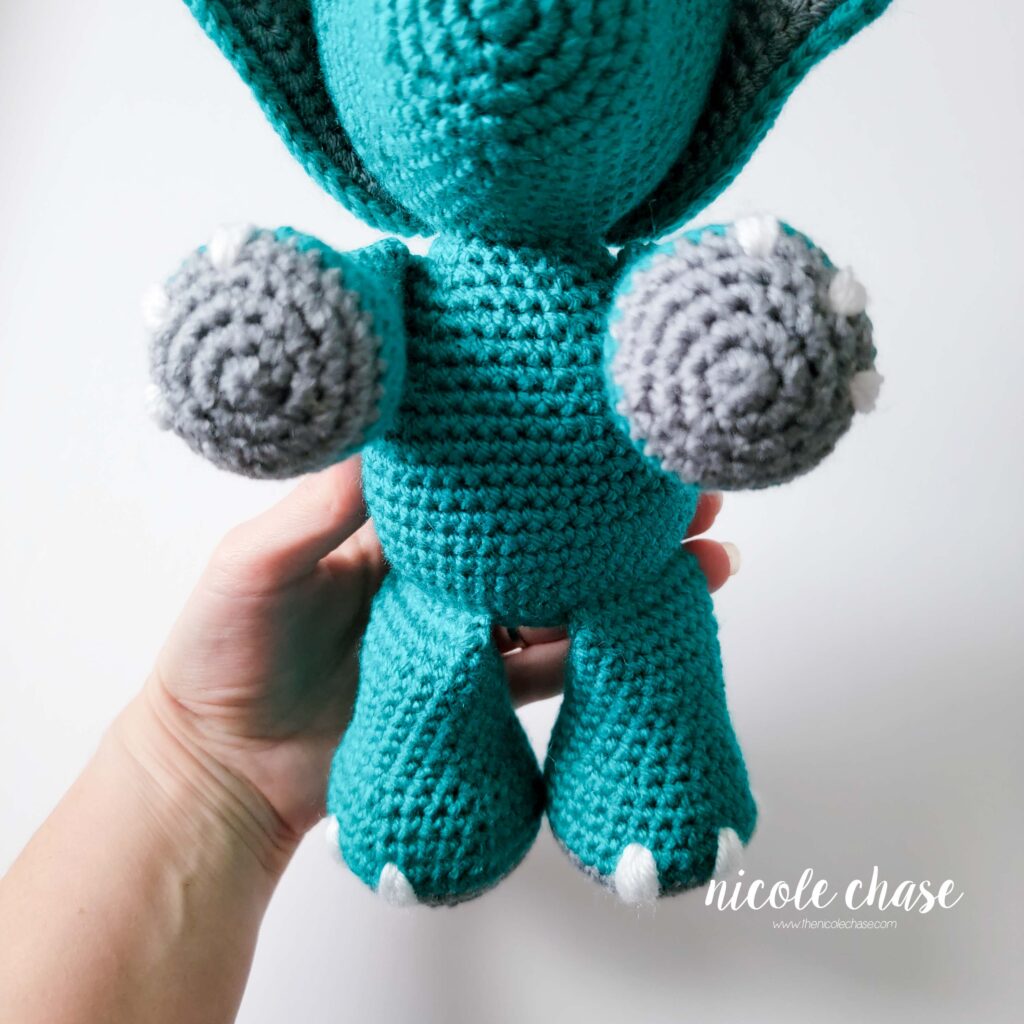
Embroider 3 nails on each arm, over R5-6, leaving about 2 sts between each nail.
Attach tail over R6-13, on the back of the body.

I hope you enjoyed this free triceratops crochet pattern!
Ad-Free PDF Pattern for Tanner the Triceratops

Tips & Tricks
- While sewing the pieces of this free triceratops crochet pattern, hold your pieces in place with pins so that they don’t move around.
- If you are having trouble with the frill piece of this free triceratops crochet pattern, be sure to carefully review the notes section under the Frill Front heading.
- Prevent your triceratops amigurumi from having a floppy head with extra stuffing. Check out this post on amigurumi head wobble.
- These amigurumi tips and tricks are a great reference for more ways to improve your crochet triceratops!
Alterations
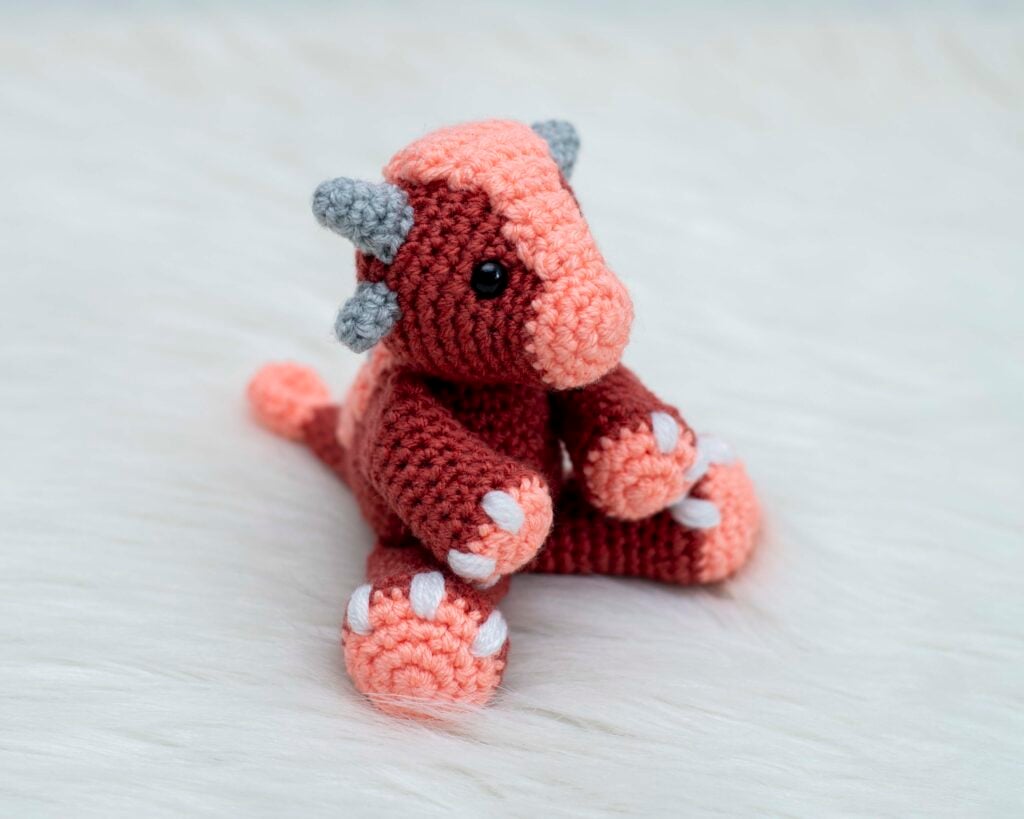
- Make a strawberry triceratops crochet pattern using this free pattern modification for Strawberry Tanner the Triceratops!
- To create a larger amigurumi dinosaur with this free triceratops crochet pattern, use a plush yarn and suitable hook size, then follow the pattern as written.
- For a smaller triceratops amigurumi, check out the mini version of this free triceratops crochet pattern: Mini Tanner the Triceratops.
More Free Dinosaur Crochet Patterns
I hope you enjoyed this free triceratops crochet pattern! If you love dinosaurs and want to crochet more of them, be sure to check out my full collection of free dinosaur crochet patterns. You may especially enjoy my ankylosaurus crochet pattern, or my parasaurolophus crochet pattern!
Start your own menagerie! This pattern is also part of my collection of free animal crochet patterns.


I hope you enjoyed this pattern! If you make it, leave me a comment below.
Want to see more from me? Be sure to subscribe to my email newsletter so that you never miss a pattern!
Follow along with me on Instagram for daily updates and a behind the scenes look at my designs.
I’d love to see what you make with this tutorial! Don’t forget to share your finished work with me: on social media by tagging me @thenicolechase, in your Ravelry projects, or post over in my Facebook group!
Thanks for stopping by! Happy crafting!
Nicole
PATTERN COPYRIGHT © 2026 NICOLE CHASE. ALL RIGHTS RESERVED.
PATTERN MAY NOT BE ALTERED, COPIED, REDISTRIBUTED OR SOLD AS YOUR OWN PATTERN.
YOU MAY SELL THE FINISHED PRODUCT ON A SMALL SCALE. PATTERN/DESIGN CREDIT GIVEN TO WWW.THENICOLECHASE.COM IS APPRECIATED. PERMISSION TO SELL DOES NOT INCLUDE MASS PRODUCTION. LARGE SCALE PRODUCTION IS PROHIBITED.
PHOTOGRAPHY COPYRIGHT © 2026 NICOLE CHASE. ALL RIGHTS RESERVED.
PHOTOS MAY NOT BE ALTERED, COPIED, REDISTRIBUTED OR SOLD AS YOUR OWN.
This post may contain affiliate links. If you make a purchase through links on our site, we may earn a commission.
I am confused on the counts for the frill section. I have 30 FSC but if I do (2 sc in the same st, 1 sc in each of the next 3…) that doesnt add up to 42 on round 2. Am I reading something incorrectly?
Hi Alana, it sounds like you aren’t doing the entire repeat. The repeat has 2 SC at the beginning and end. So it would be 2 SC, 1 SC x3, 2 SC, 2 SC, 1 SC x 3, 2 SC, and so on.
I am a bit confused on the head. Round 15 says there should be 54 stitches and round 16 says there should be 60. Each time I’m getting 48 stitches in round 15 and 54 stitches in 16. But round 17 I get to 60 stitches like it says. Any advise is appreciated.
Hi Mari, is your stitch count correct after R14? If so, it sounds like you probably didn’t do the repeat the full number of times indicated. So if R14 you have 48 sts, you are good at that point. Then R15, You will repeat that first sequence from the * a total of 6 times, then SC x 24. That will get you to 54 sts. Hope that helps! Let me know if you need anything further. Thanks!
Hi Nicole,
I had the same issue as Mari. My stitch count on row 14 is 48. If you count up the stitches on row 15 it equals 49 stitches.
2 in one + 3 sc 5 times = 25 stitches then add the 24 in the pattern and that equals 49 stitches.
I’ll continue on as you indicated above but you may have an error in your pattern. I do LOVE how it’s turning out. 🙂
Hi Rachel! You are not including the first repeat in that sequence in your calculation. You do 2SC + 3 SC which is 5 sts. Then you repeat that sequence an ADDITIONAL 5 times, which you are correct is 25, but with the first 5 (for a total of 6 repeats), that would be 30. Plus the 24 sts, which makes 54. Glad you’re liking the pattern, enjoy!
This is such a great pattern! Thank you for the details on assembly. I always have a hard time with symmetry and your instructions made it achievable. ????
I’m so glad they were helpful! 🙂
Hola Nicole. Te cuento que acabo de terminar éste hermoso proyecto. Lo disfruté muchísimo y me enamoré de él. Gracias por compartir!!!!!
¡Gracias! ¡Me alegra que lo hayas disfrutado! Disculpe mi probable pobre español; Usé un traductor. 🙂
Thank you! I’m so glad you enjoyed it! Excuse my likely poor Spanish; I used a translator. 🙂
Thank you so much for this pattern! My boy is very excited to get his very own Triceratops. I am a bit confused, though. I have only finished the body and the head and according to the instructions they are still open. I can’t seem to find any instructions about when to go ahead and close them up as in your pictures about assembly they’re already closed up. Thanks so much!
The body will remain open as the body is sewn to the head which takes care of the opening. The head is stuffed and closed completely, perhaps you didn’t see the full instructions for the head, but it goes to R30. Let me know if you have any questions! ????
I closed the body up is this ok or should I start over?
The body should not be closed.
Thank you for sharing, I was very concerned that my frill wasn’t going to work but it turned out beautifully!
Thanks for a wonderful pattern. Just finished Tanner. Yesterday I tried The miniTanner. Love them both.
I’m so glad that you enjoyed them both!! Thanks for your comment! 🙂
Please help
6 times I have tried the frill and the count isn’t adding up
Ch 31 2nd chain from hook 30 sc
30 sc across
Ch1 I’ve done 2sc in same stitch and next stitch doesn’t add up
When you get to 7 sc then 2sc I have 4 stitches left over
None of the stitch counts are adding up
It sounds like you aren’t doing the 2 SC at the end of each repeat. The 2 SC are at the beginning and end of the repeat, not just at the end of the frill. Hope that helps!
This messed me up the same way! Glad I’m not the only one that read that incorrectly. Thank you Nicole for clarifying!
Anytime!
Idk if any one clarified this for you. If you read carefully. (I didn’t lol) your supposed to make 2sc in the same stitch 2 times. So it’s 2sc one stitch. 3 sc Over the next 3 stitches. Then 2sc same stitch, then 2sc same stitch.
Thank you Nicola for this pattern. Extremely well written and so easy to follow. The photo tutorials are a brilliant added bonus. I was thrilled with my Tanner and I’m sure my grandson will be too
I’m so glad you enjoyed the pattern! I just added the extra photo tutorials, so I’m really happy to hear that they were worth the effort! 🙂
Thank you much for this pattern!! I was just saying to my DH that the people who write patterns are so clever. The shaping of the head especially is just devine!!
Thank you so much!! The head shaping took me quite a while to get just right, so I’m so glad that it is appreciated! Thanks so much for your comment!