Magic Ring Crochet Tutorial
This post may contain affiliate links. If you make a purchase through links on our site, we may earn a commission.
The crochet magic ring, also known as the magic circle, magic loop, or adjustable loop, is an essential technique for any crocheter. While it can feel a bit tricky at first, mastering this technique is the best way to achieve a professional, gap-free start to your amigurumi projects.
I use the magic ring at the start of nearly all of my amigurumi patterns, as it allows you to pull the center hole completely closed so that no stuffing can peek through. In this tutorial, I’ll explain when to use this technique and walk you through how to make a magic ring with clear photos and a brand-new step-by-step video tutorial.
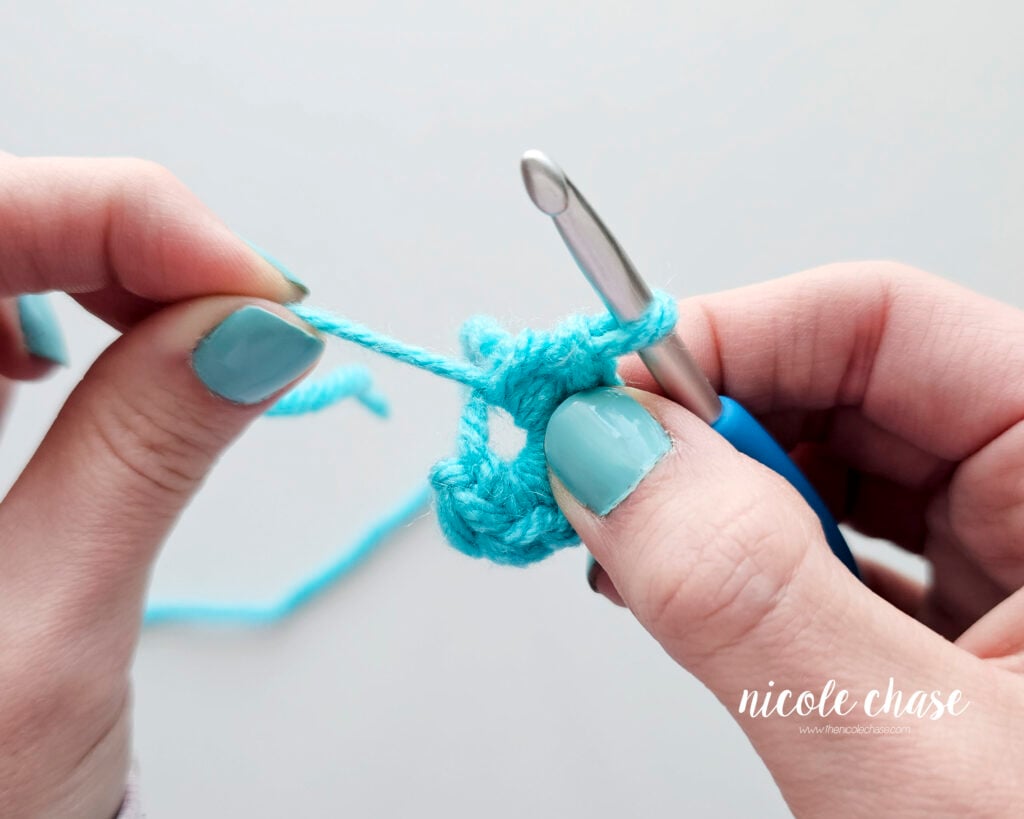
Table of Contents
Why Should I Use a Magic Ring?
The main reason to use a crochet magic ring is to eliminate the small hole that often forms at the center of your working when using the chain 2 method. Because you are working into an adjustable loop, you can pull the yarn tail to close the center completely.
This technique offers several professional advantages:
- Gap-Free Finish: It creates a solid, tight center, which is essential for amigurumi projects so that fiberfill stuffing doesn’t peek through.
- Adjustable Tension: You can easily control exactly how tight or loose the initial ring is before you move on to round two.
- Professional Look: It provides a much cleaner, more polished start for any project worked in the round.
When Should I Use a Magic Ring?
This technique is the gold standard for starting amigurumi crochet patterns or any project worked in the round. I use the magic ring to begin nearly all of my designs because it ensure the piece is secure and stuffing-proof.
You should use a magic ring when:
- Working in the Round: Along with amigurumi, use it for hats worked top-down, granny squares, or circular coasters.
- Reading Patterns: Look for instructions like “6 SC in MR” or “6 SC in MC.” These are common abbreviations for Magic Ring or Magic Circle.
- Replacing the Ch 2 Method: If a pattern says “Ch 2, 6 SC in 2nd ch from hook,” you can almost always substitute a magic ring for a cleaner finish.
Whether you’re making a tiny plushie or a large blanket, if the project starts from the center and works outward, the magic ring is usually your best choice.
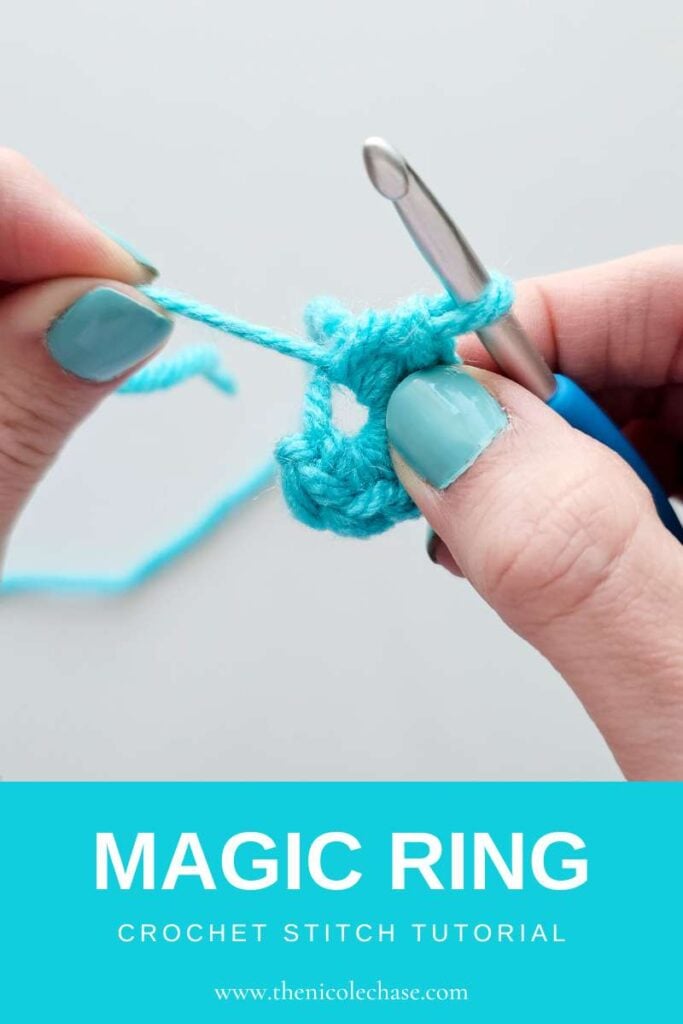
How to Make a Magic Ring (Magic Circle)
The crochet magic ring is a foundational technique that allows you to start a project in the round with a perfectly closed center. While it can feel a bit like a magic trick at first, it is the most effective way to ensure your amigurumi projects are secure and professional.
Video for the Magic Ring Tutorial
If you are a visual learner, watch my beginner video tutorial below to learn how to make a magic ring. I’ll show you my exact finger placement and the method I use to keep the ring secure every time.
This video is also available on YouTube. Watch this video: Magic Ring Crochet Tutorial on YouTube.
Step-by-Step Magic Ring Photo Tutorial
Follow this step-by-step photo walkthrough to show you how to master the magic ring.
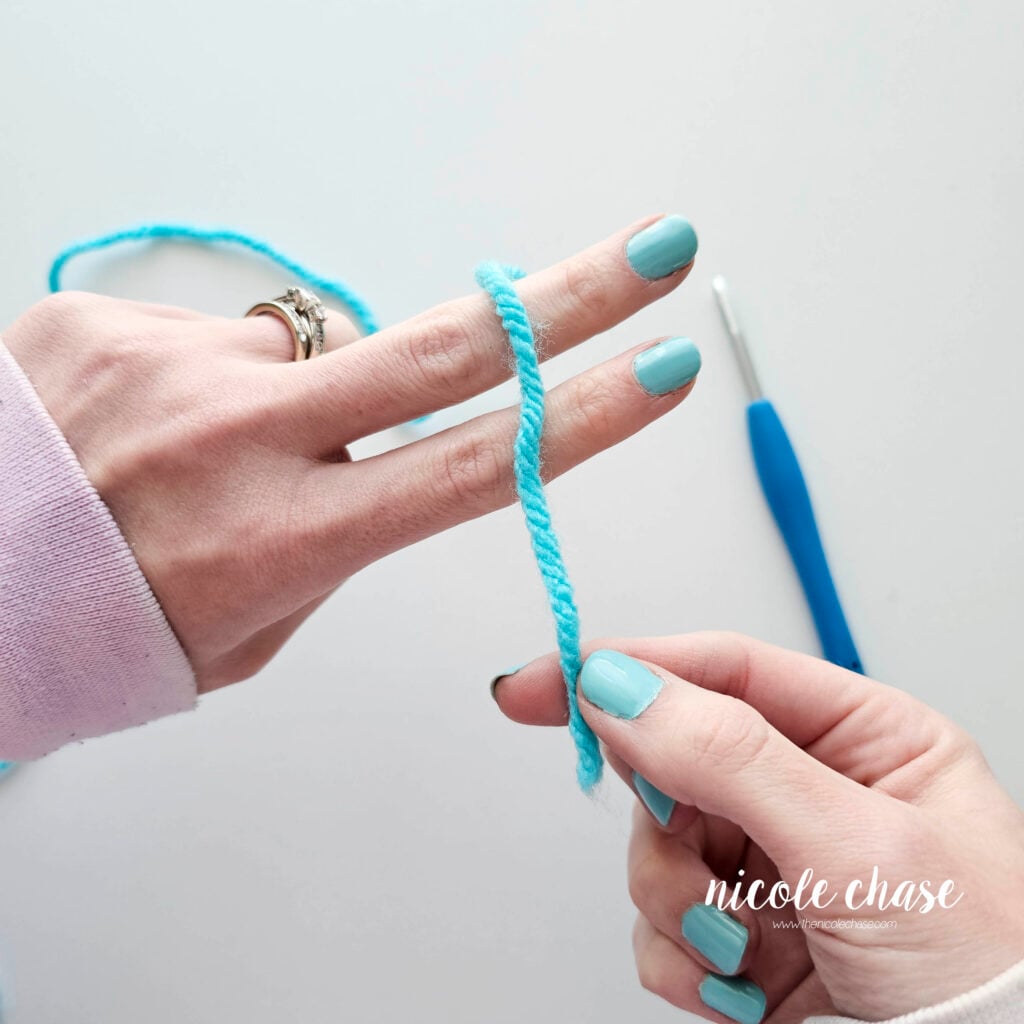
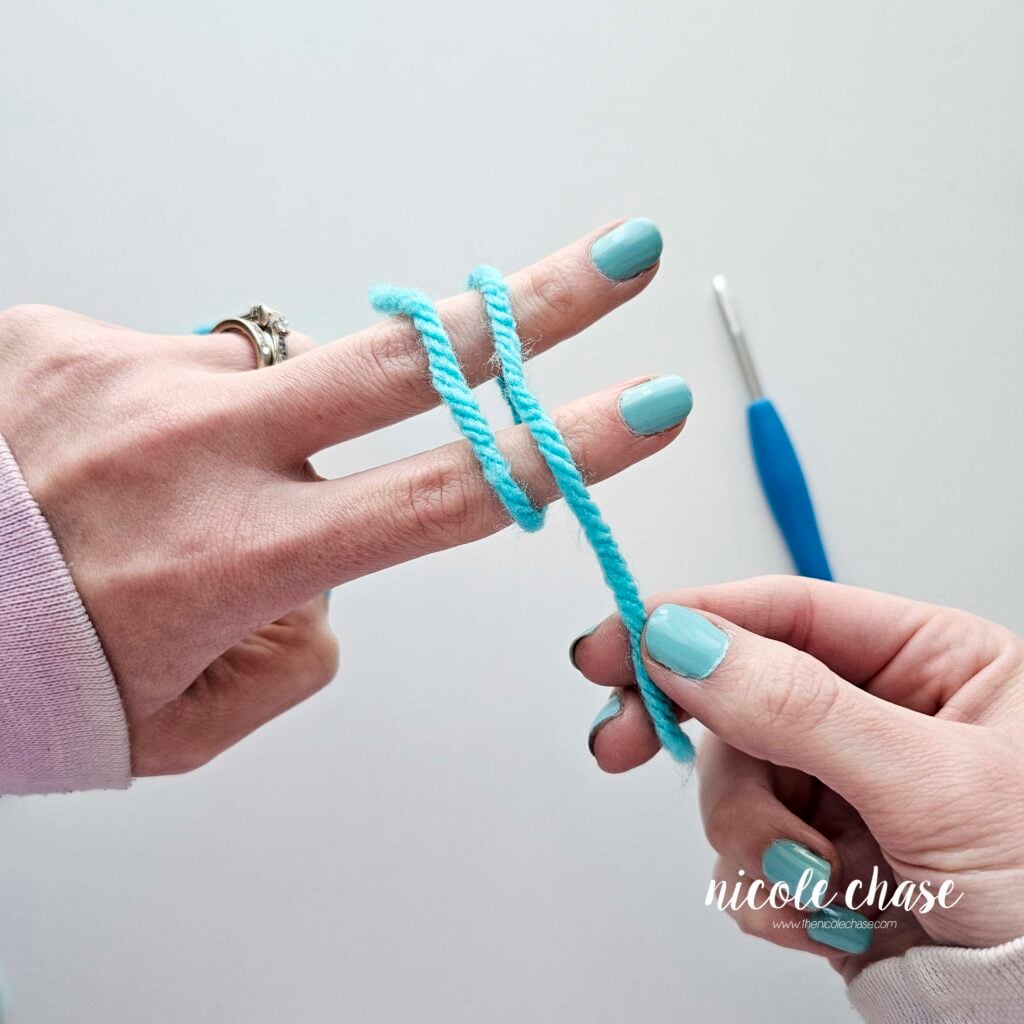
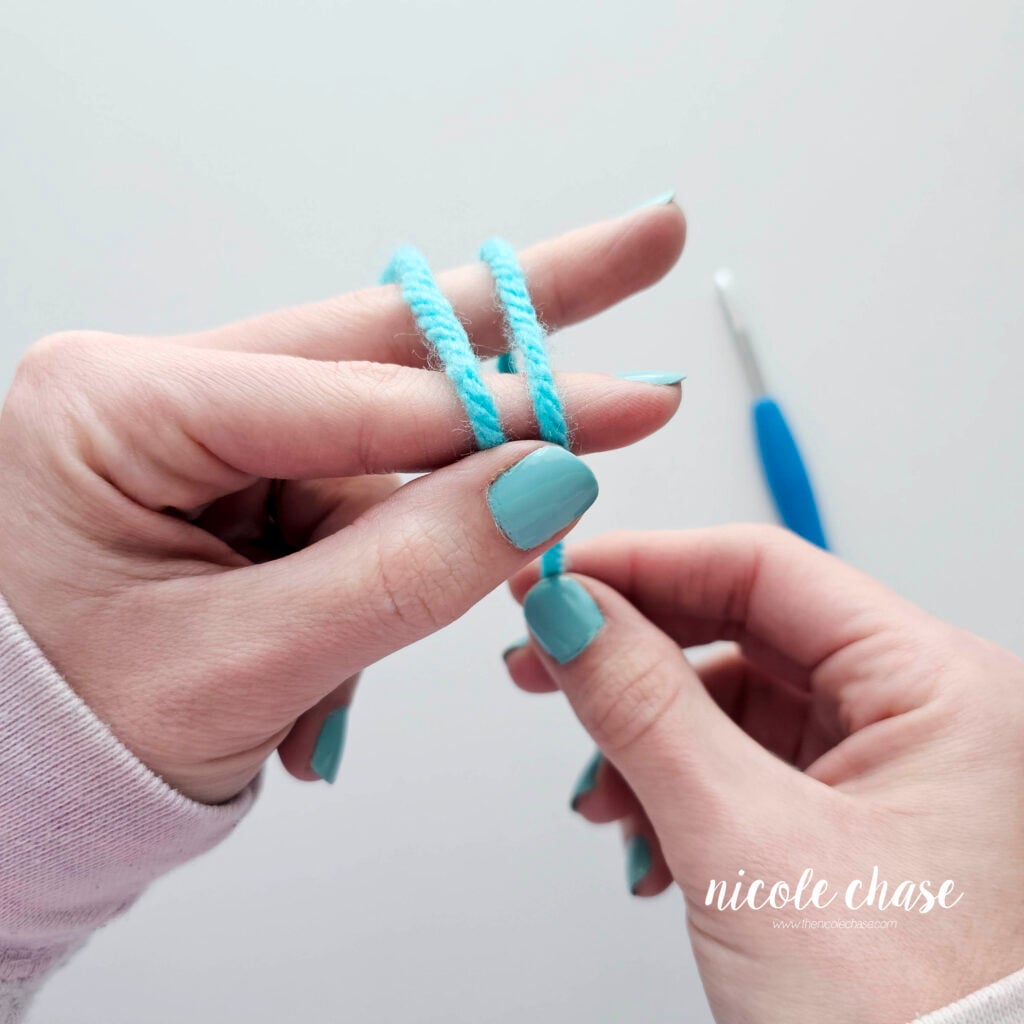
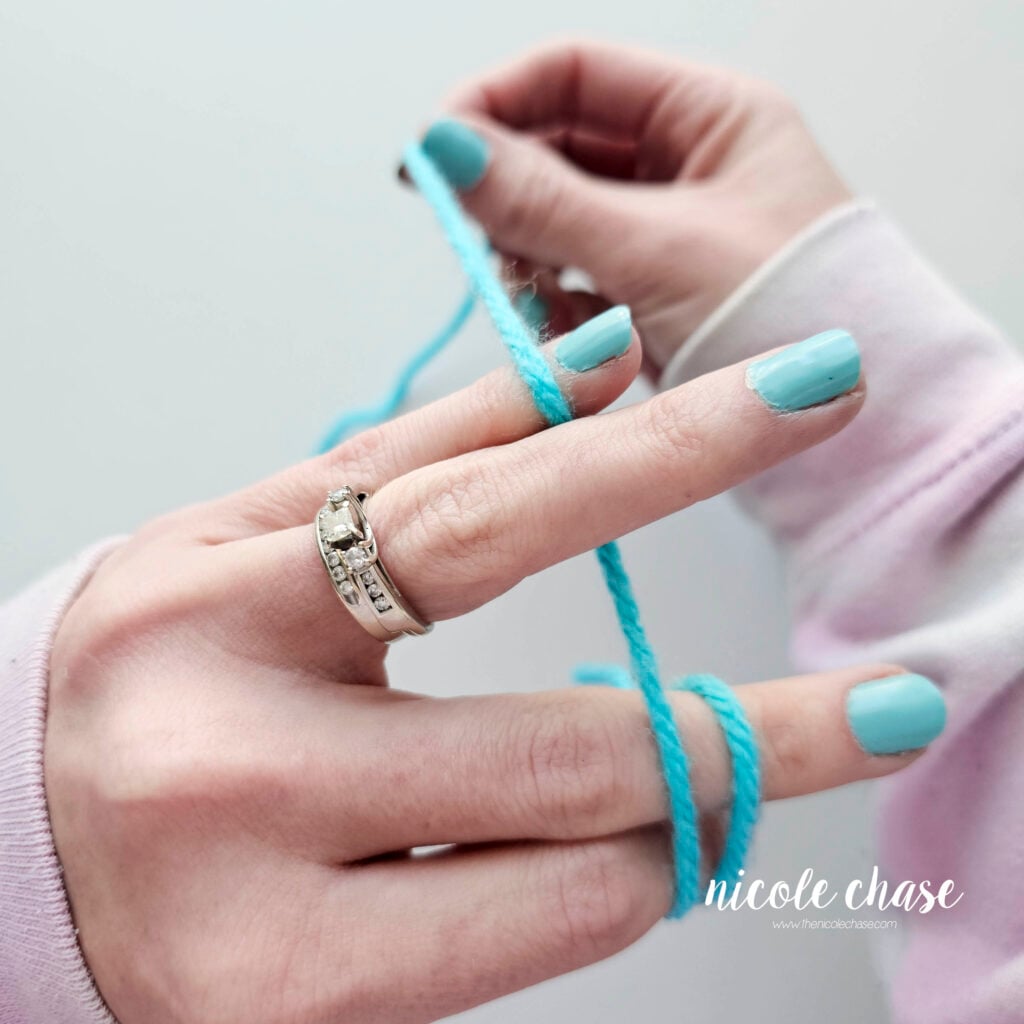
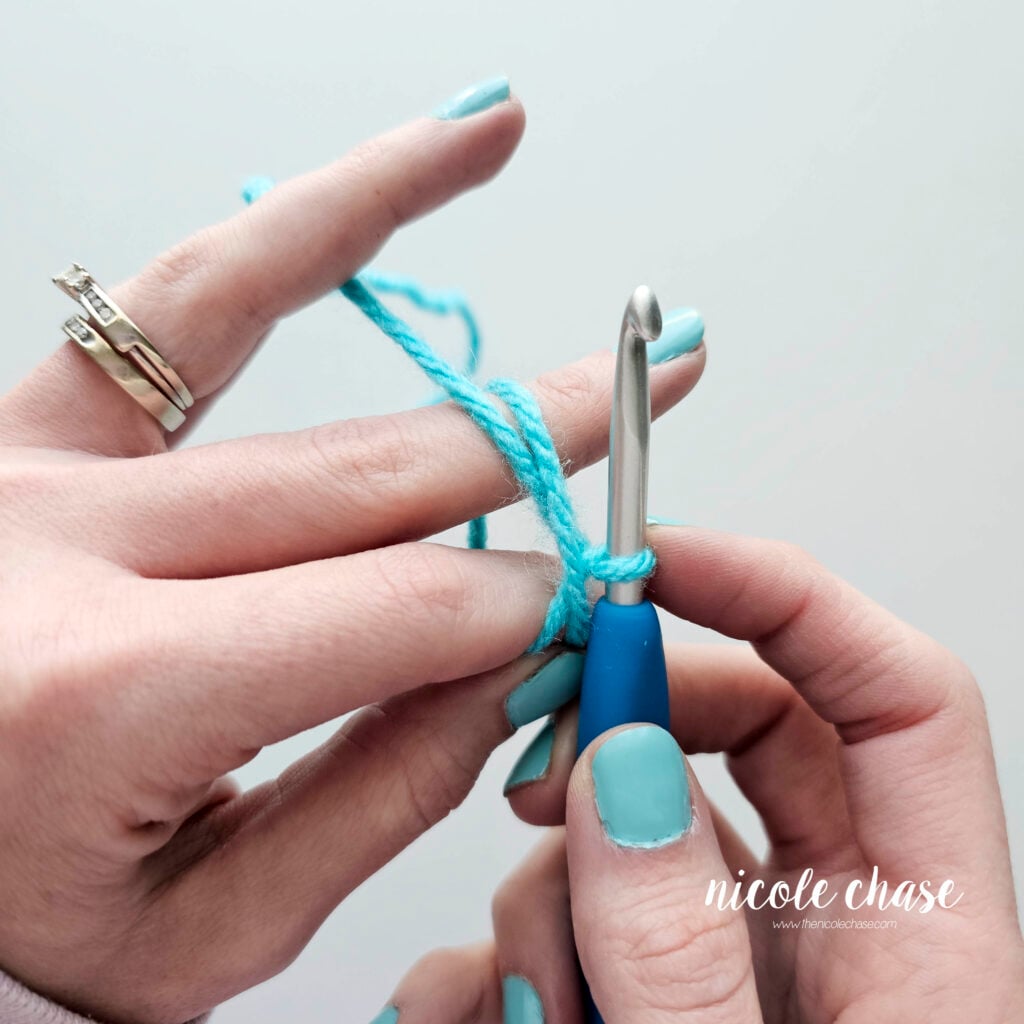
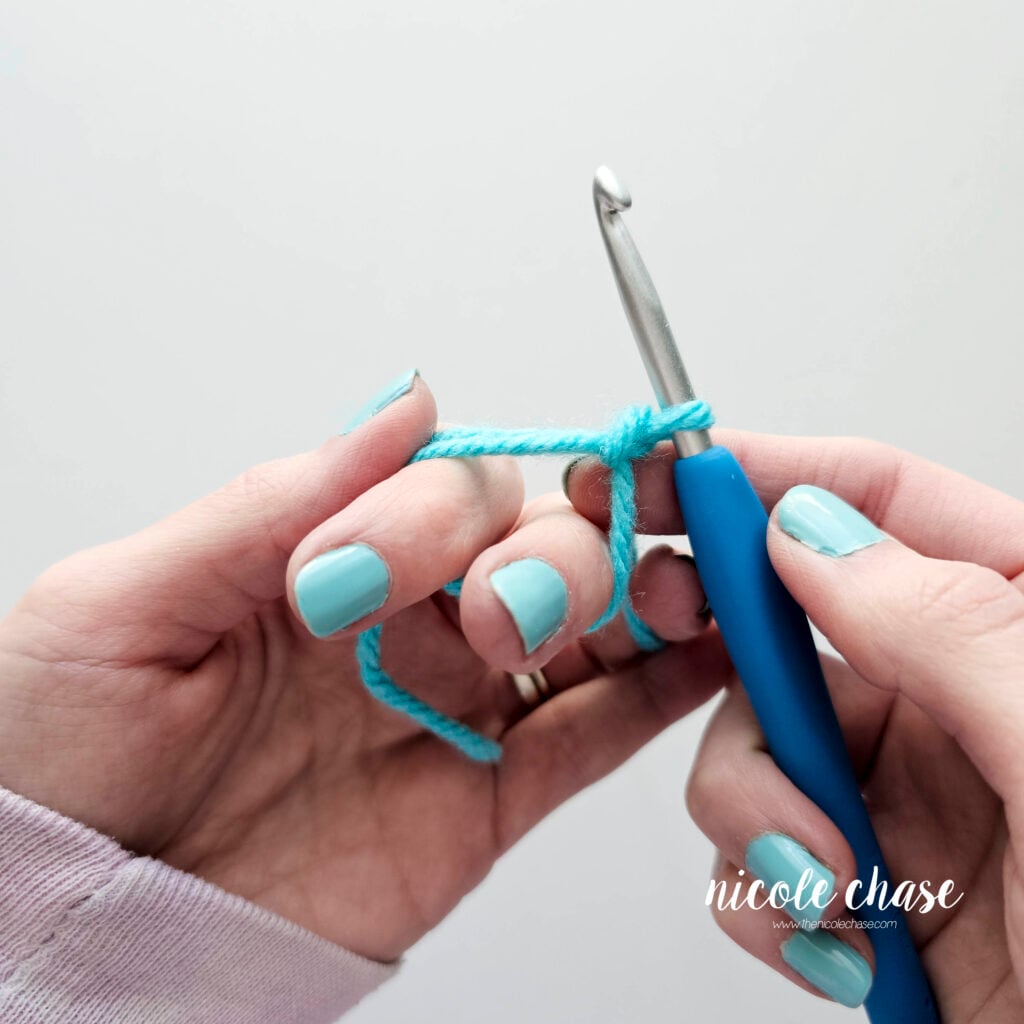
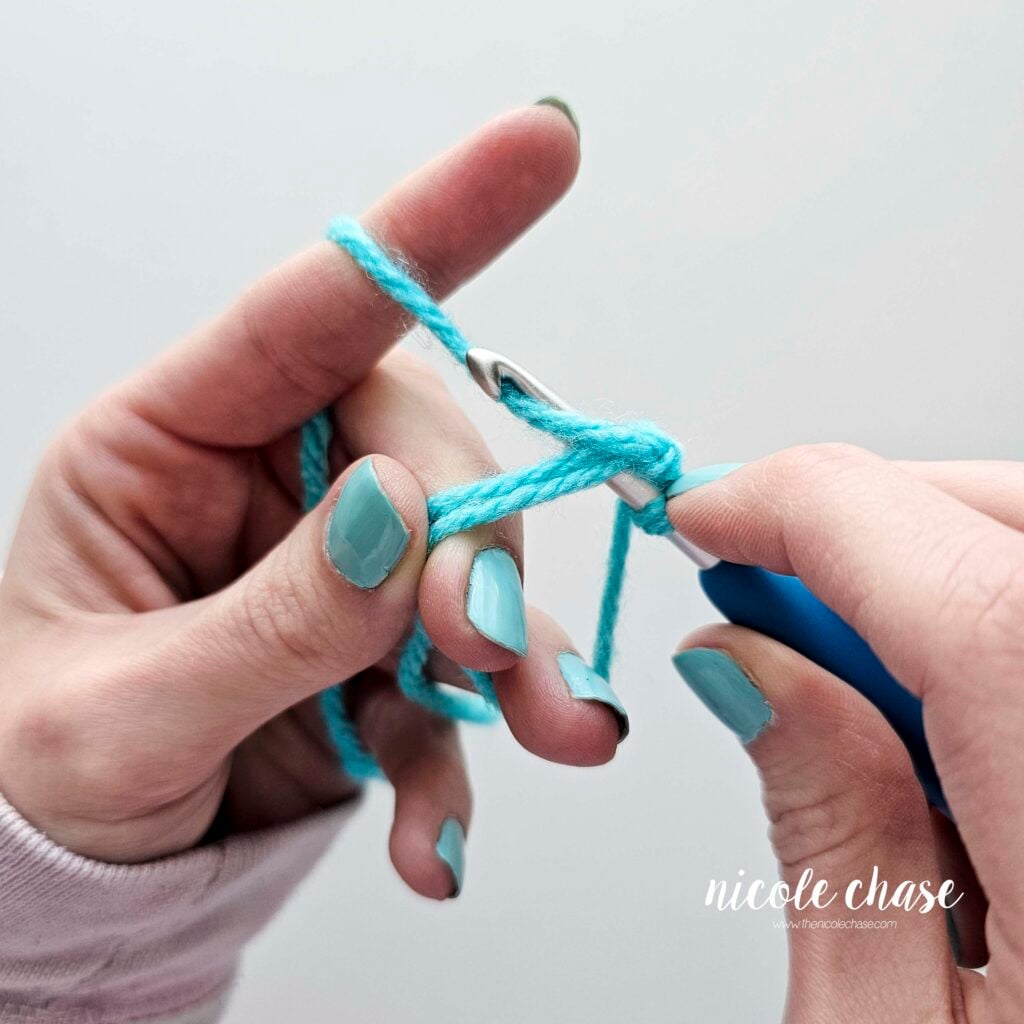
Step 1: Create the Loop
Loop the yarn around your index and middle fingers twice, starting away from you and wrapping towards you. Use your thumb to hold the two strands of yarn against your pointer finger, and use your pinky and ring finger to hold the working yarn.
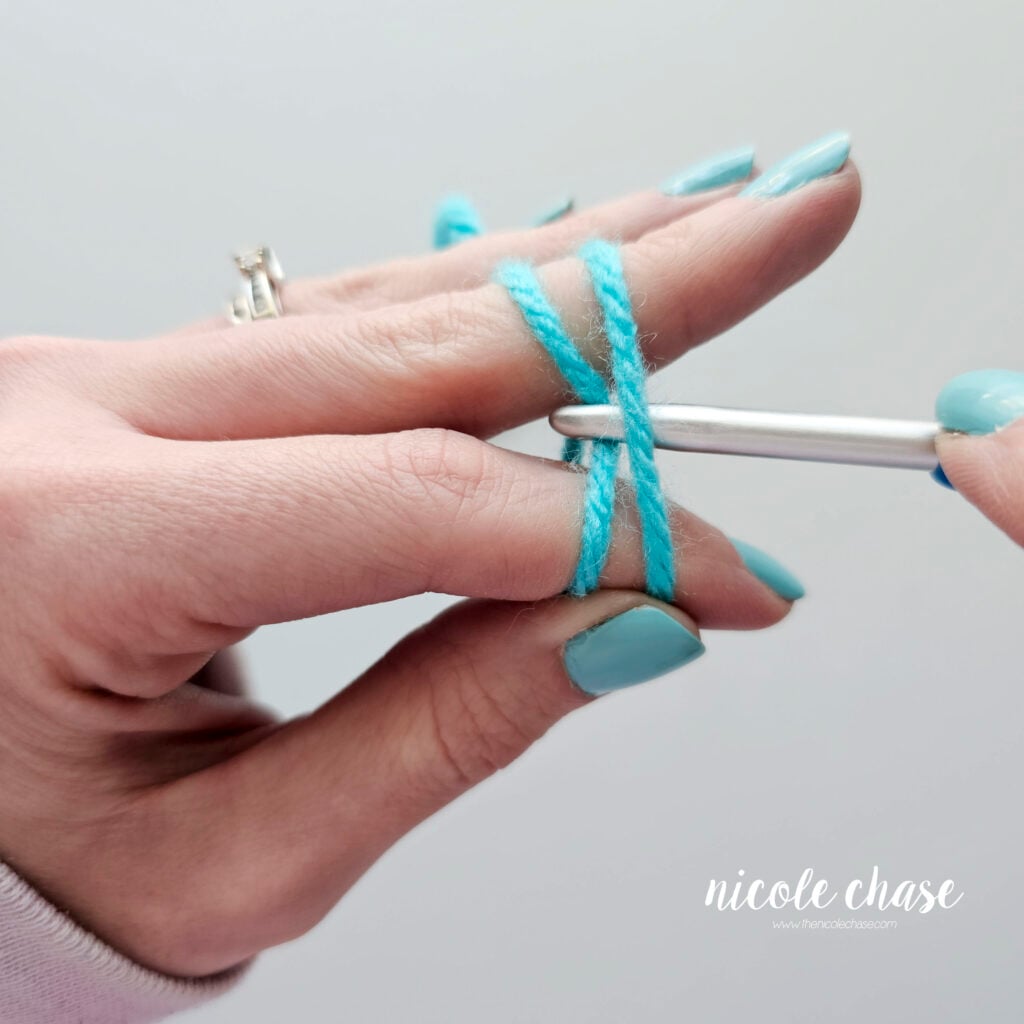
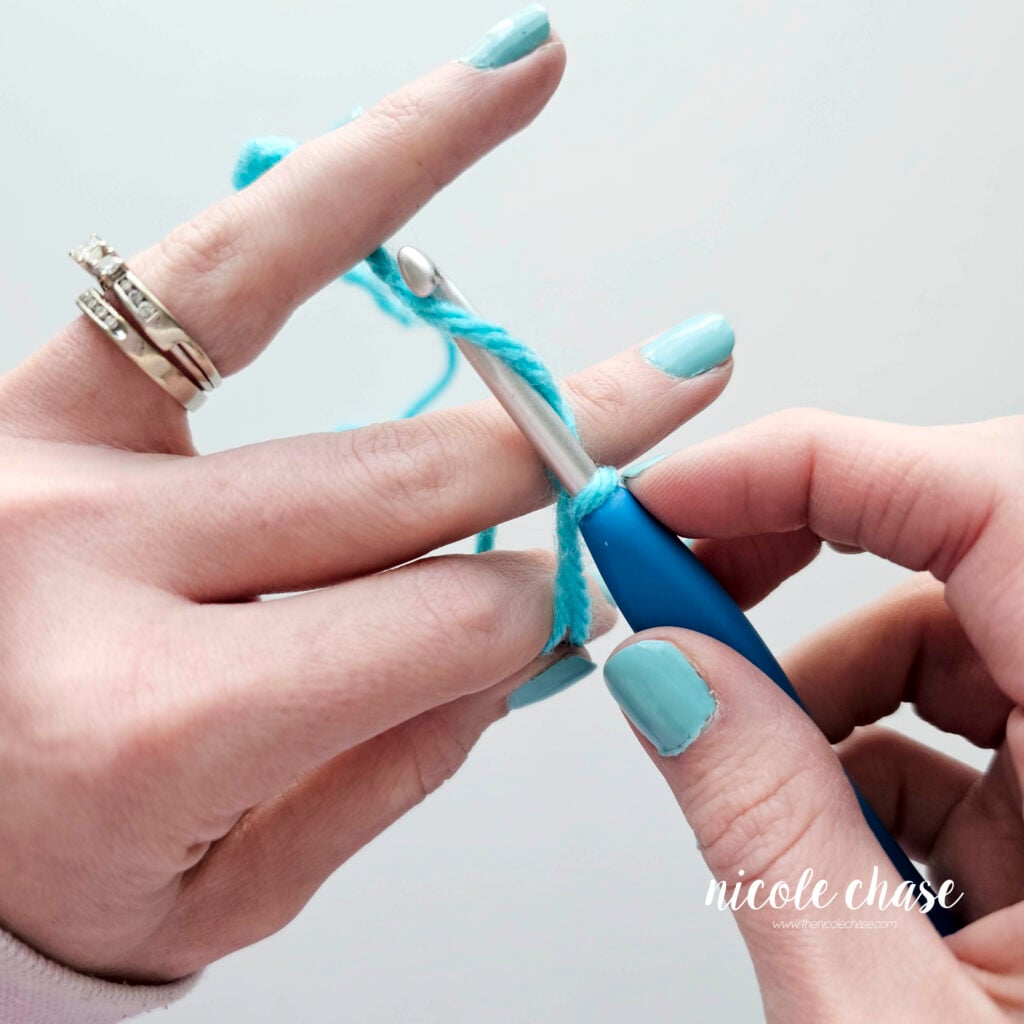
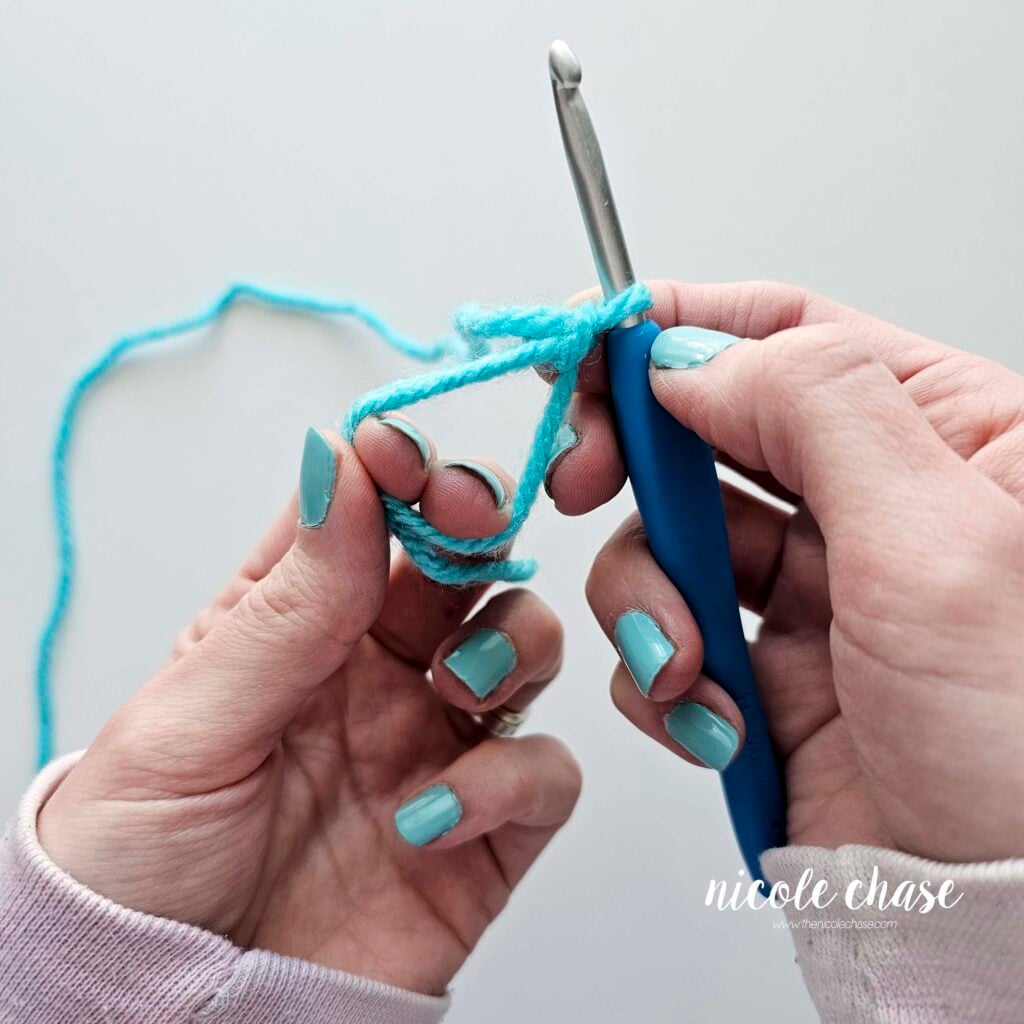
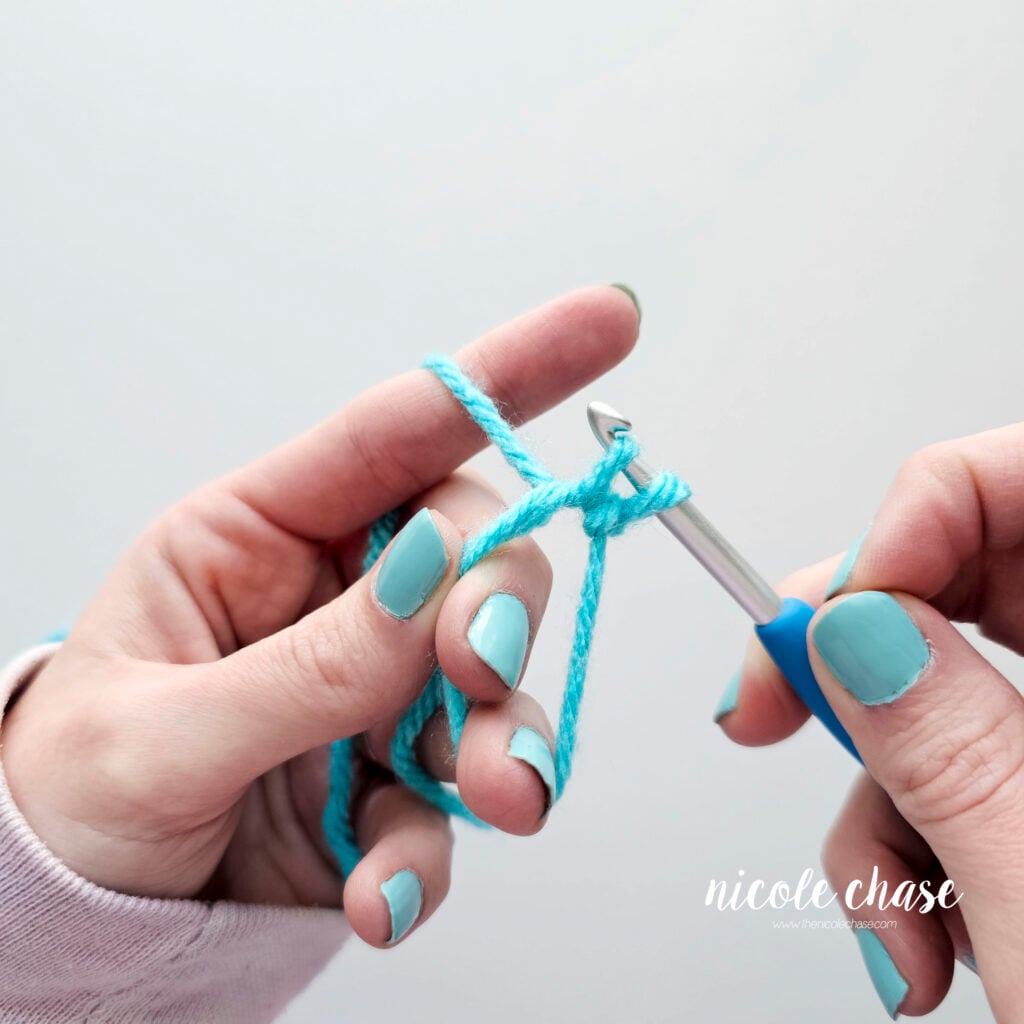
Step 2: Pull Up a Loop
Insert your crochet hook under the front strand of yarn and grab the back strand of yarn. Pull it under and through to the front.

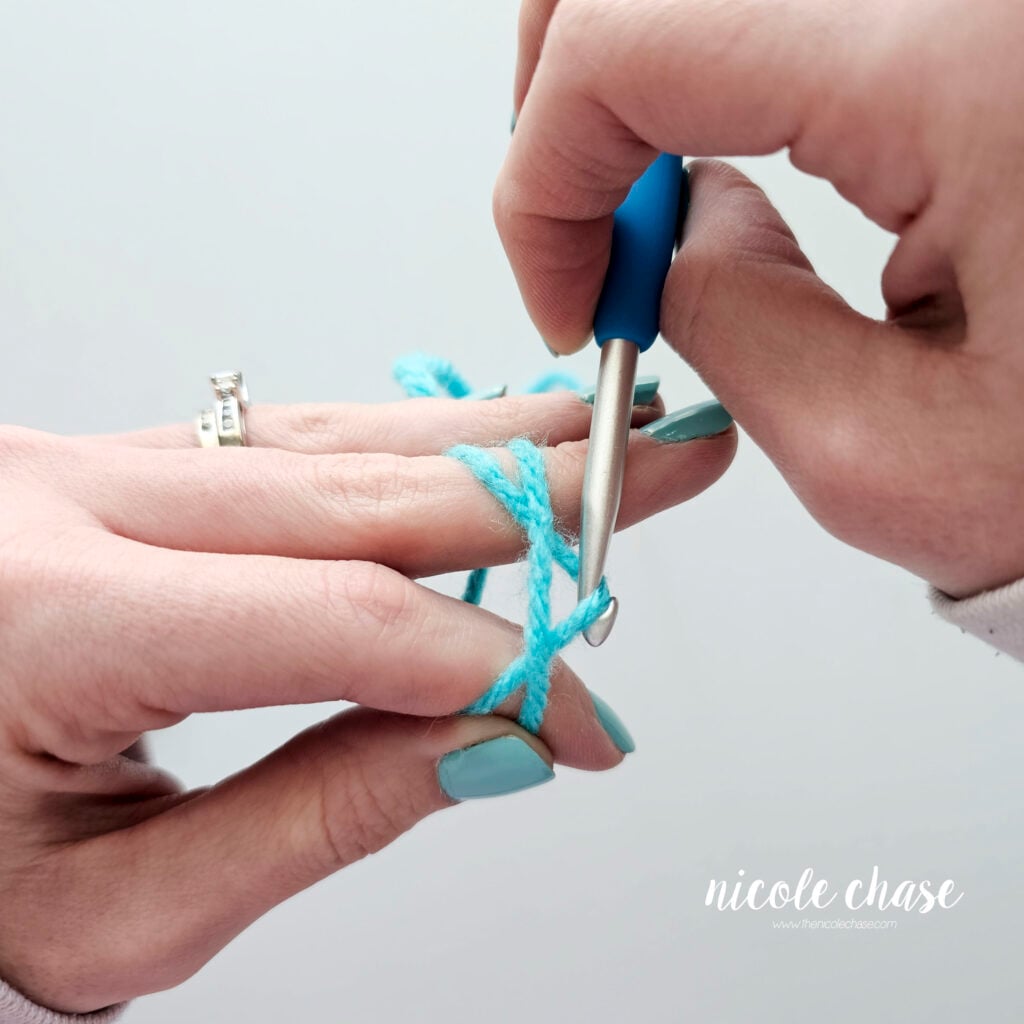
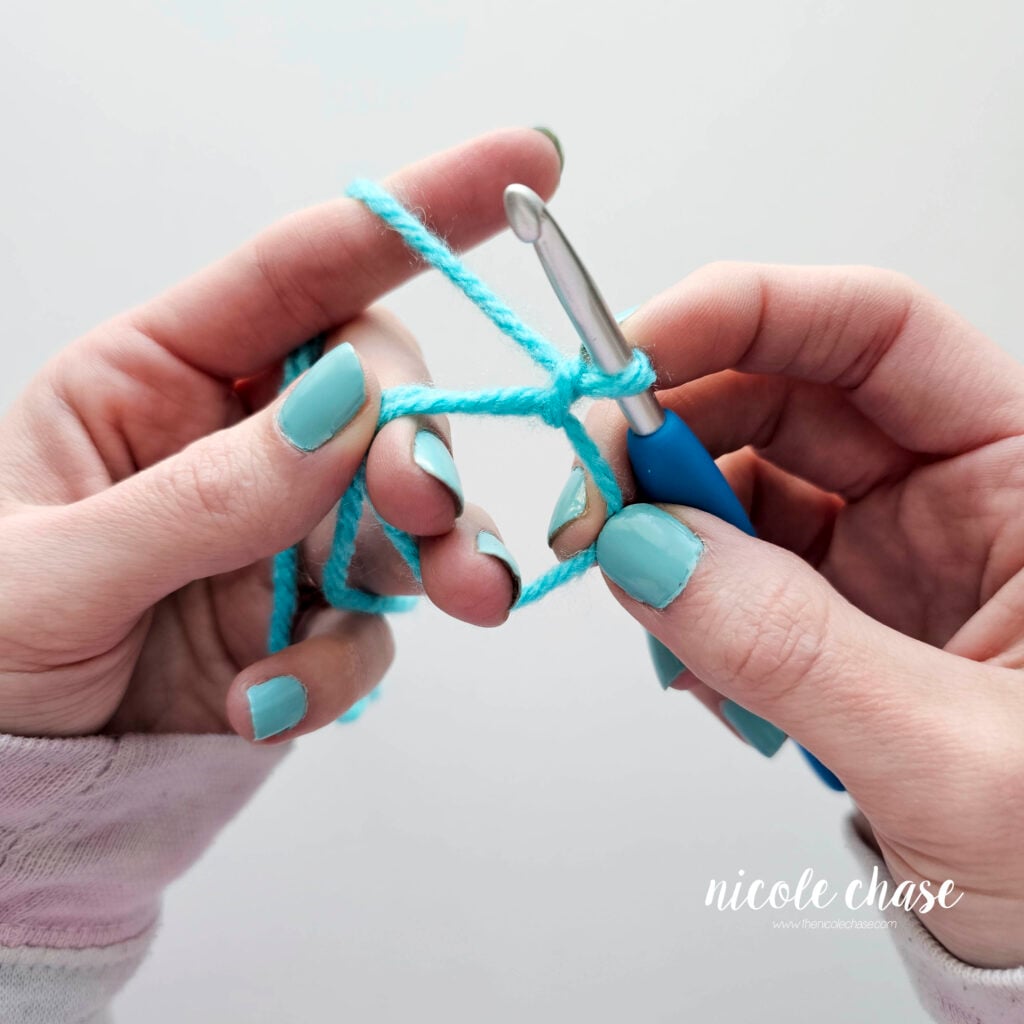
Step 3: Twist and Secure
Carefully twist your hook to create a loop on your hook.
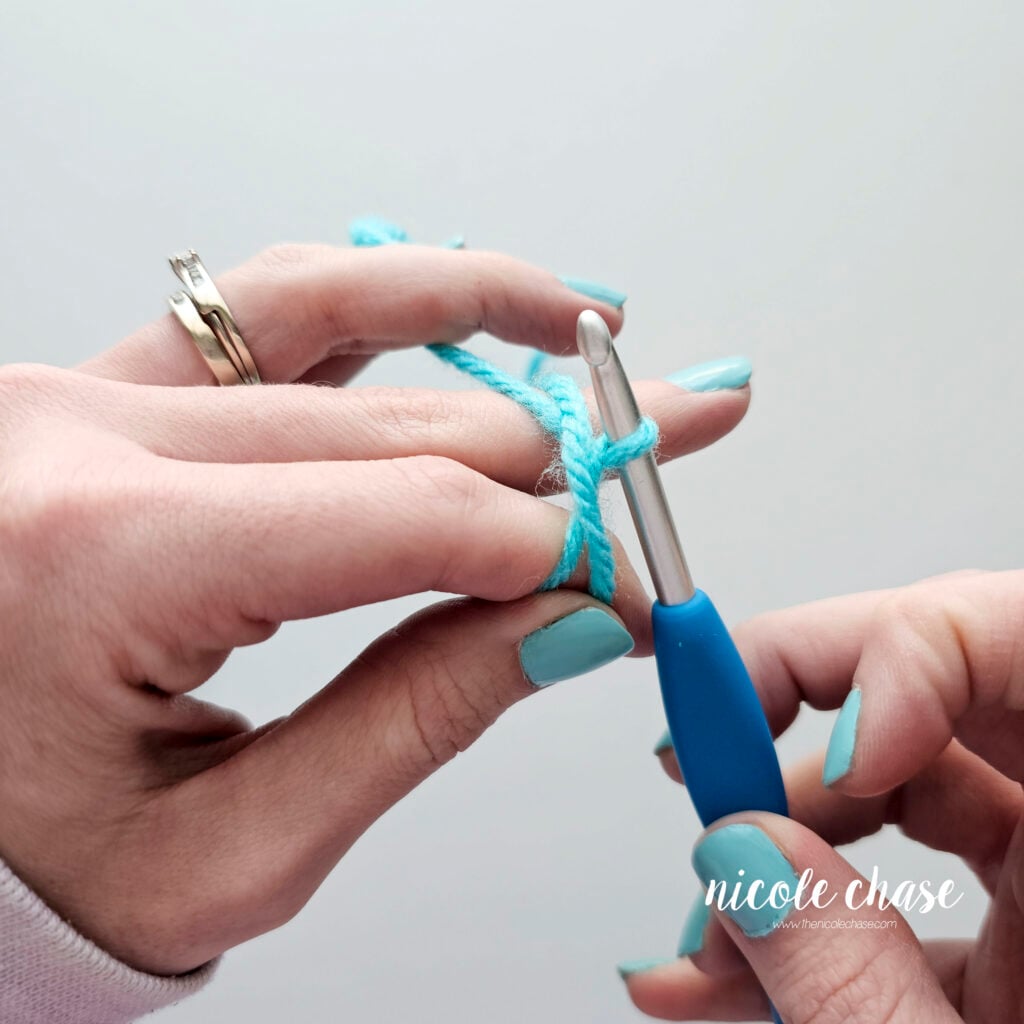
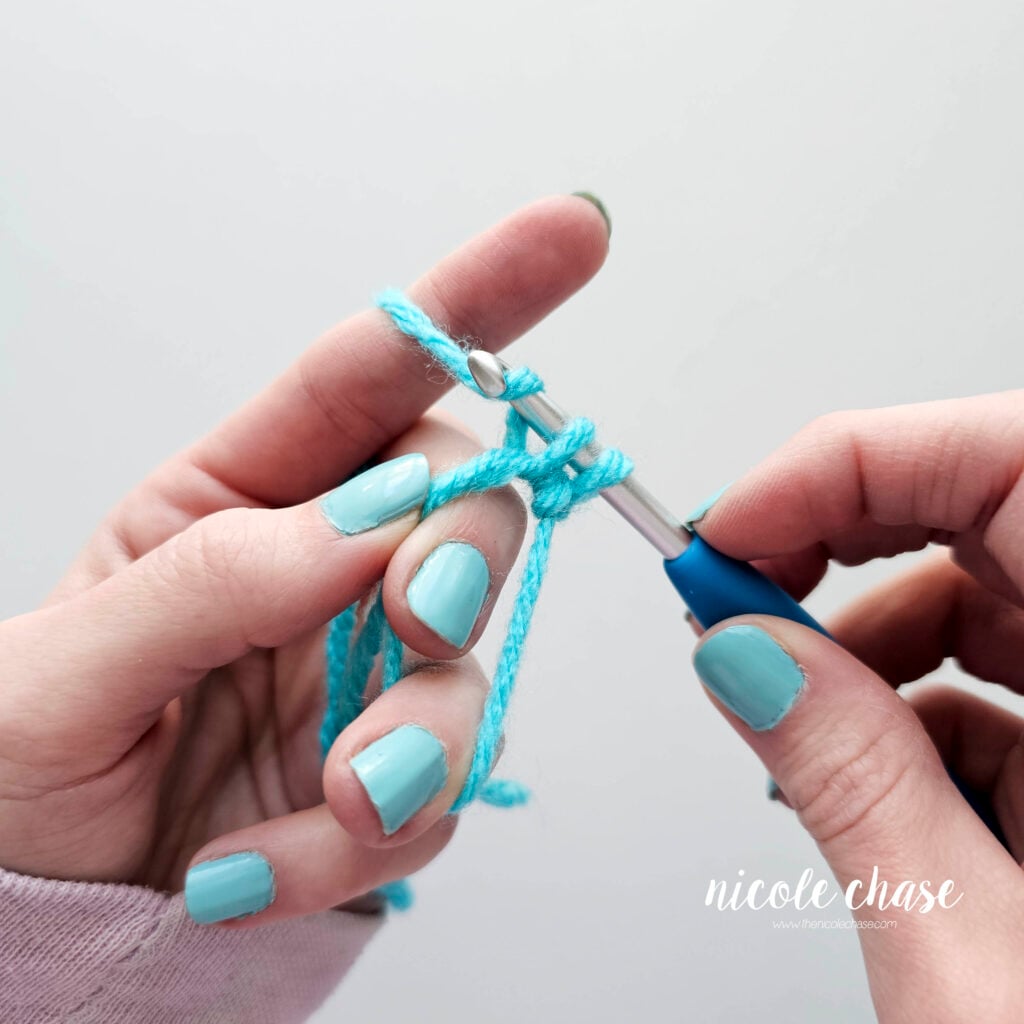
Yarn over and pull through to create a chain 1. This secures the ring so you can remove your fingers.
Note: If you are working a taller stitch, such as a double crochet, you may need to add an additional chain here.
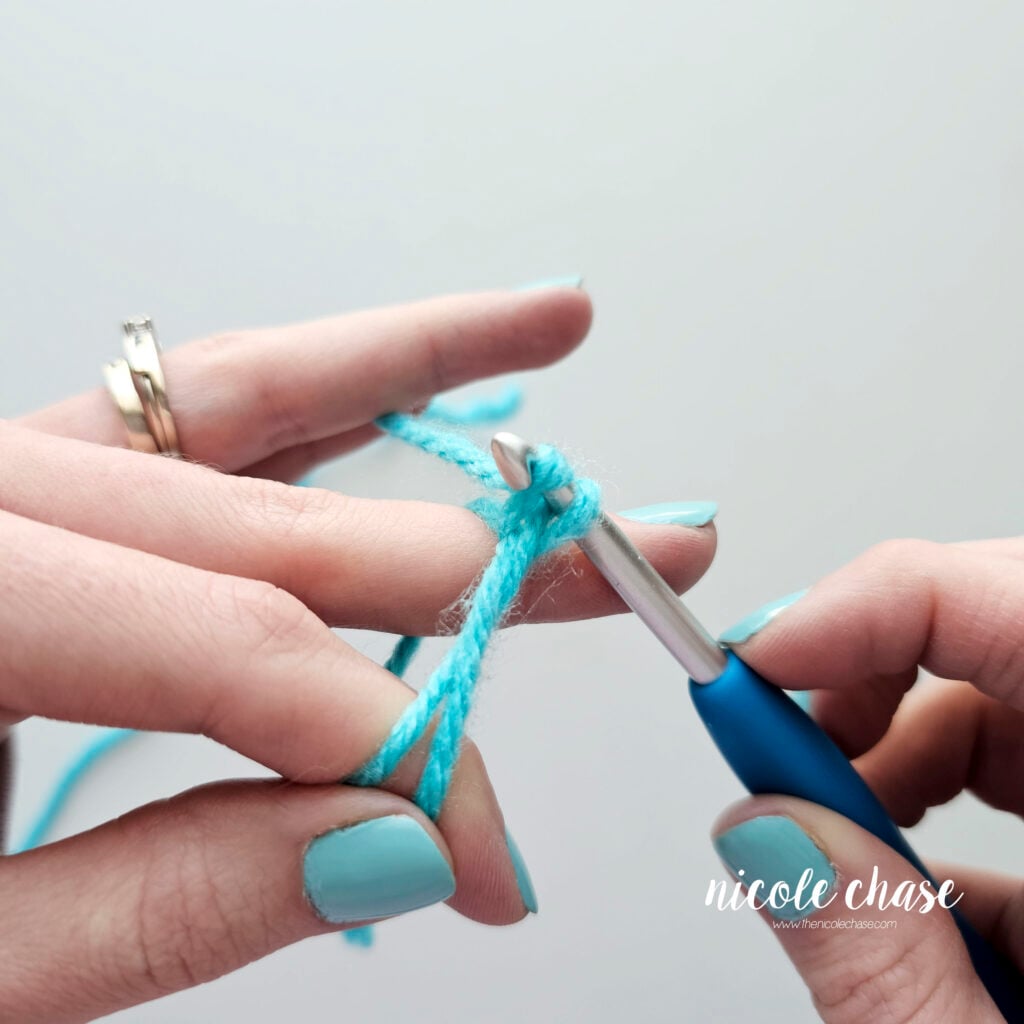
Carefully remove your fingers.
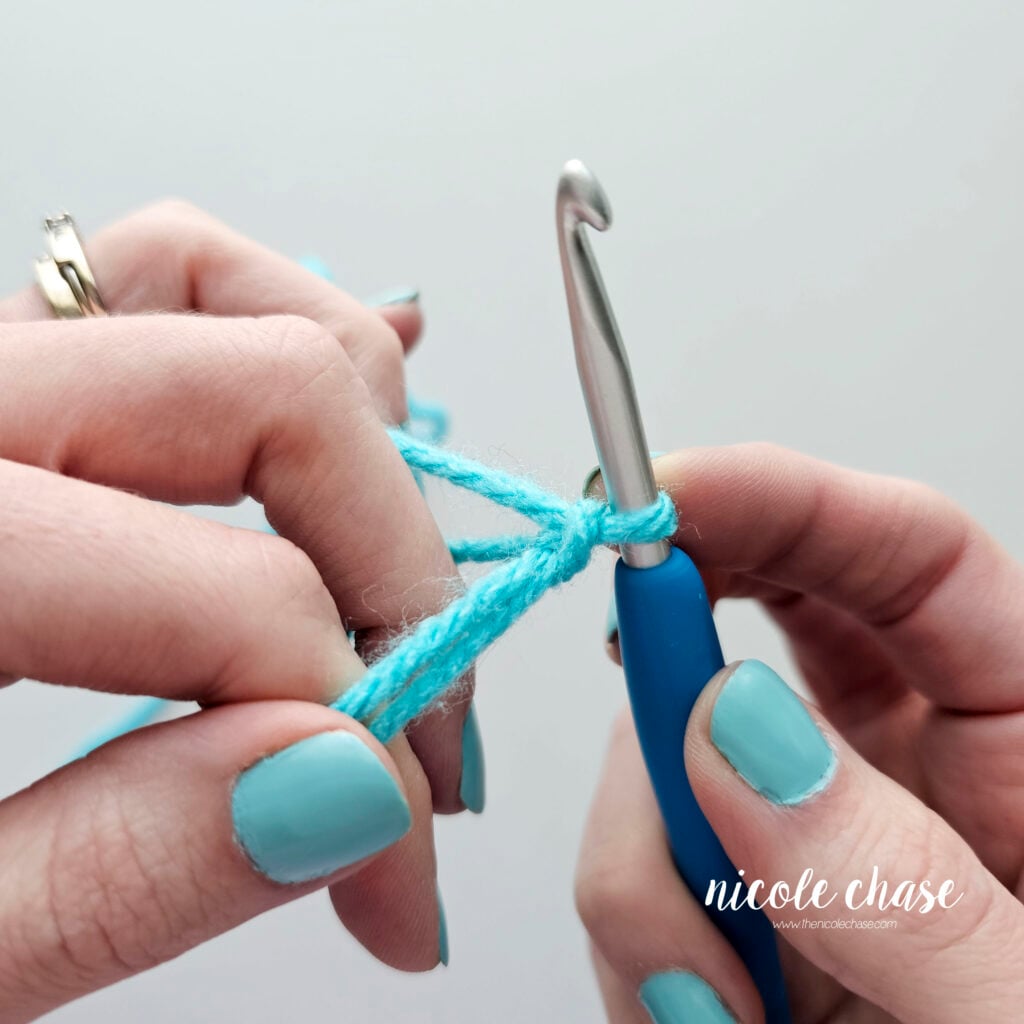
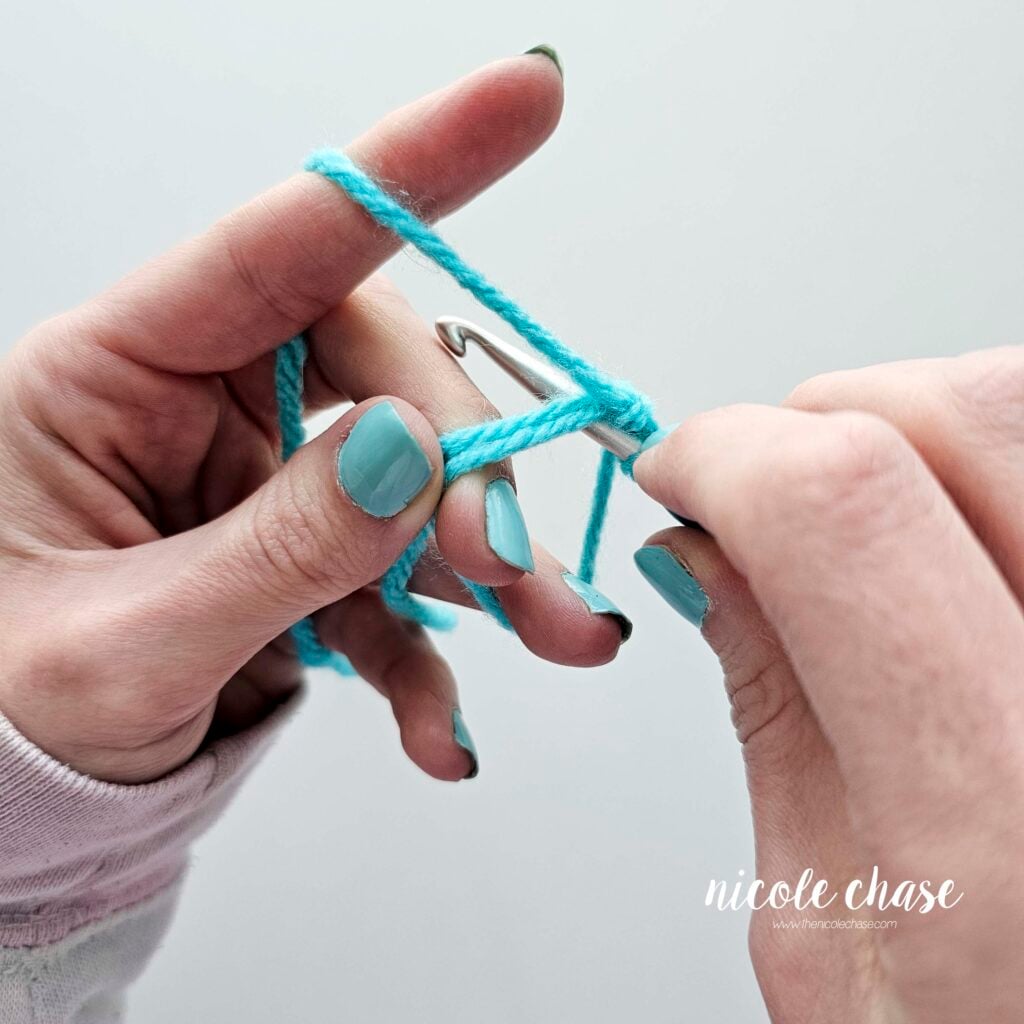
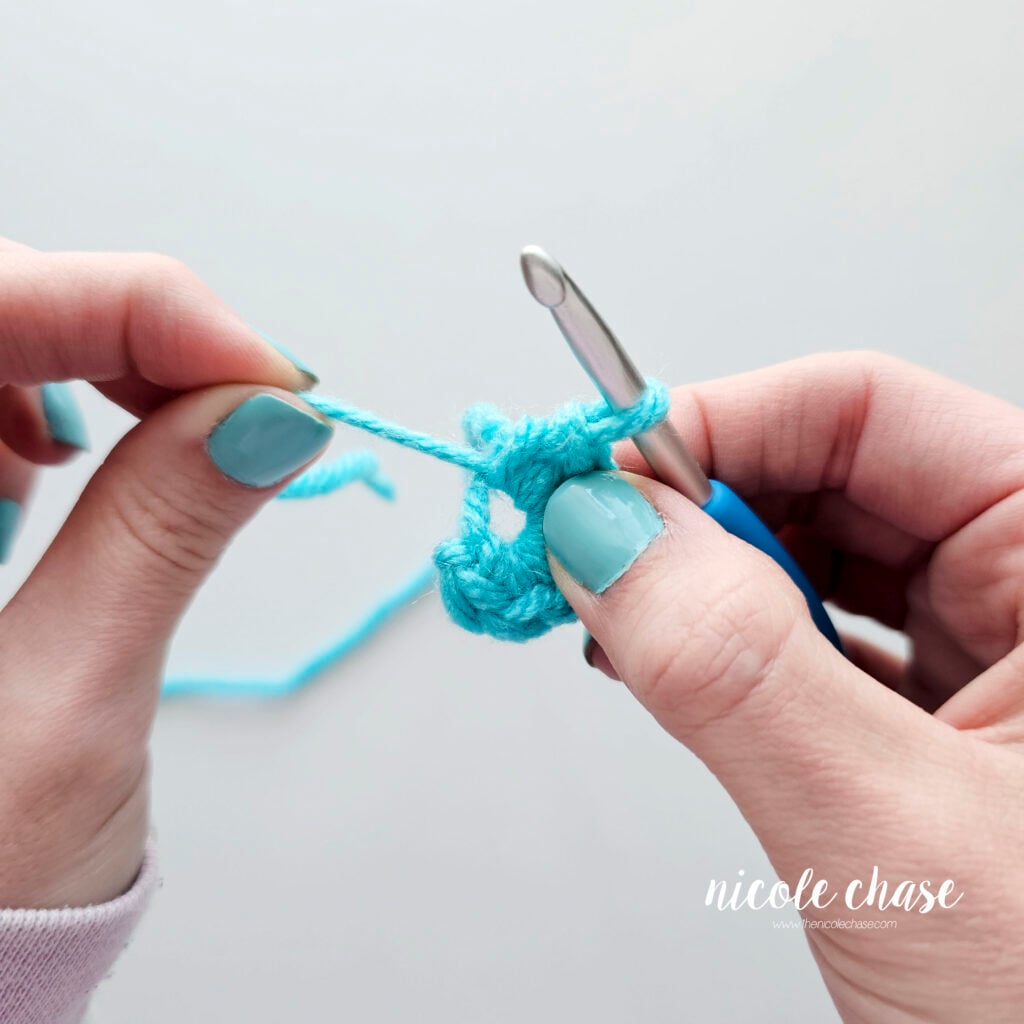
Step 4: Work Your Stitches
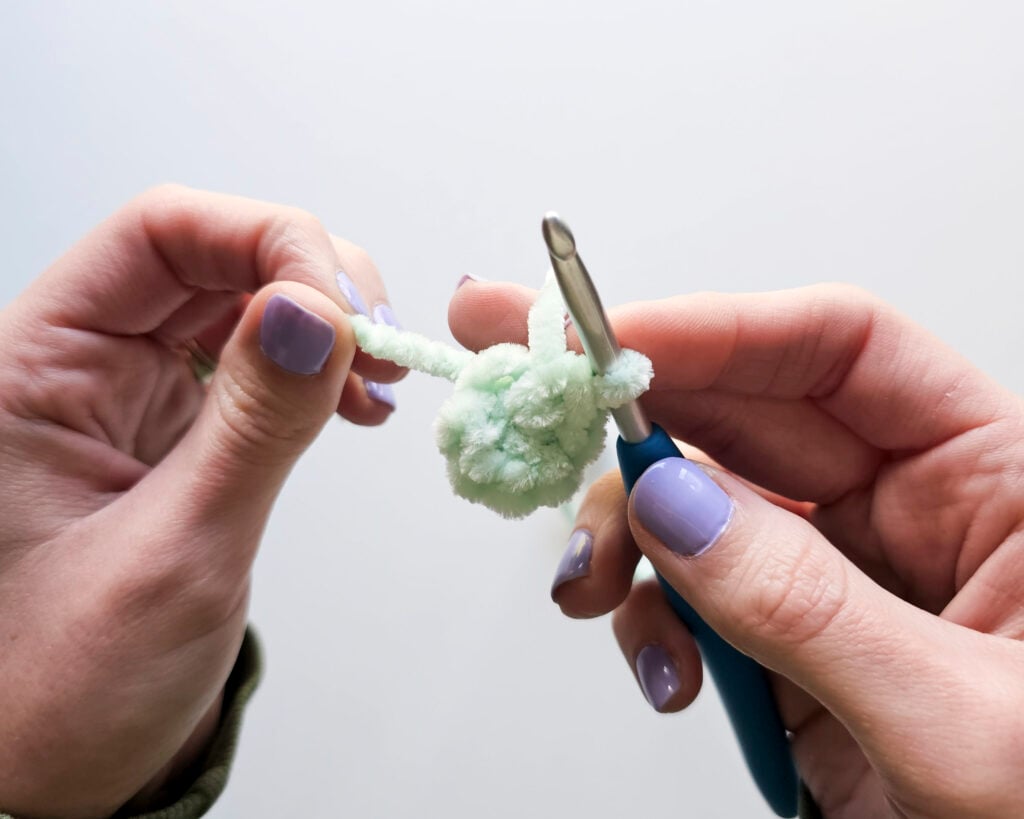
Work your required number of stitches (often 6 SC for amigurumi) into the center of the ring.
Important: Make sure you are crocheting your stitches over both the loop and the yarn tail. If you miss the tail, the ring won’t pull closed!

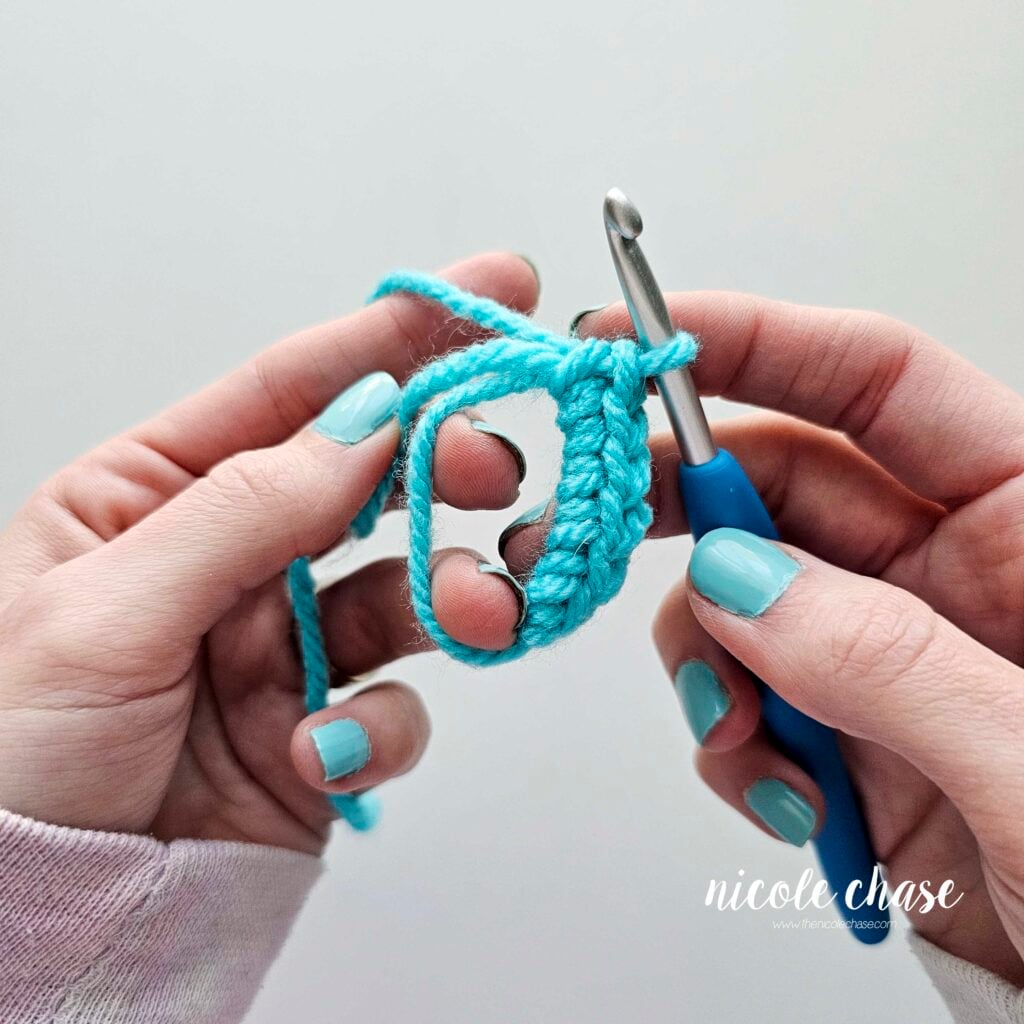
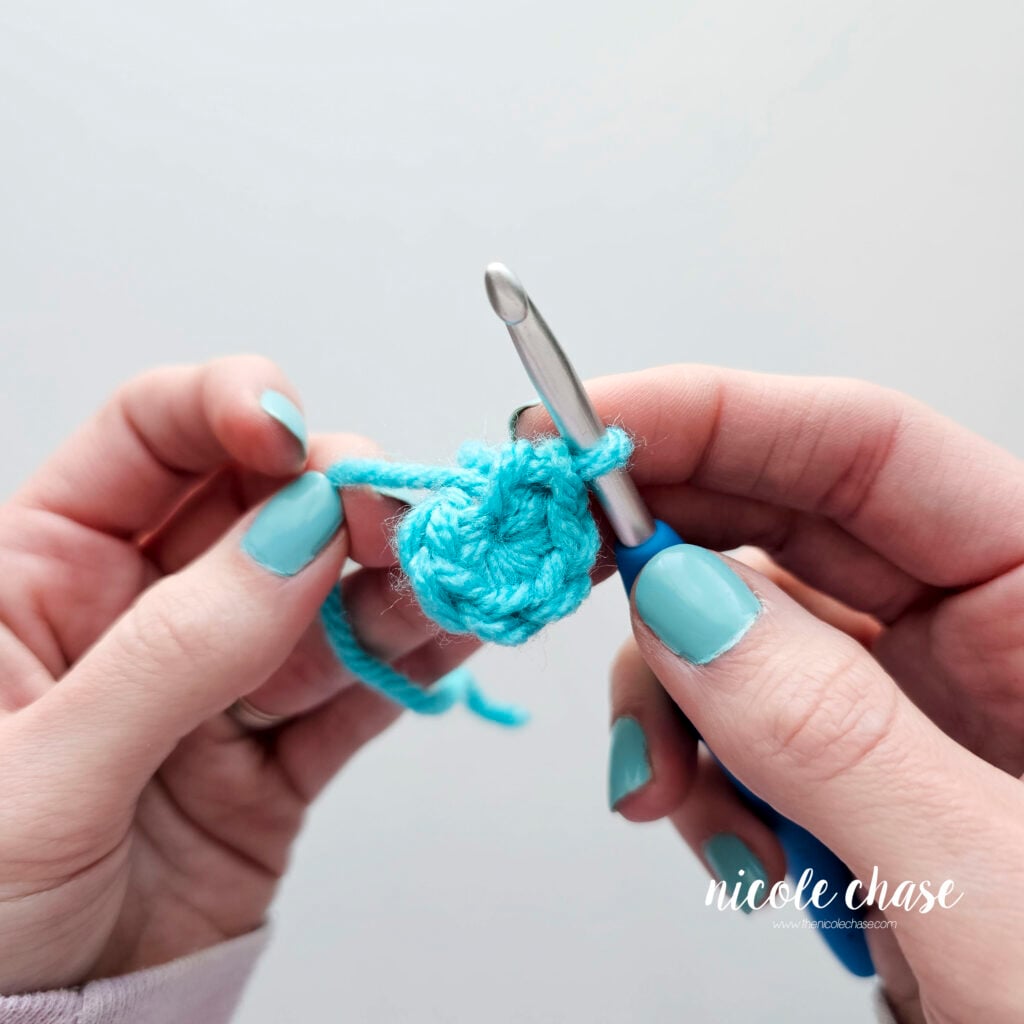
Step 5: Pull it Tight
Once your stitches are complete, hold the fabric firmly and gently pull the yarn tail. You will see the center hole disappear completely!

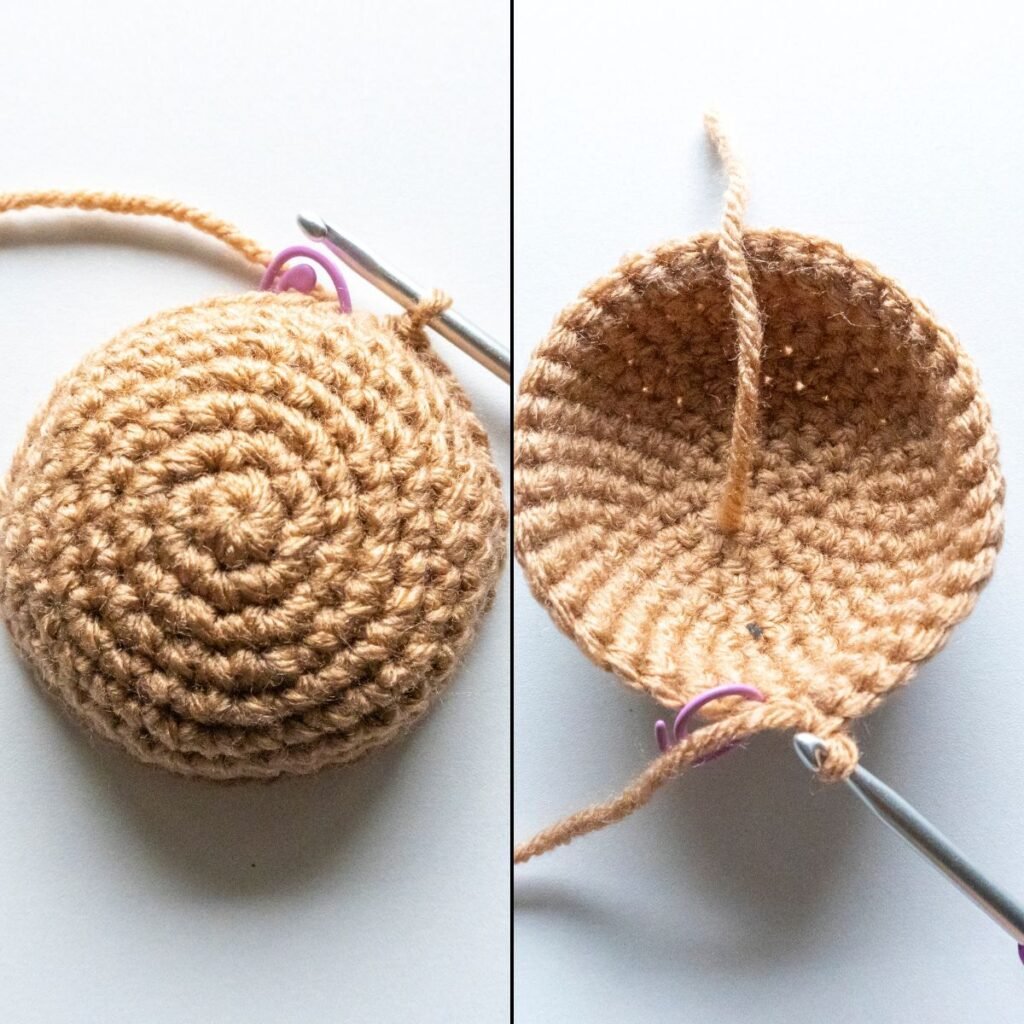
Designer Tip: Make Your Magic Ring Secure
After pulling my magic ring tight, I always tie the yarn tail and the working yarn together in a secure knot before moving on to Round 2.
While some crocheters prefer to avoid knots, I find that this is the best way to ensure the magic ring never comes undone, especially for amigurumi that will be handled or played with. Since most of my projects are plushies, the knot and yarn tail will be hidden safely inside the piece, so there’s no need to weave in the ends.

Tips for the Perfect Magic Ring
For the best start to your magic ring, keep these tips in mind:
- Loose First Stitch: Making your first single crochet stitch slightly looser than your normal tension is a game-changer. Once you pull that ring tight, the top of that first stitch can become very tight. By working it a bit more loosely, you’ll have no trouble inserting your hook to begin Round 2.
- Mastering Difficult Yarns (Chenille & Fur): Making a magic circle with fuzzy or chenille yarn is notoriously difficult because the fibers can shed off and the yarn tends to snap. Work all of your magic ring stitches loosely and pull the tail very gently. If the ring gets stuck, use your fingers to manually push the stitches closer together along the loop before pulling the yarn tail again. This reduces friction and prevents the yarn from breaking.
- The Directional Check: If you find your magic ring isn’t closing, check the direction of your stitches. Ensure you are working counter-clockwise around the loop (for right-handed crocheters). If you accidentally flip the ring and work the other way, the tail will get trapped and won’t glide through the stitches to close the hole.
- Practice with Smooth Yarn: If you are a total beginner, don’t start your first magic ring with chenille yarn. Use a smooth worsted weight acrylic yarn. Being able to clearly see the “V” of your stitches as you work over the two strands of the ring will make the learning process easier.
Magic Ring Alternative (The Chain 2 Method)
While I always recommend mastering the standard magic ring for the best finish, I know it can be frustrating when you’re just starting out. It’s much better to keep crocheting than to get discouraged and quit!
The chain 2 magic ring alternative is a great backup plan, especially in these two scenarios:
- Beginners: If the finger placement for the magic ring feels too fiddly right now, this method will let you get started today while you practice the magic ring on the side.
- Fragile Yarns: If you are working with velvet or chenille yarn that tends to snap when pulled tight, the chain 2 method is much more forgiving.
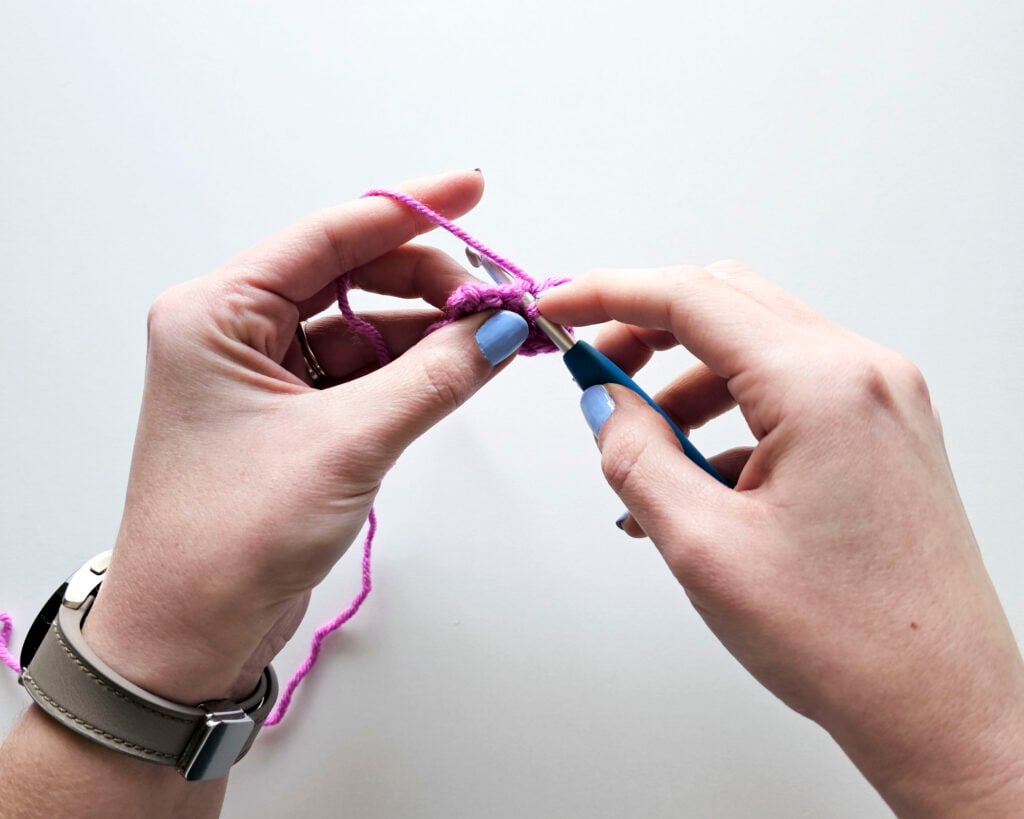
How it Works:
Instead of an adjustable loop, you simply chain 2 and work your first round of stitches directly into the second chain from your hook.
For a complete breakdown, including a video and step-by-step photos, head over to my full tutorial on the magic ring alternative.

Frequently Asked Questions about the Magic Ring
Why is my magic ring not closing?
The most common reason that a magic ring won’t close is that the stitches were worked in the wrong direction or the yarn tail was not kept together with the loop. Ensure you are crocheting over both the loop and the tail.
Can I use a magic ring for blankets or hats?
Yes! While famous for amigurumi, the magic ring is a great way to start any project worked in the round, including top-down hats, circular blankets, and granny squares. It provides a much cleaner center than the traditional chain and join method.
Is the magic circle the same as a magic ring?
Yes. “Magic ring,” “magic circle,” “adjustable loop,” and “magic loop” are all different names for the exact same technique. In crochet patterns, you will often see it abbreviated as MR or MC.
What if my yarn keeps snapping when I pull the magic ring?
If you are using a fragile or bulky yarn that breaks easily, try making your stitches slightly looser than usual. If it still breaks, it may be better to use a magic ring alternative like the chain 2 method.
Ready to Master Amigurumi?
If you’ve gotten the hang of how to make a magic ring and are ready to create your very first plushie, this is for you! I created my Amigurumi for Beginners course especially to help you move past the basics and start making cute, professional-quality toys with confidence.
In the course, I walk you through everything from reading patterns to seamless color changes, and more! Join the Amigurumi for Beginners course today and let’s start making something amazing!
Learn How to Crochet Amigurumi!
Sign up for my free amigurumi for beginners course and learn everything you need to know to make your own crochet plush!
To see what is included, check out the course summary page!
More Beginner Crochet Tutorials
If you’re building your crochet skills, after this magic circle tutorial, you might find some of my other tutorials helpful for your next project:
- Magic Ring Alternative (Chain 2 Method): The perfect backup plan for when the magic ring just isn’t cooperating.
- How to Crochet a Slip Knot and Chain: Go back to the beginning and master this crochet basic.
- Crocheting in the Round for Beginners: Now that you’ve started your magic ring, learn how to keep going to create 3D shapes.
- Right Side vs. Wrong Side in Amigurumi: Don’t let your plushies be inside out! Learn how to identify the “pretty” side of your work.


First published October 2022.
I hope you enjoyed this post! Be sure to leave me a comment below to let me know what you think.
Want to see more from me? Be sure to subscribe to my email newsletter so that you never miss a post!
Follow along with me on Instagram for daily updates and a behind the scenes look at my designs.
I’d love to see what you make with this tutorial! Don’t forget to share your finished work with me: on social media by tagging me @thenicolechase, in your Ravelry projects, or post over in my Facebook group!
Thanks for stopping by! Happy crafting!
Nicole
PATTERN COPYRIGHT © 2026 NICOLE CHASE. ALL RIGHTS RESERVED.
PATTERN MAY NOT BE ALTERED, COPIED, REDISTRIBUTED OR SOLD AS YOUR OWN PATTERN.
YOU MAY SELL THE FINISHED PRODUCT ON A SMALL SCALE. PATTERN/DESIGN CREDIT GIVEN TO WWW.THENICOLECHASE.COM IS APPRECIATED. PERMISSION TO SELL DOES NOT INCLUDE MASS PRODUCTION. LARGE SCALE PRODUCTION IS PROHIBITED.
PHOTOGRAPHY COPYRIGHT © 2026 NICOLE CHASE. ALL RIGHTS RESERVED.
PHOTOS MAY NOT BE ALTERED, COPIED, REDISTRIBUTED OR SOLD AS YOUR OWN.
This post may contain affiliate links. If you make a purchase through links on our site, we may earn a commission.