Hailey the Horse – Free Crochet Pattern
This post may contain affiliate links. If you make a purchase through links on our site, we may earn a commission.
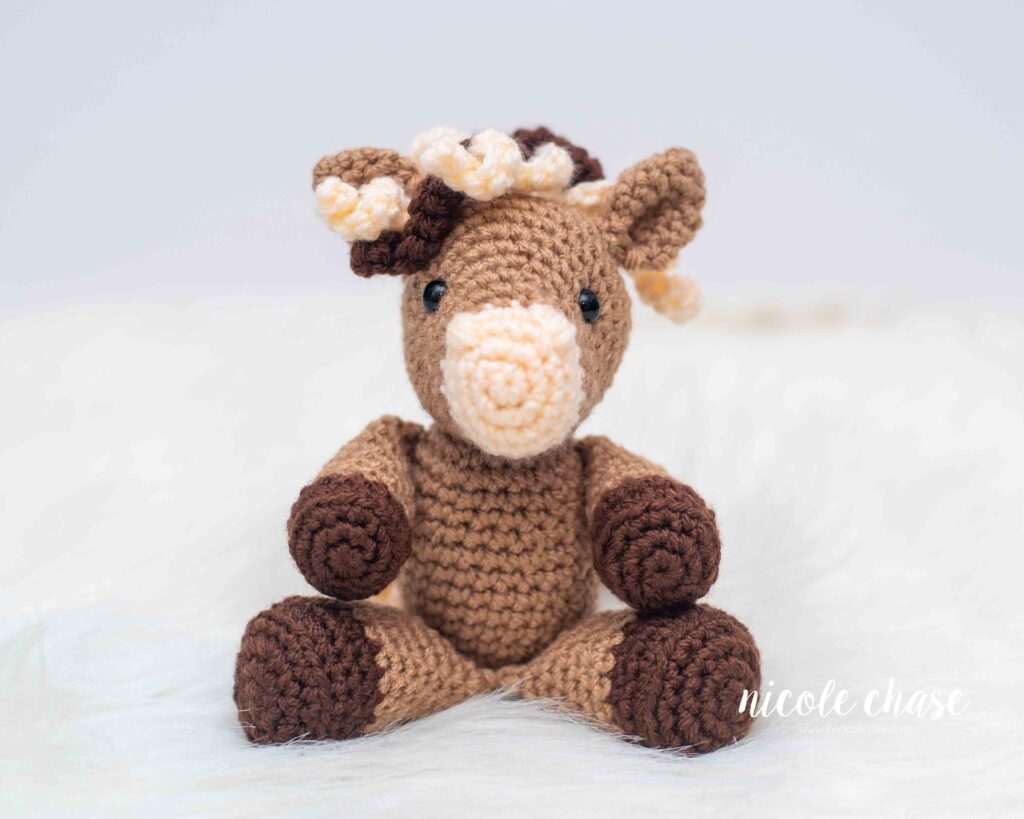
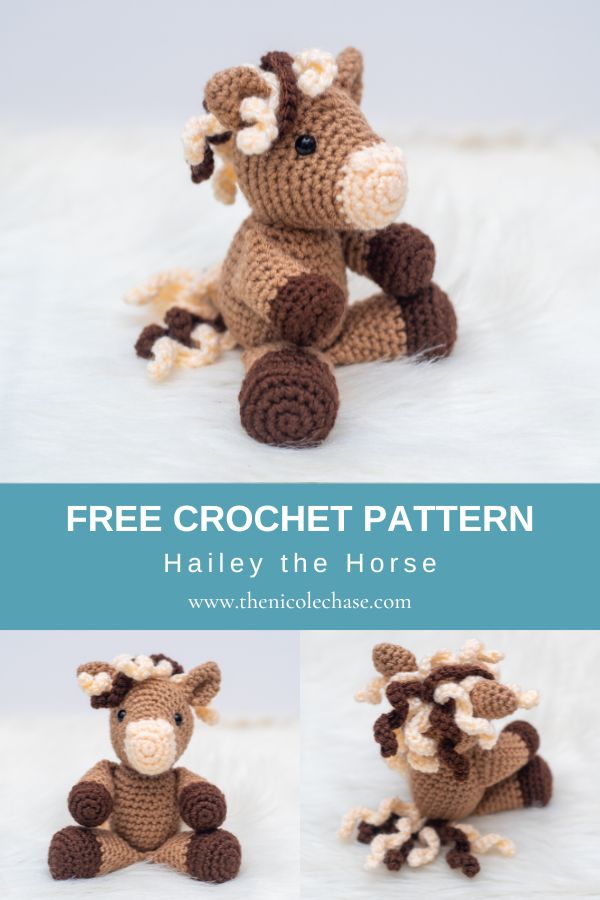
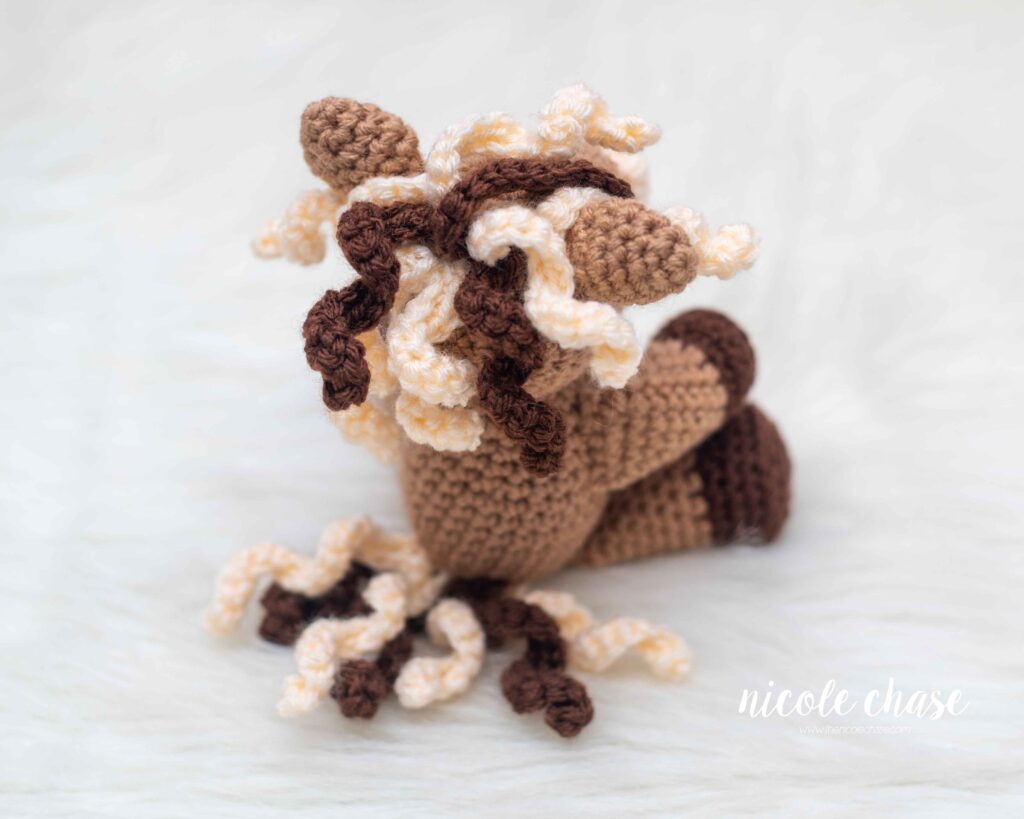
I’m so happy to share this cute horse crochet pattern, Hailey the Horse! This free horse crochet pattern is the latest addition to my farm animal collection. This crochet horse pattern is great for all skill levels and works up very quickly. I just love her curly mane!
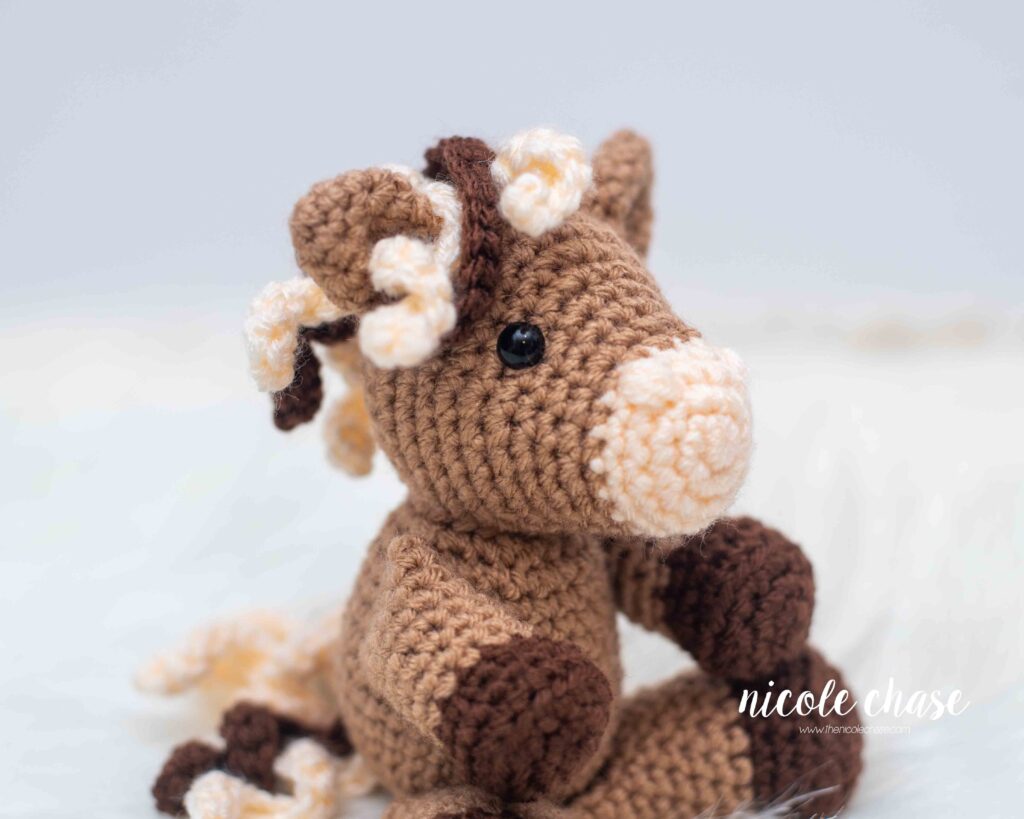
Table of Contents
I hope you enjoy this free crochet pattern available here on my blog! An ad-free, formatted PDF version of this crochet pattern is also available for purchase here:
I would classify this horse crochet pattern as “advanced beginner”. It would be helpful to have had some experience with amigurumi before creating this project.
Pin this free horse crochet pattern for later.
Add this free horse crochet pattern to your favorites and save it to your project queue on Ravelry.
Free Crochet Pattern for Hailey the Horse

Pattern Specifics
Measurements: Approximately 5.5” tall (sitting) or 7.5” tall (standing)
Gauge: Not necessary for this pattern; see notes
Hook Size: 4.0mm (G) crochet hook
Other Tools: tapestry needle/yarn needle, stitch markers, scissors (grab these on Amazon)
Yarn Weight: Medium (4) Worsted Weight
Yarn Used: WeCrochet / Knit Picks Brava Worsted
Yardage: color A (brown): 70 yds, color B (cream): 18 yds, color C (dark brown): 30 yds
Other Materials: poly-fil stuffing, 9mm safety eyes
Stitch Abbreviations
st = stitch
sl st = slip stitch
ch = chain
SC = single crochet
SC2tog = single crochet 2 stitches together (invisible decrease is recommended)
DC = double crochet
Special Stitches
SC2tog (using invisible decrease method): Insert hook into front loop of the first stitch. Insert hook into front loop of second stitch. Yarn over. Draw through the first two loops on hook. Yarn over. Draw through both loops on hook.
Notes
- Checking your gauge is not required for this pattern. Use a hook that is smaller than the size recommended for your yarn weight. This will ensure that your stuffing will not show through the stitches.
- All pieces, with the exception of the curls, are worked in the round. Use a stitch marker to indicate the beginning of each round.
- Invisible decreases are recommended. Please see “Special Stitches”.
- Safety eyes and noses pose a choking risk for babies; therefore, if making this toy for a baby, I recommend using yarn, felt, or embroidered details.
- Body, head, legs, and arms require stuffing. Stuff each piece as you work to ensure the piece is completely filled. Do not add stuffing to the ears.
- See tutorial photos.
Pattern
Using 4.0mm (G) hook:
Body
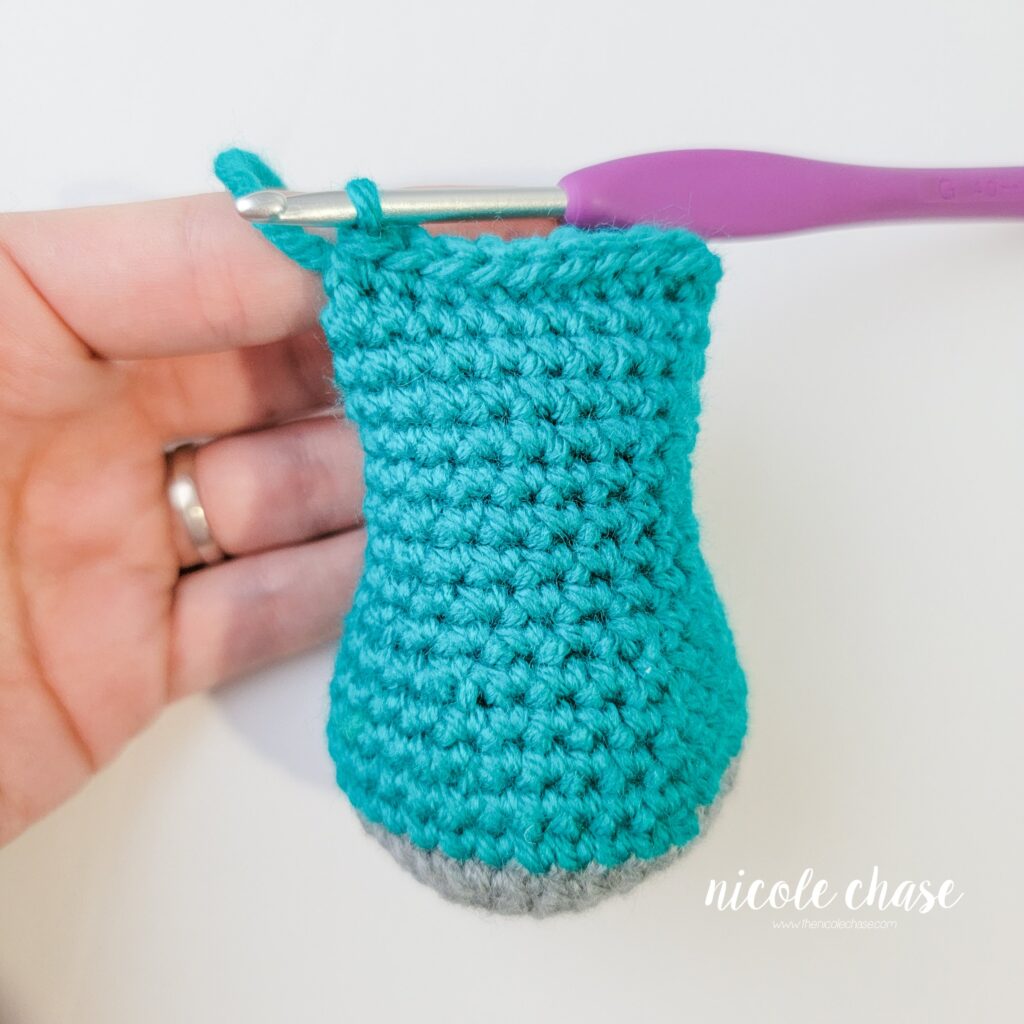
Using color A (shown as brown):
R1: Begin with 6 SC in a magic ring. (6 sts)
R2: 2 SC in each st around. (12 sts)
R3: *2 SC in next st, 1 SC in next st. Repeat from * around. (18 sts)
R4: *2 SC in next st, 1 SC in each of the next 2 sts. Repeat from * around. (24 sts)
R5: *2 SC in next st, 1 SC in each of the next 3 sts. Repeat from * around. (30 sts)
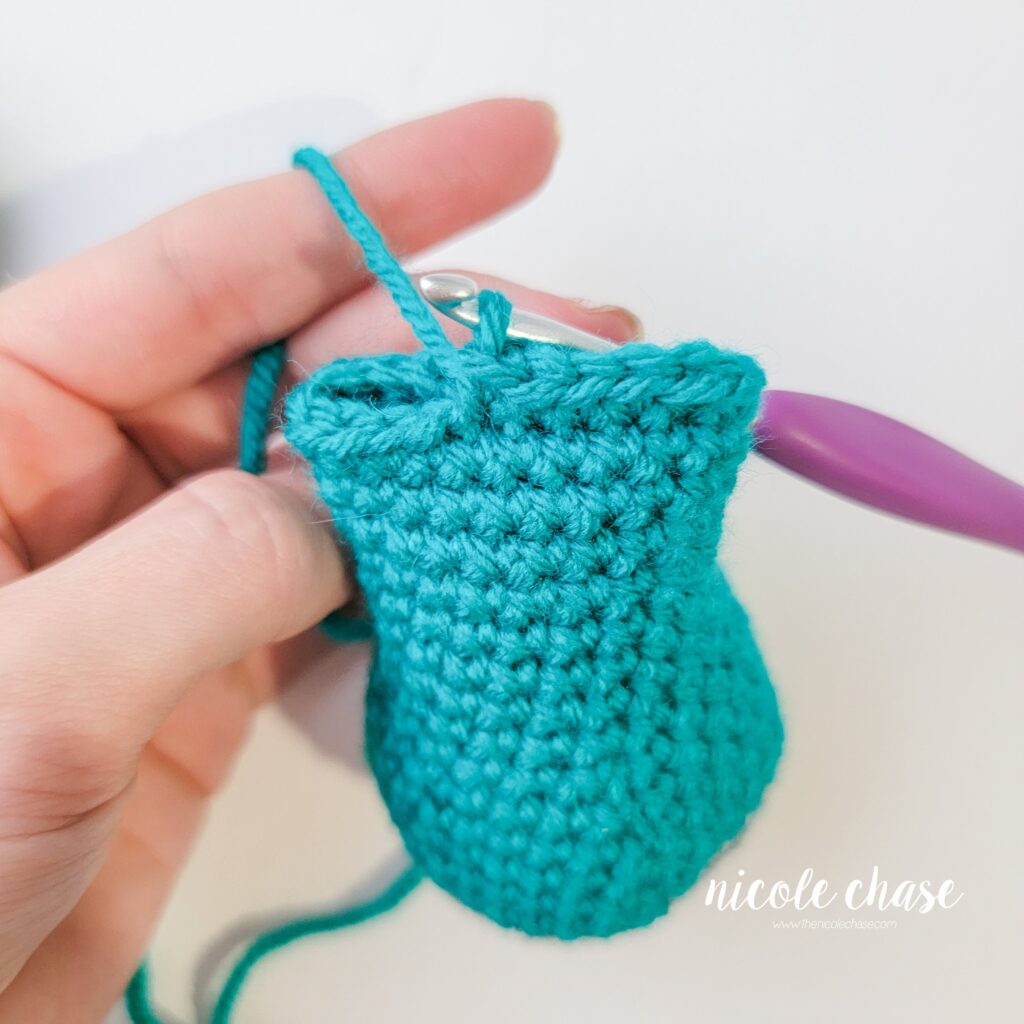
R6-11: 1 SC in each st around. (30 sts)
R12: *SC2tog, 1 SC in each of the next 3 sts. Repeat from * around. (24 sts)
R13-15: 1 SC in each st around. (24 sts)
R16: *SC2tog, 1 SC in each of the next 2 sts. Repeat from * around. (18 sts)
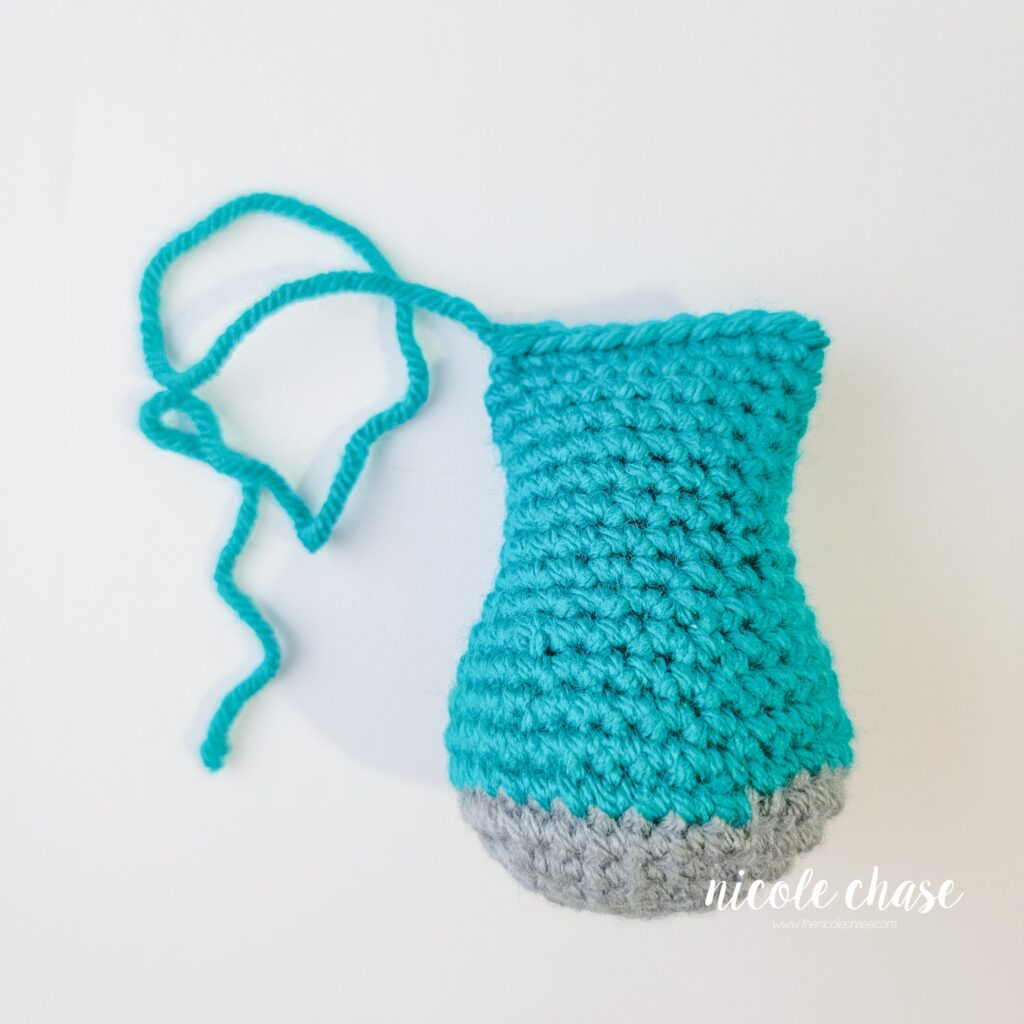
Cut yarn, leaving long strand for sewing. Fasten off.
Fill with stuffing.
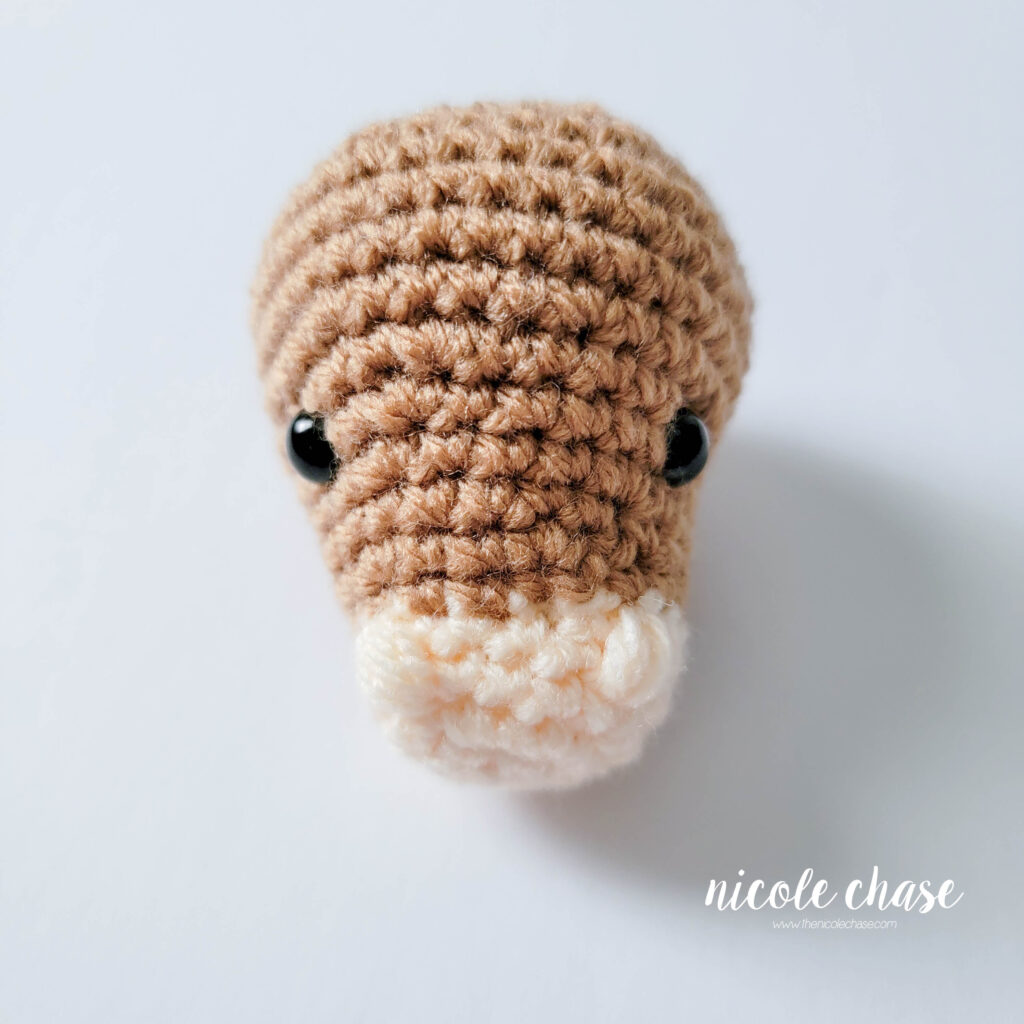
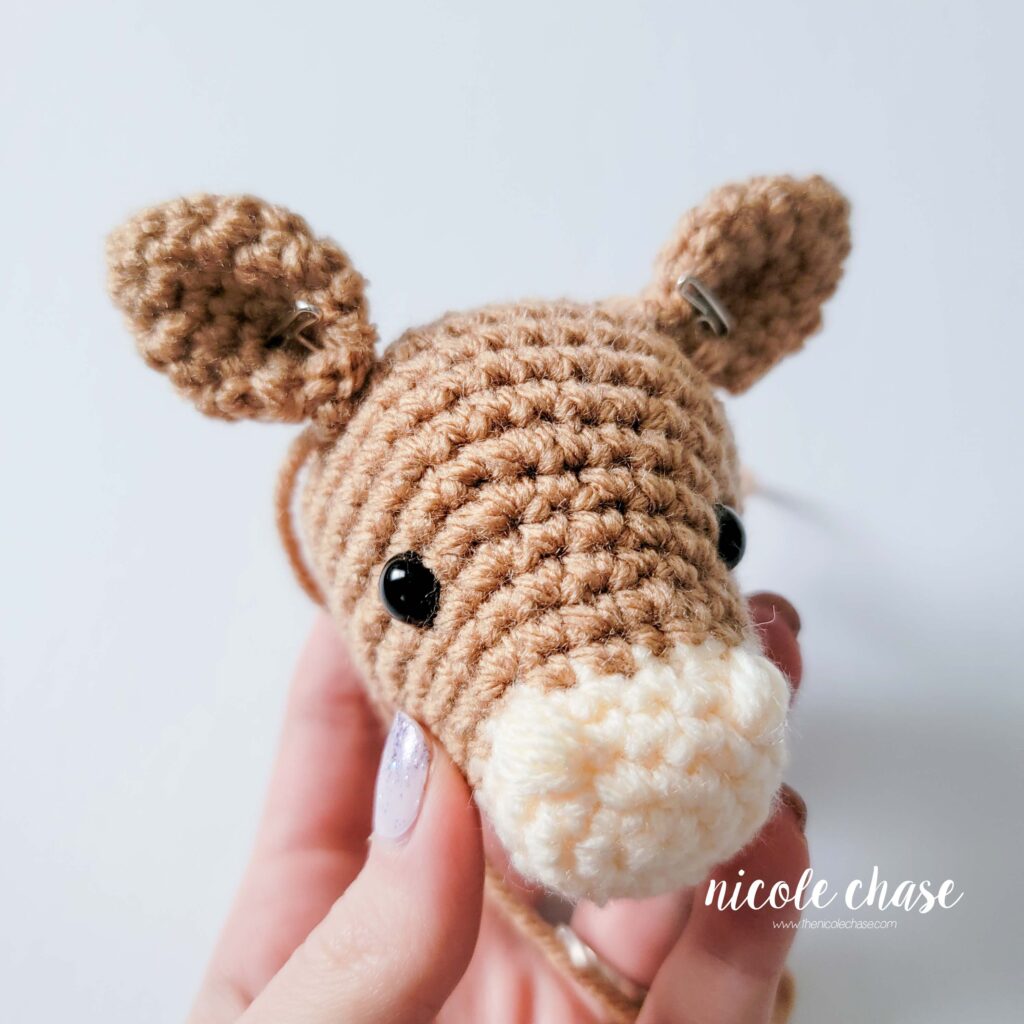
Head
Using color B (shown as cream):
R1: Begin with 6 SC in a magic ring. (6 sts)
R2: 2 SC in each st around. (12 sts)
R3: *2 SC in next st, 1 SC in next st. Repeat from * around. (18 sts)
R4-5: 1 SC in each st around. (18 sts)
Using color A (shown as brown):
R6: 1 SC in each st around. (18 sts)
R7: *2 SC in next st, 1 SC in each of the next 2 sts. Repeat from * an additional 2 times. 1 SC in each of the next 9 sts around. (21 sts)
R8: 1 SC in each st around. (21 sts)
R9: *2 SC in next st, 1 SC in each of the next 3 sts. Repeat from * an additional 2 times. 1 SC in each of the next 9 sts around. (24 sts)
R10: *2 SC in next st, 1 SC in each of the next 4 sts. Repeat from * an additional 2 times. 1 SC in each of the next 9 sts around. (27 sts)
R11: *2 SC in next st, 1 SC in each of the next 5 sts. Repeat from * an additional 2 times. 1 SC in each of the next 9 sts around. (30 sts)
R12: *2 SC in next st, 1 SC in each of the next 4 sts. Repeat from * an additional 2 times. Add a st marker to the last worked st. **2 SC in next st, 1 SC in each of the next 4 sts. Repeat from ** an additional 2 times. (36 sts)
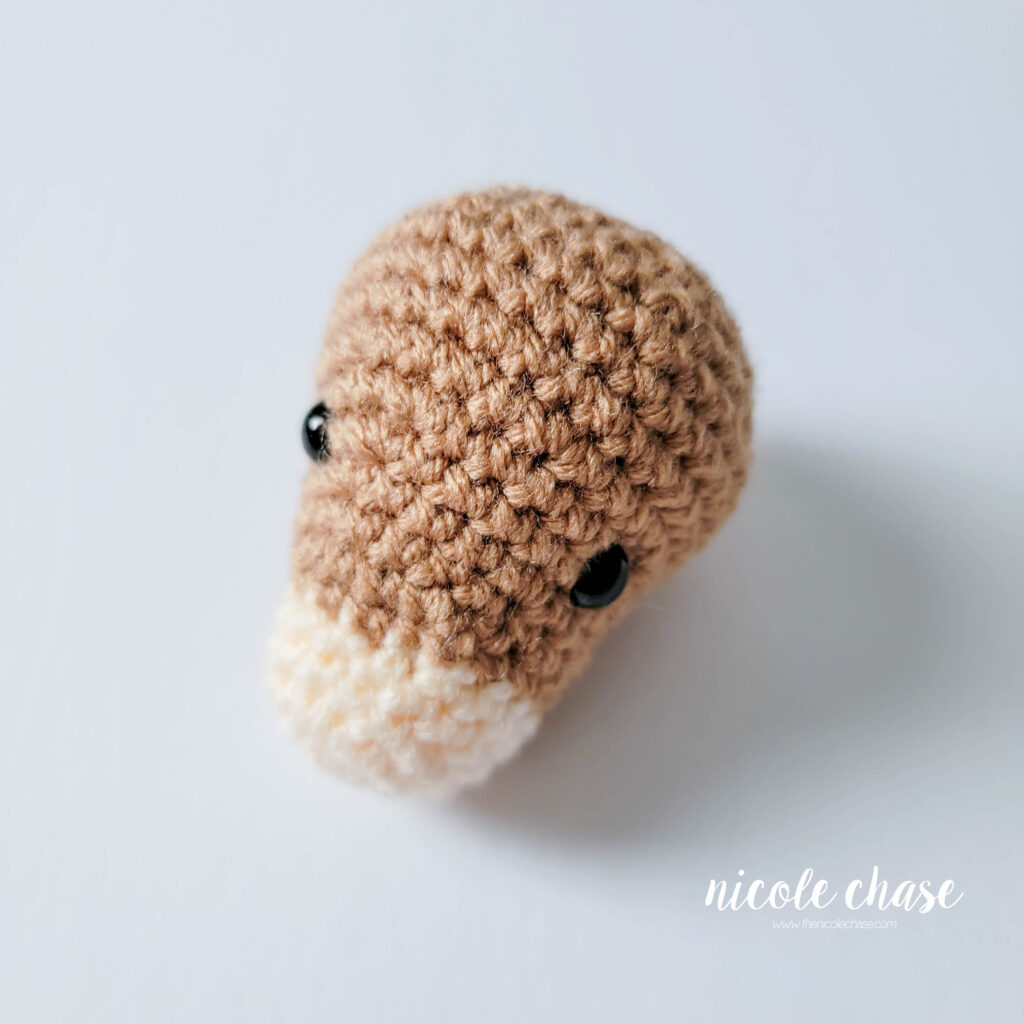
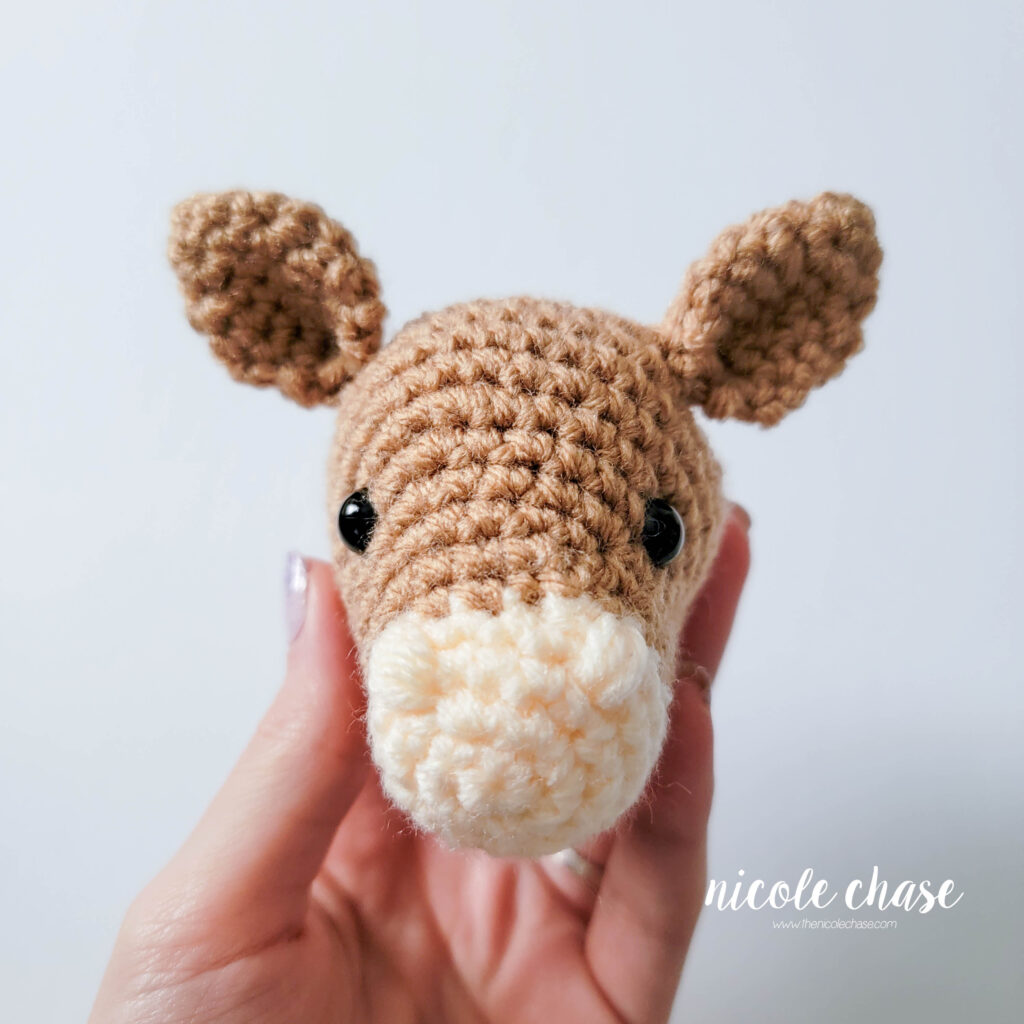
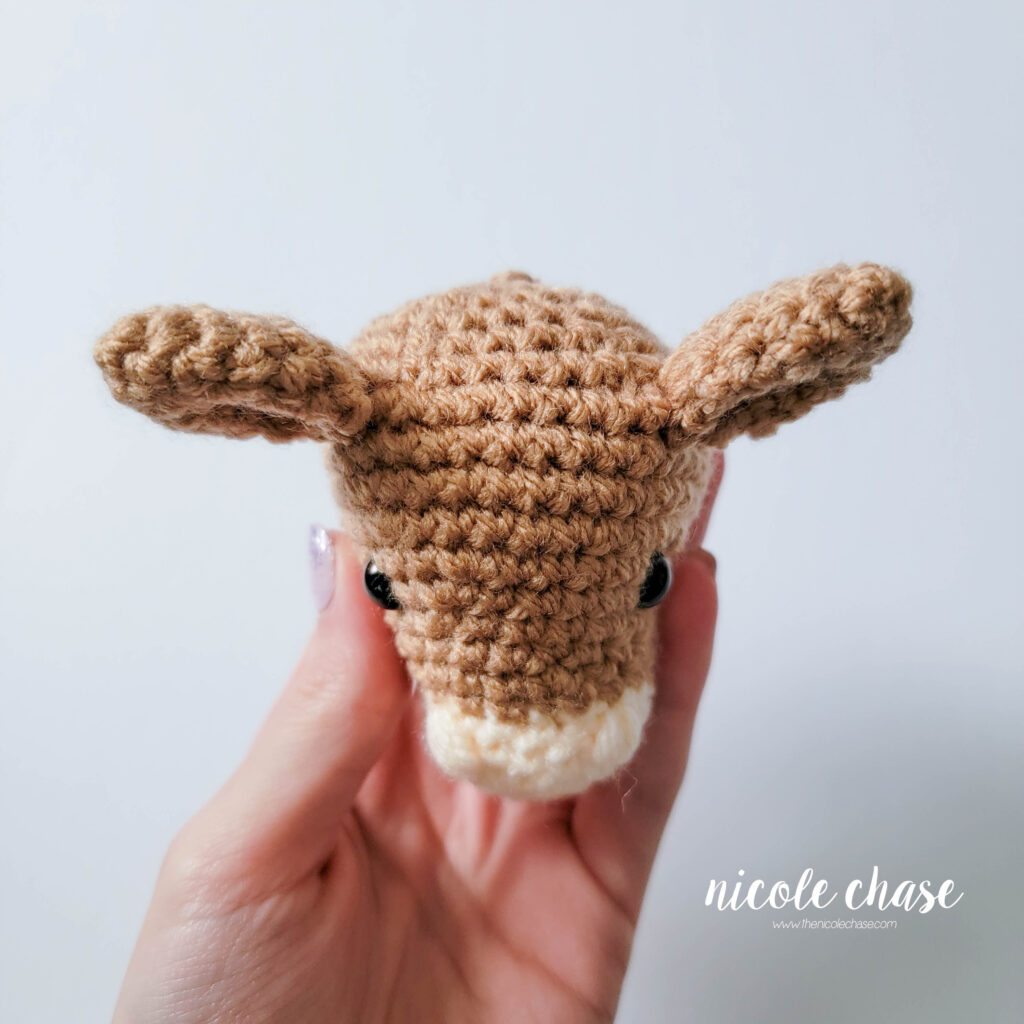
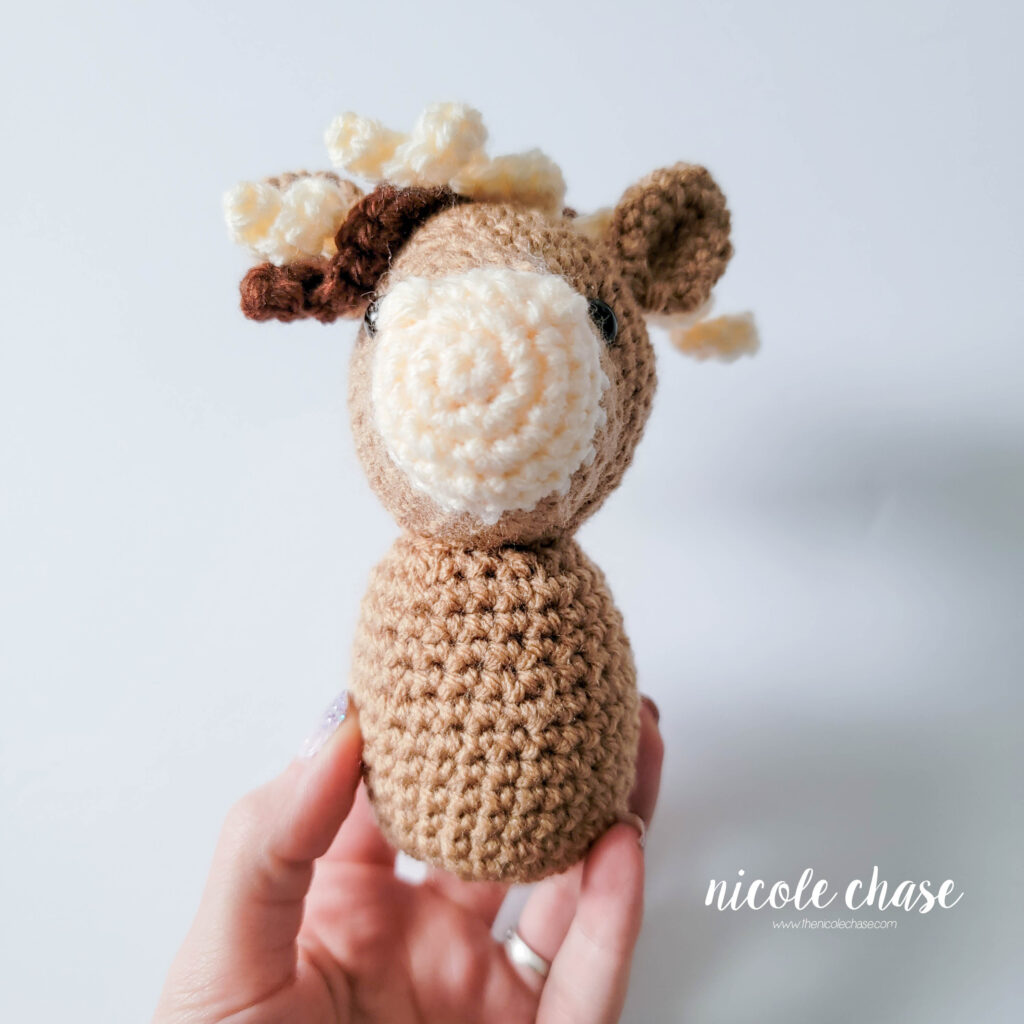
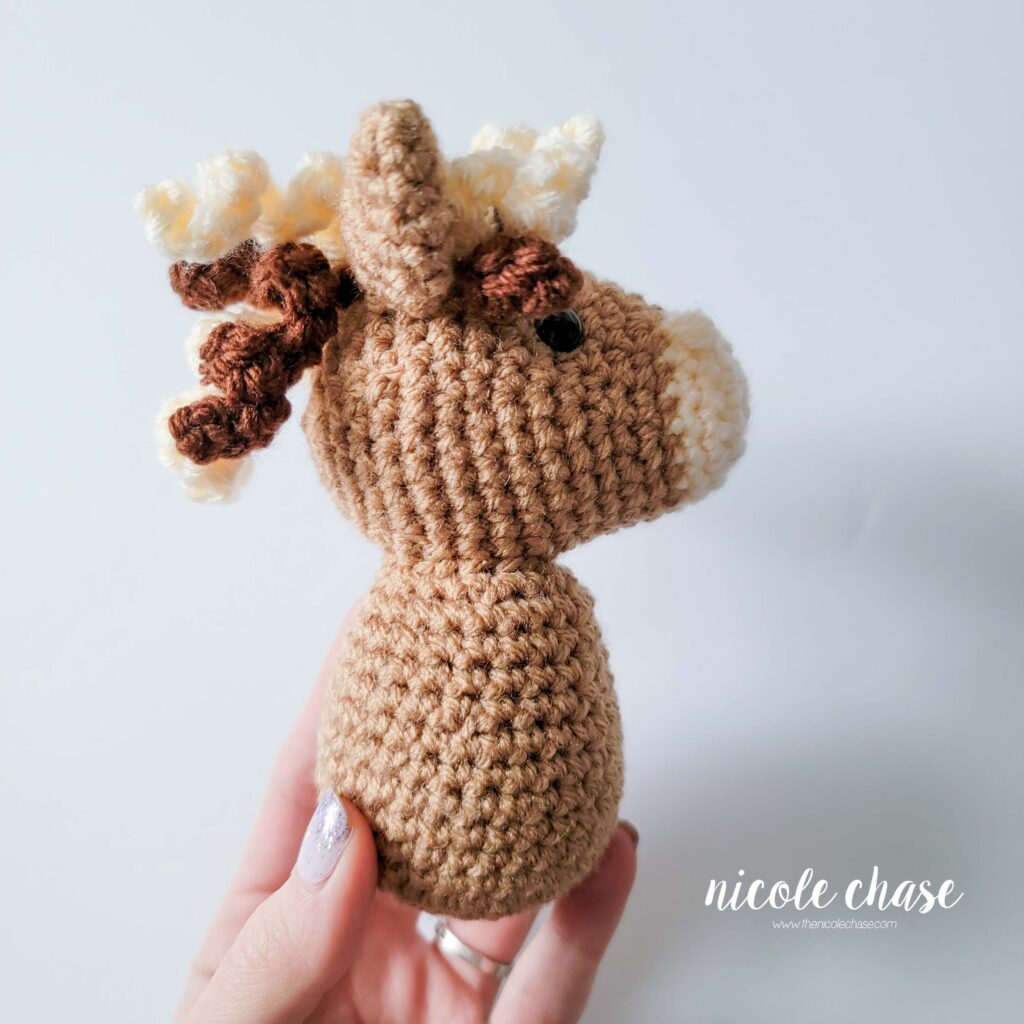
The added st marker, and the st marker at the beginning of this round helps to indicate the front sides of the face. The first sequence of sts between the first and second st markers indicates the top of the head. The second sequence of sts between the second and first st markers indicates the bottom of the head. If using safety eyes, insert eyes between R10-11, with 8 sts between. You can now remove your second st marker. See tutorial photos.

R13-15: 1 SC in each st around. (36 sts)
R16: *SC2tog, 1 SC in each of the next 4 sts. Repeat from * around. (30 sts)
R17: *SC2tog, 1 SC in each of the next 3 sts. Repeat from * around. (24 sts)
R18: 1 SC in each st around. (24 sts)
R19: *SC2tog, 1 SC in each of the next 2 sts. Repeat from * around. (18 sts)
R20: *SC2tog, 1 SC in next st. Repeat from * around. (12 sts)
Fill head with stuffing.
R21: *SC2tog. Repeat from * around. (6 sts)
Cut yarn, leaving long strand. Weave yarn in and out of remaining sts. Pull tight to close. Tie off and weave in ends.
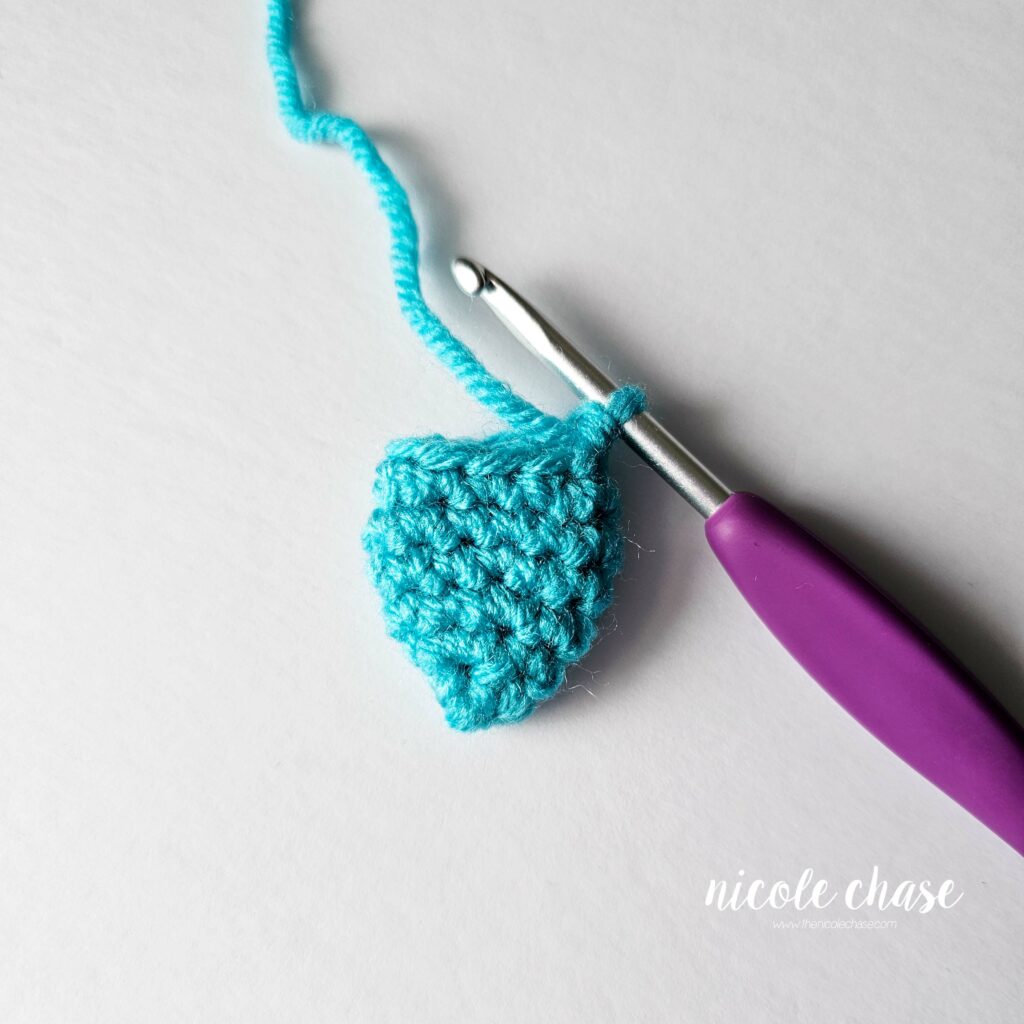
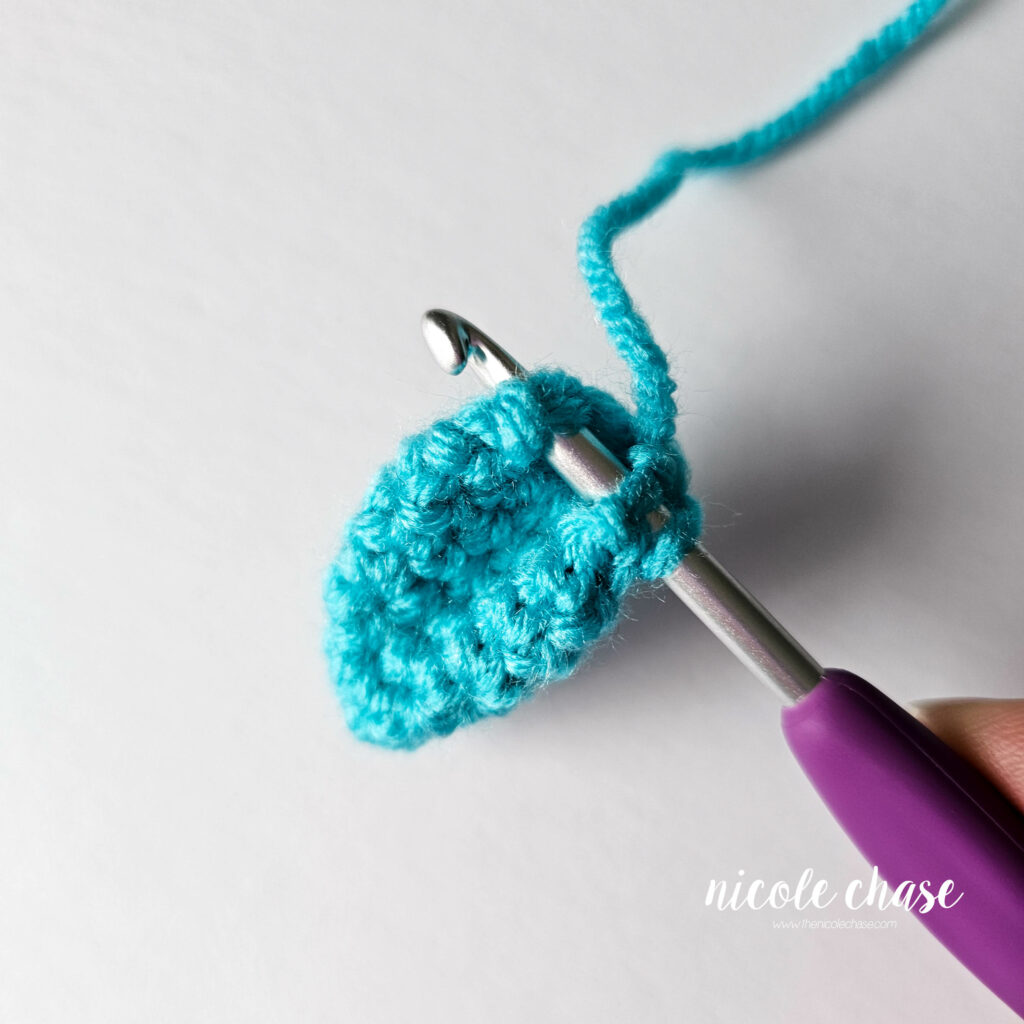
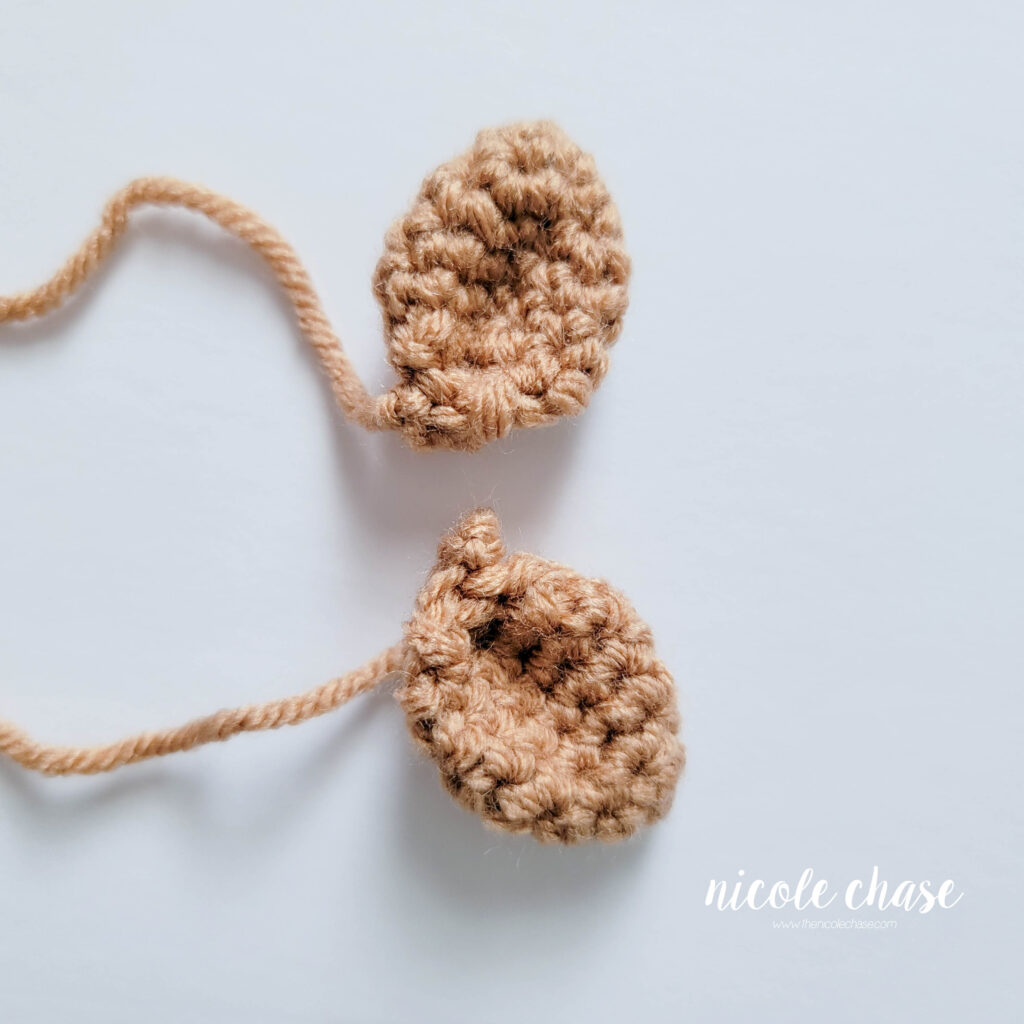
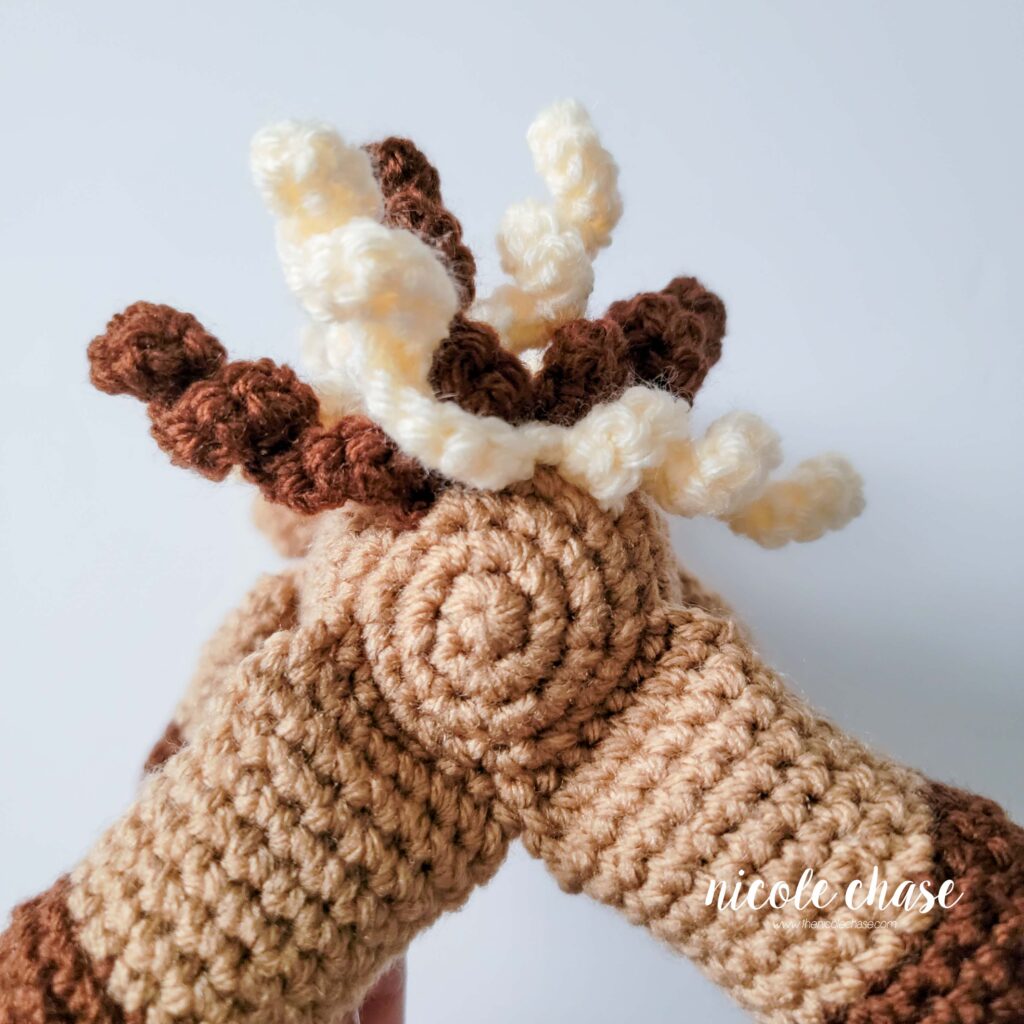
Ears (make 2)
Using color A (shown as brown):
R1: Begin with 4 SC in a magic ring. (4 sts)
R2: *2 SC in next st, 1 SC in next st. Repeat from * around. (6 sts)
R3: *2 SC in next st, 1 SC in next st. Repeat from * around. (9 sts)
R4: *2 SC in next st, 1 SC in each of the next 2 sts. Repeat from * around. (12 sts)
R5-6:1 SC in each st around. (12 sts)
R7: *SC2tog, 1 SC in each of the next 2 sts. Repeat from * around. (9 sts)
R8: Fold the ear closed, leaving 1 unworked st at the beginning of the fold. Working through both sides, to close the ear, 1 SC in each st across, leaving 2 unworked sts at the end of the fold. (3 sts) See tutorial photos.
Insert hook through the remaining 2 unworked sts, pinch the bottom of the ear to bring each end together
Insert hook through the remaining 2 unworked sts, pinch the bottom of the ear to bring each end together, and working through both ends, join the ear with 1 SC. See tutorial photos.
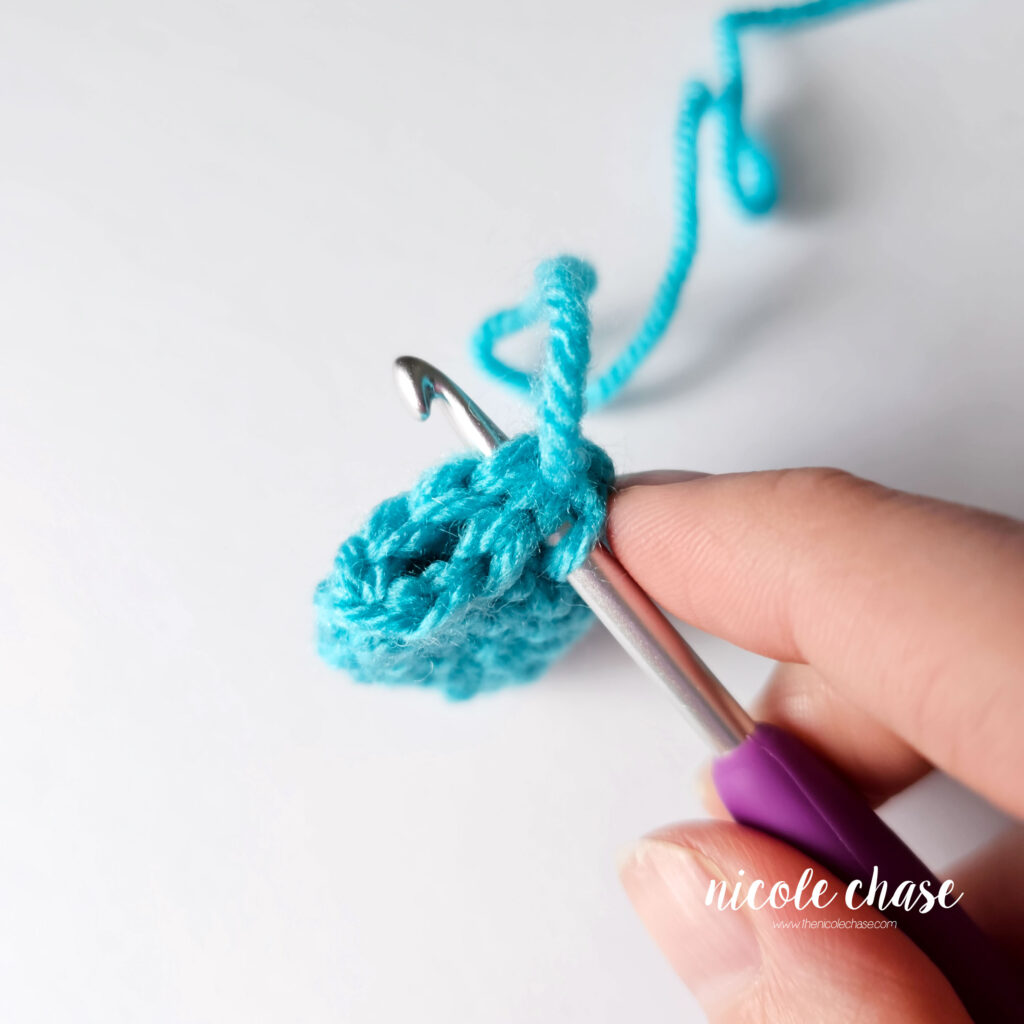
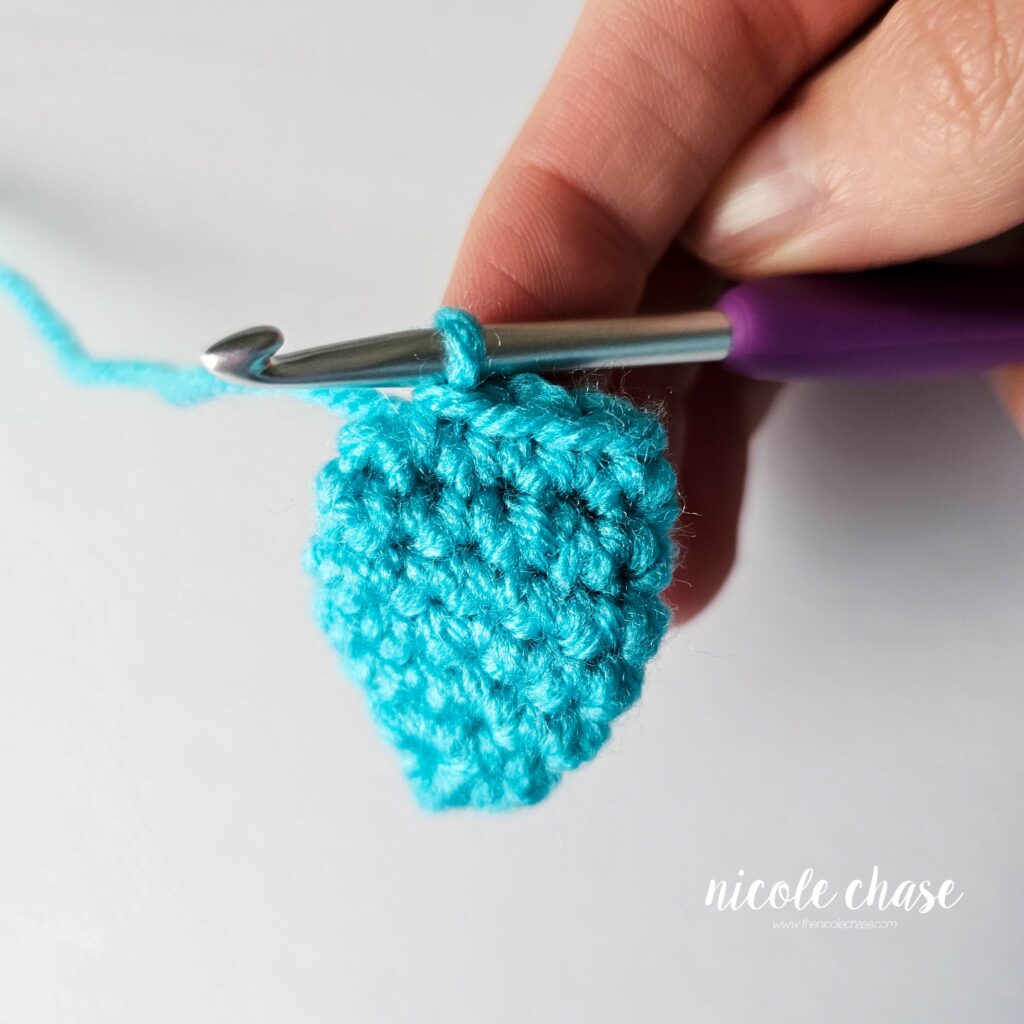
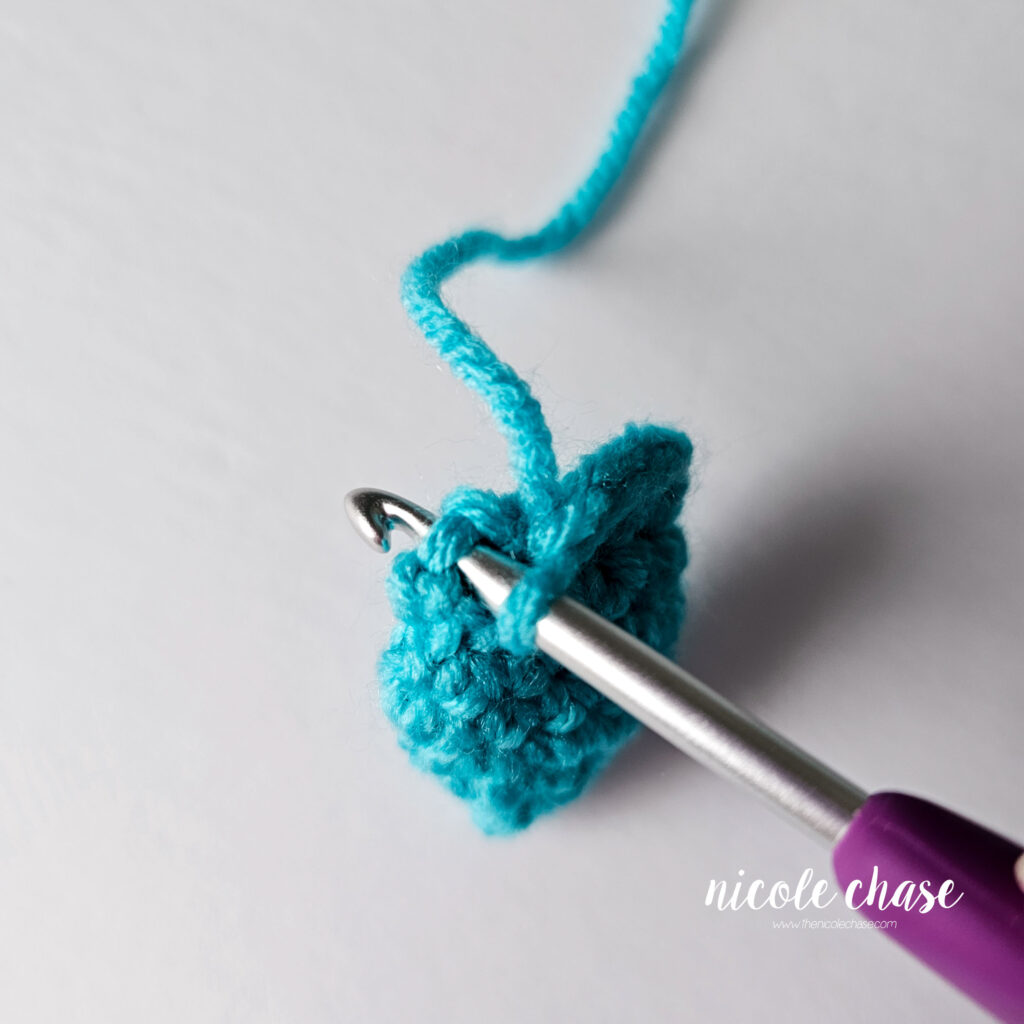

Cut yarn, leaving long strand for sewing. Fasten off.
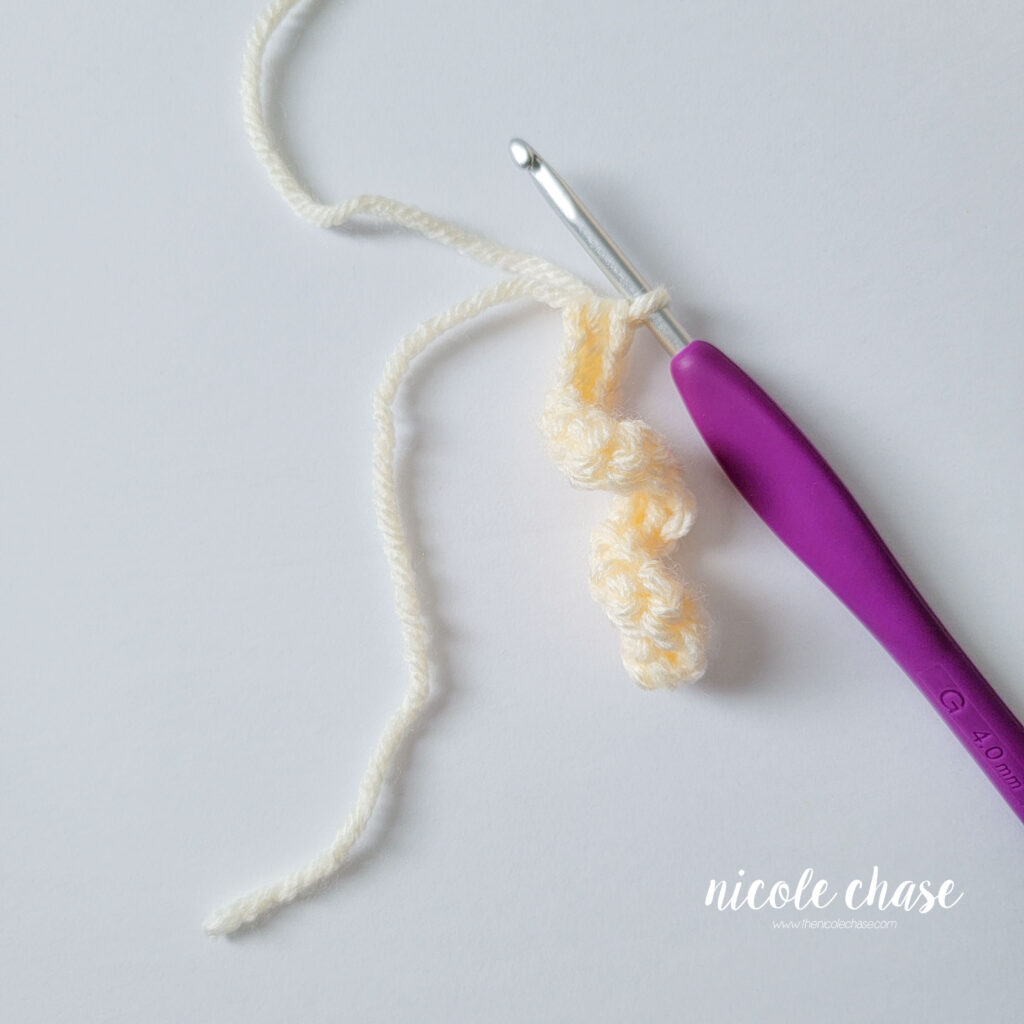
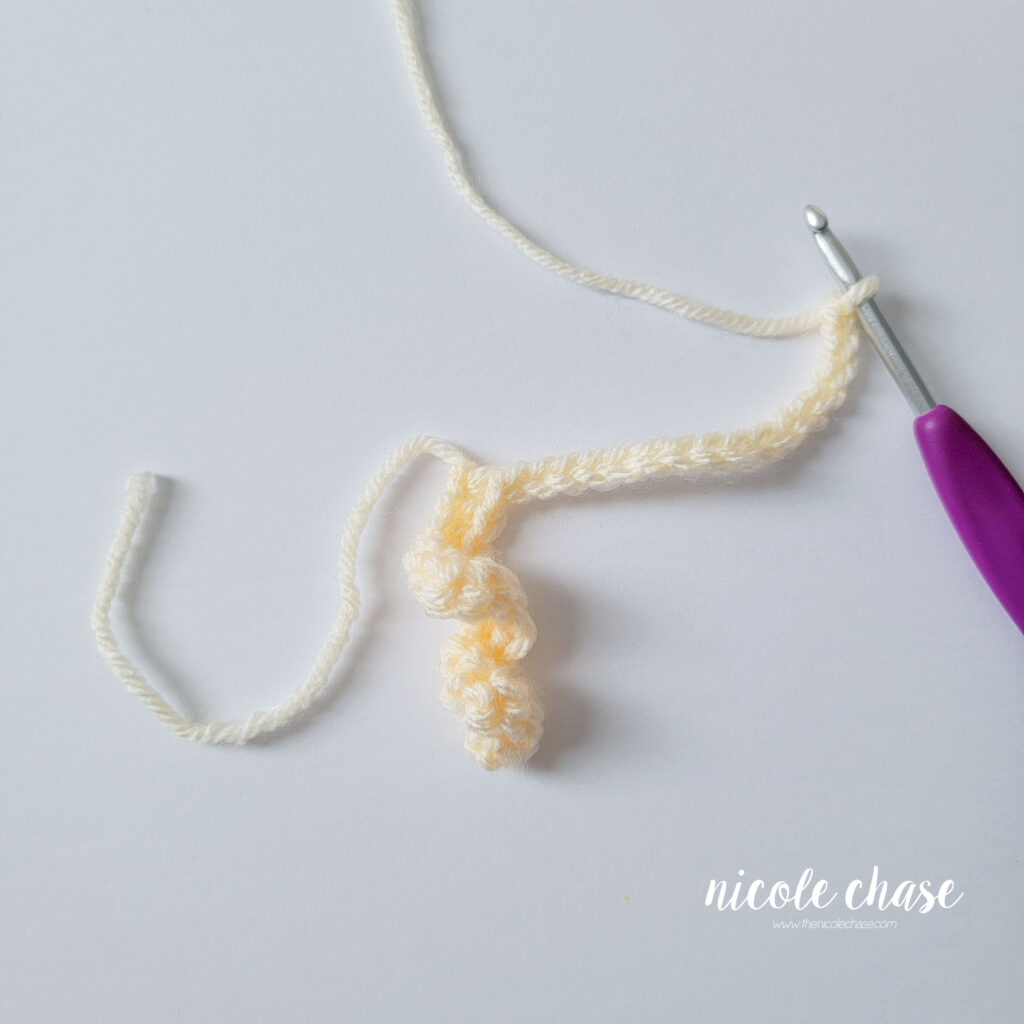
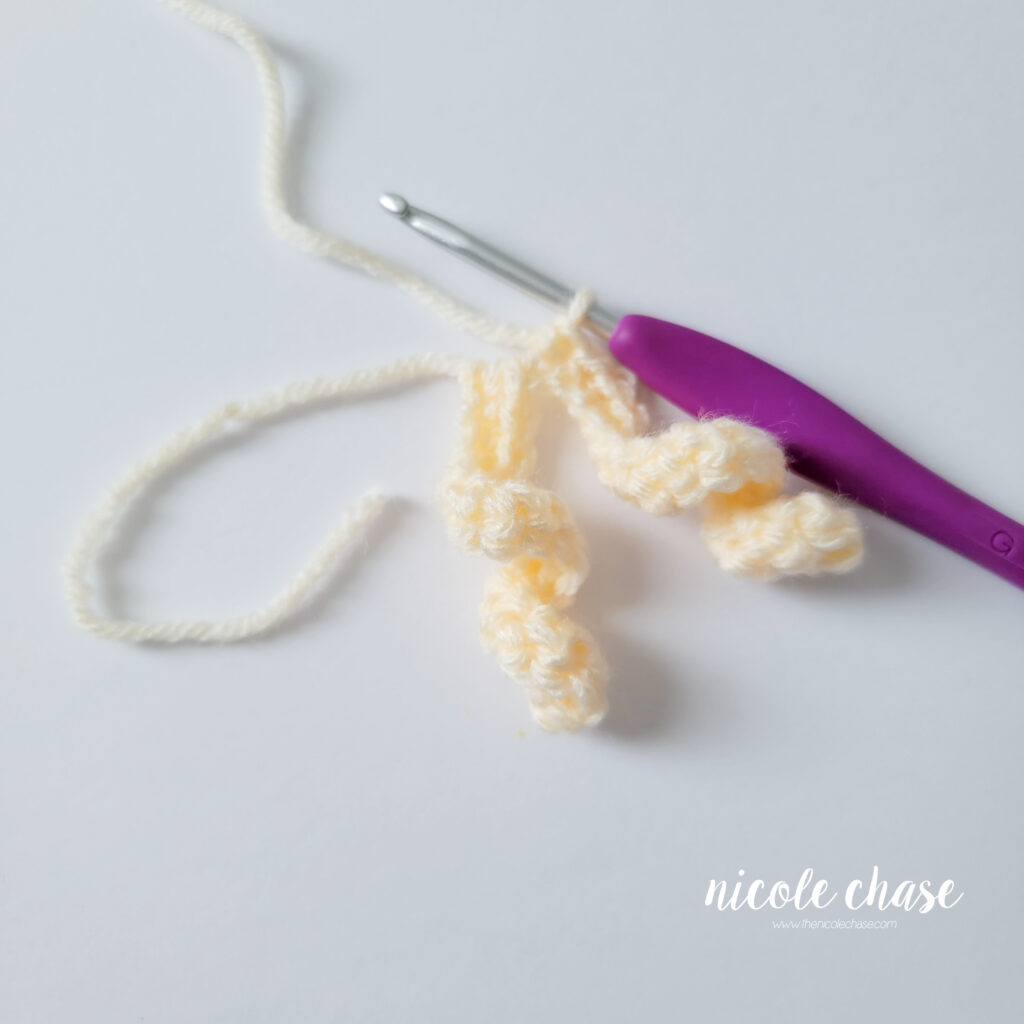
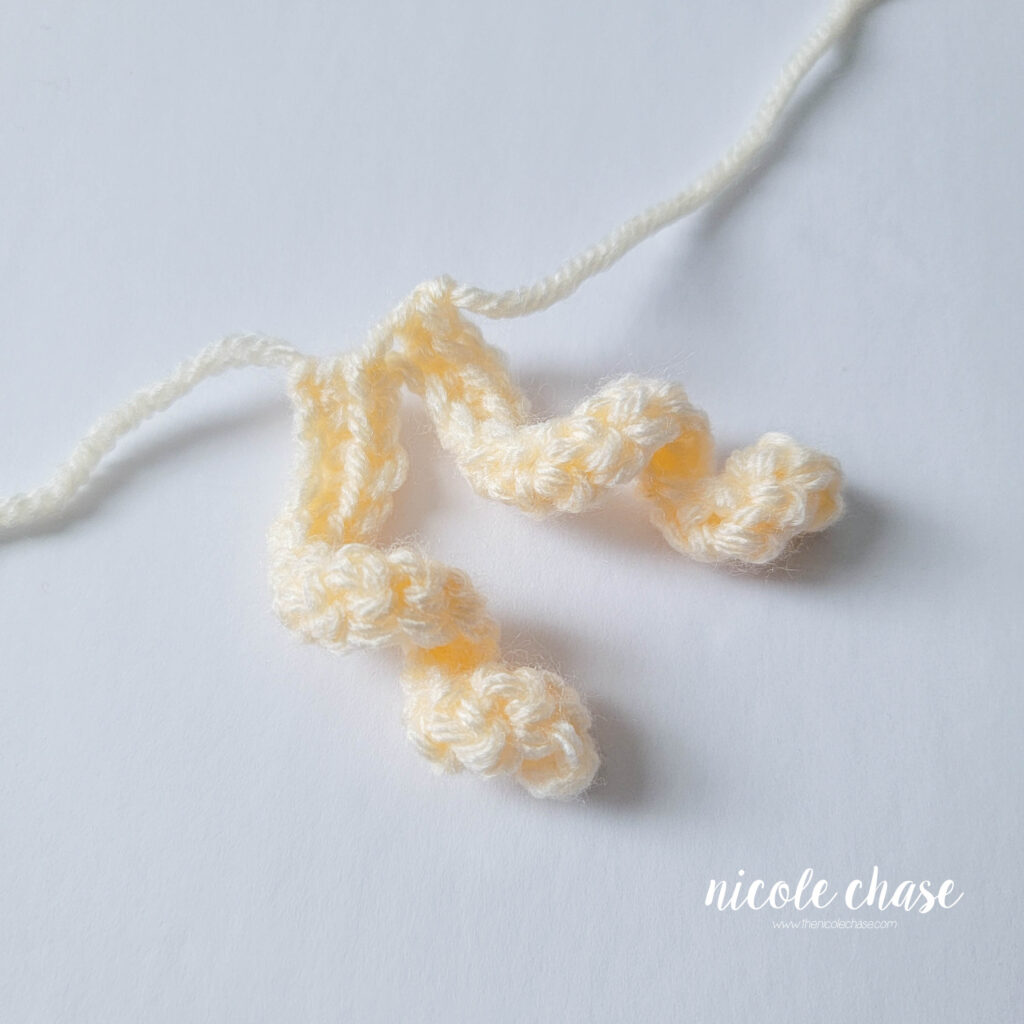
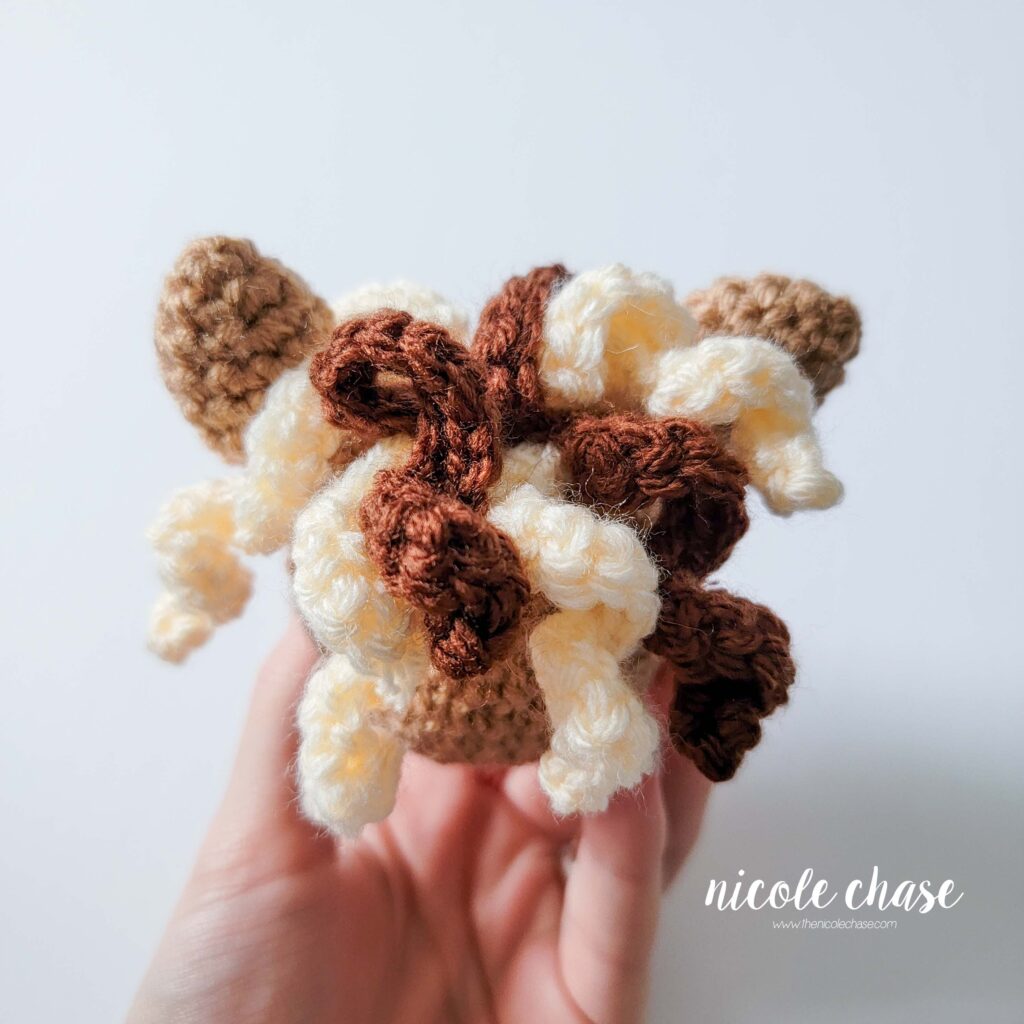
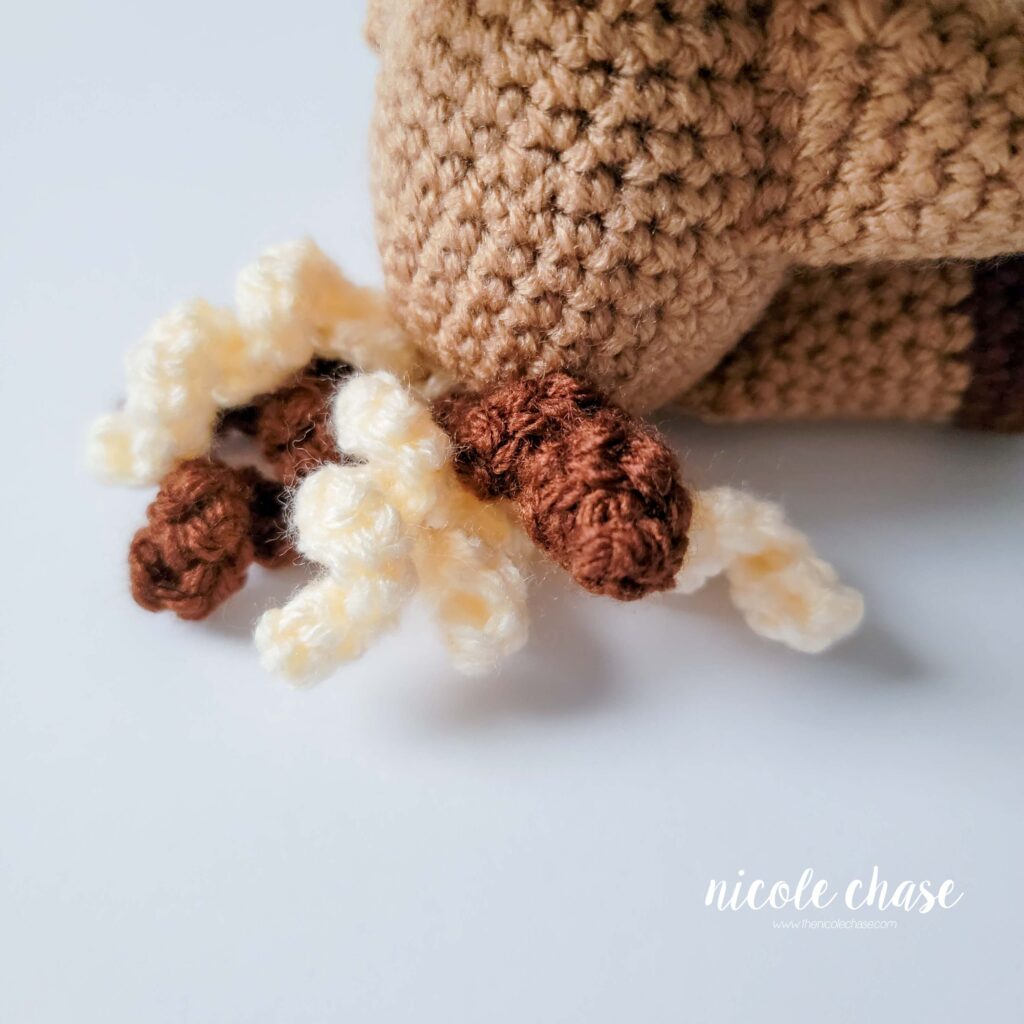
Hair Curls A (make 2)
Using color B (shown as cream):
R1: Ch 16, 2 SC in second ch from hook, 1 SC in each of the next 2 sts. *2 SC in next st, 1 SC in each of the next 2 sts. Repeat from * across. Do not fasten off. (20 sts)
R2: Ch 16, 2 SC in second ch from hook, 1 SC in each of the next 2 sts. *2 SC in next st, 1 SC in each of the next 2 sts. Repeat from * across. Do not fasten off. (20 sts)
R3: Ch 16, 2 SC in second ch from hook, 1 SC in each of the next 2 sts. *2 SC in next st, 1 SC in each of the next 2 sts. Repeat from * across. Do not fasten off. (20 sts)
R4: Ch 16, 2 SC in second ch from hook, 1 SC in each of the next 2 sts. *2 SC in next st, 1 SC in each of the next 2 sts. Repeat from * across. (20 sts)
Cut yarn, leaving long strand for sewing. Fasten off.
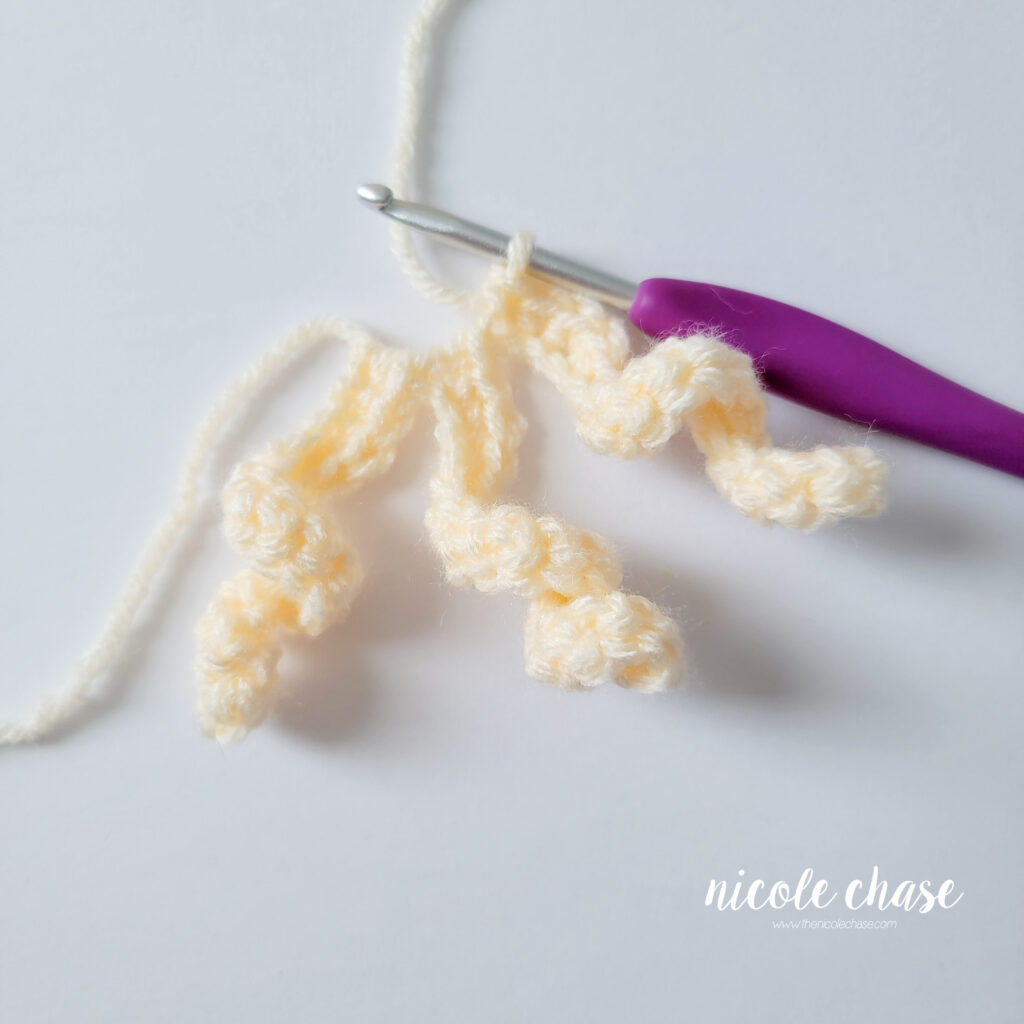
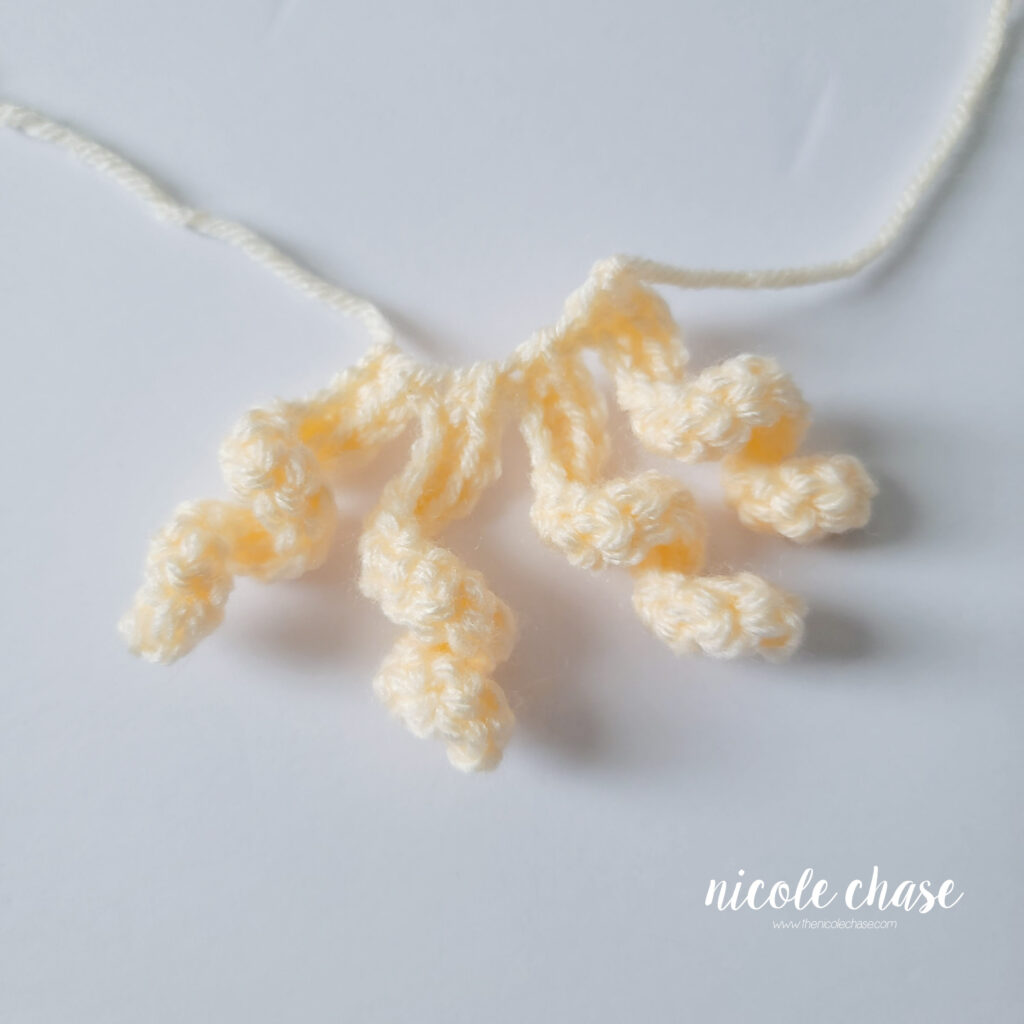
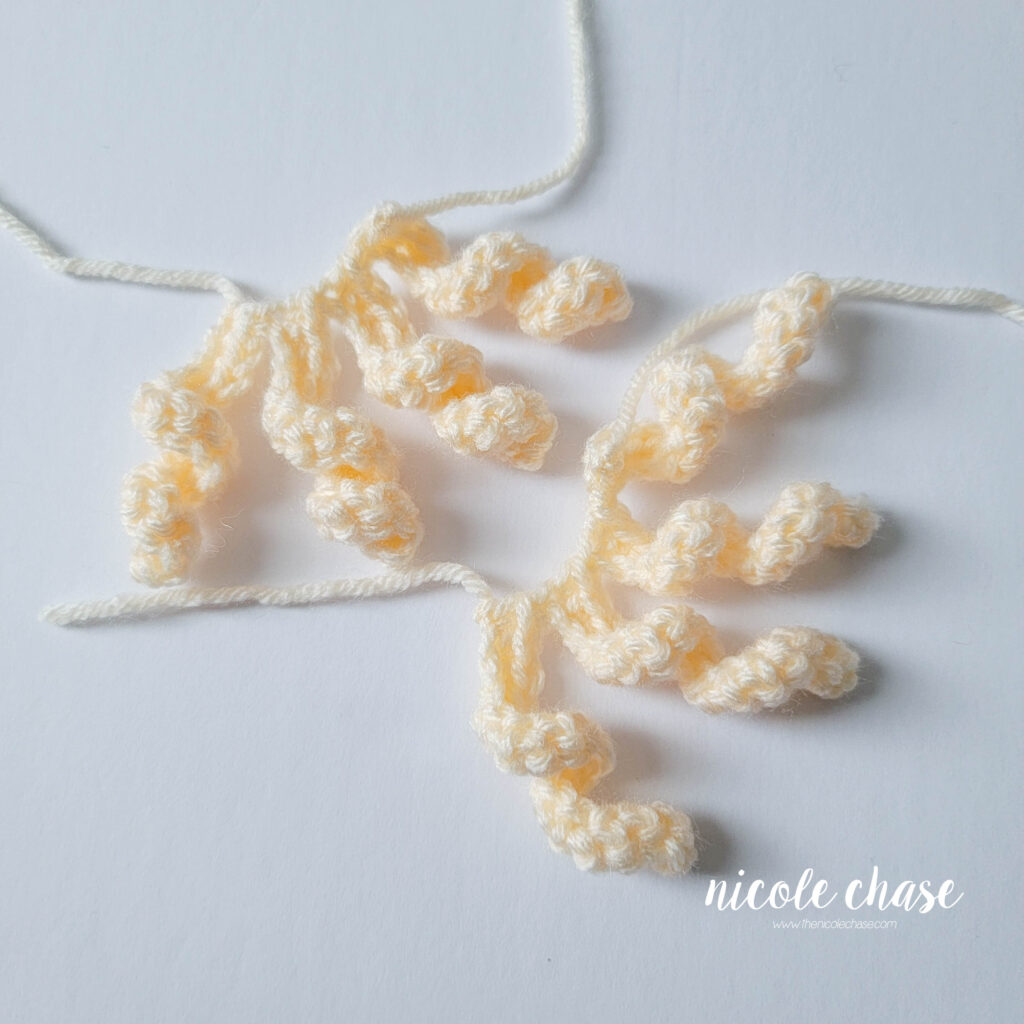
Hair Curls B (make 2)
Using color C (shown as dark brown):
R1: Ch 16, 2 SC in second ch from hook, 1 SC in each of the next 2 sts. *2 SC in next st, 1 SC in each of the next 2 sts. Repeat from * across. Do not fasten off. (20 sts)
R2: Ch 16, 2 SC in second ch from hook, 1 SC in each of the next 2 sts. *2 SC in next st, 1 SC in each of the next 2 sts. Repeat from * across. Do not fasten off. (20 sts)
R3: Ch 16, 2 SC in second ch from hook, 1 SC in each of the next 2 sts. *2 SC in next st, 1 SC in each of the next 2 sts. Repeat from * across. (20 sts)
Cut yarn, leaving long strand for sewing. Fasten off.
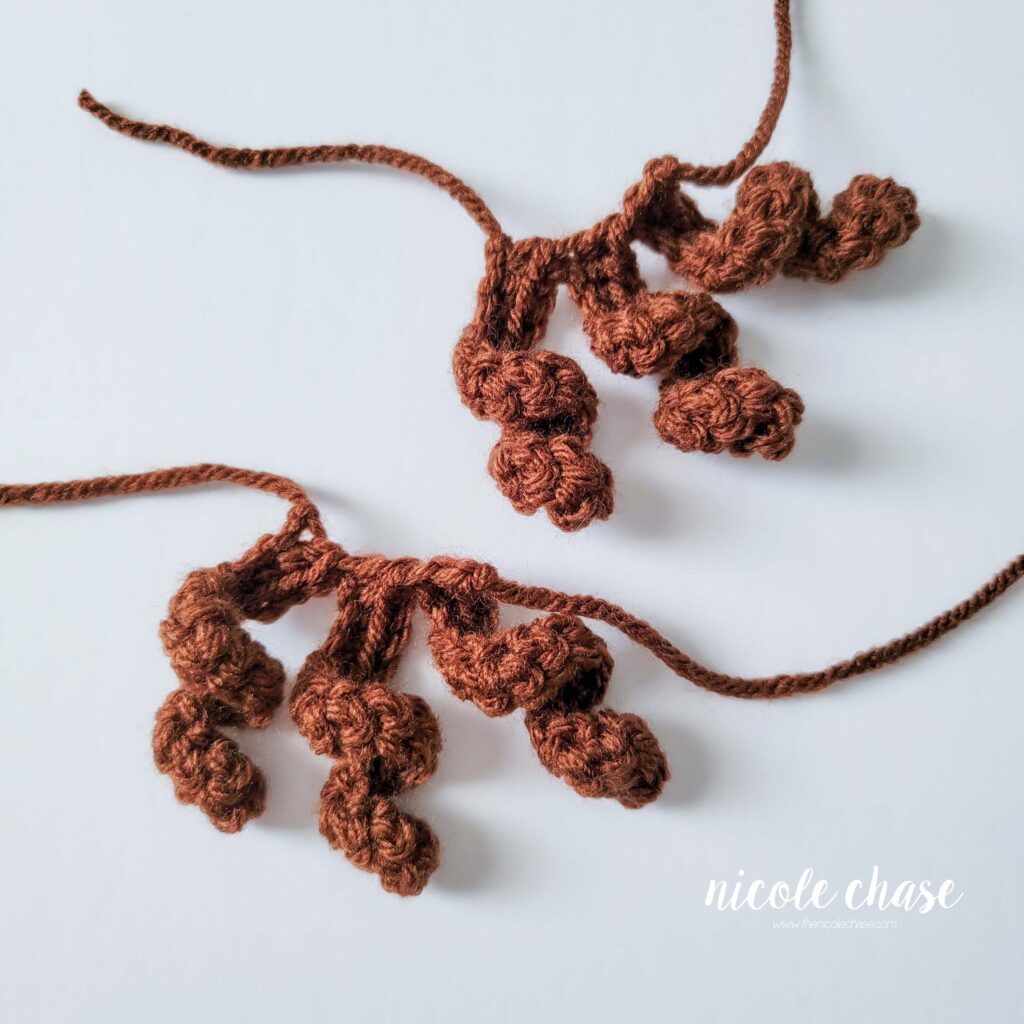
Hair Curls C (make 2)
Using color B (shown as cream):
R1: Ch 16, 2 SC in second ch from hook, 1 SC in each of the next 2 sts. *2 SC in next st, 1 SC in each of the next 2 sts. Repeat from * across. Do not fasten off. (20 sts)
R2: Ch 16, 2 SC in second ch from hook, 1 SC in each of the next 2 sts. *2 SC in next st, 1 SC in each of the next 2 sts. Repeat from * across. (20 sts)
Cut yarn, leaving long strand for sewing. Fasten off.
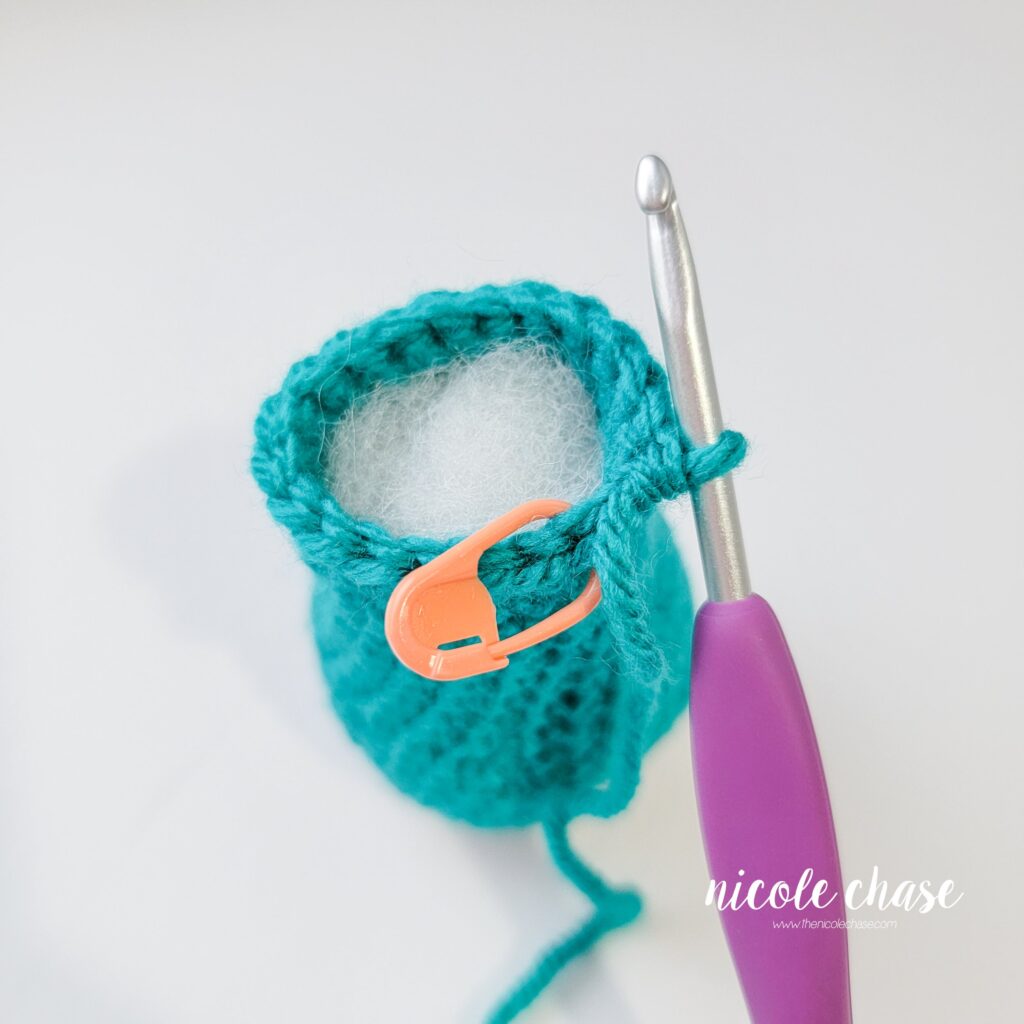
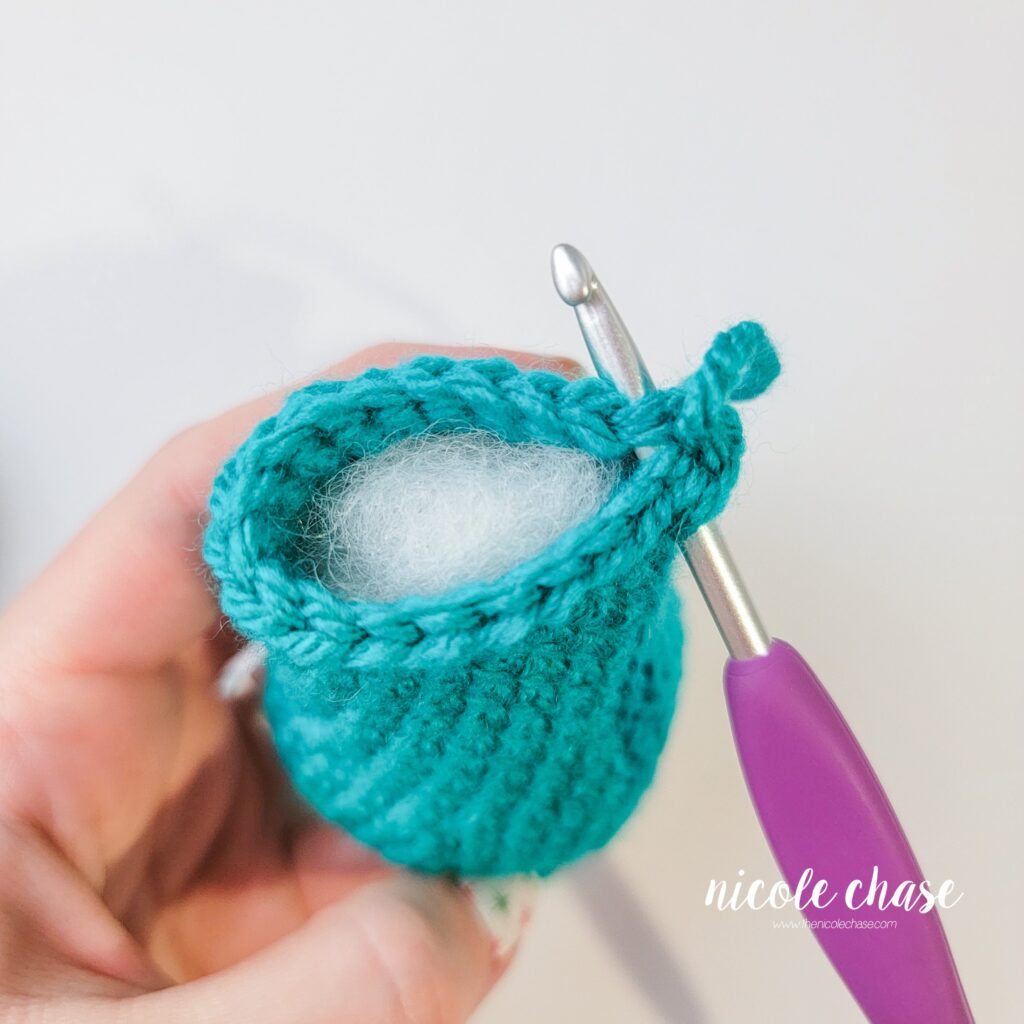
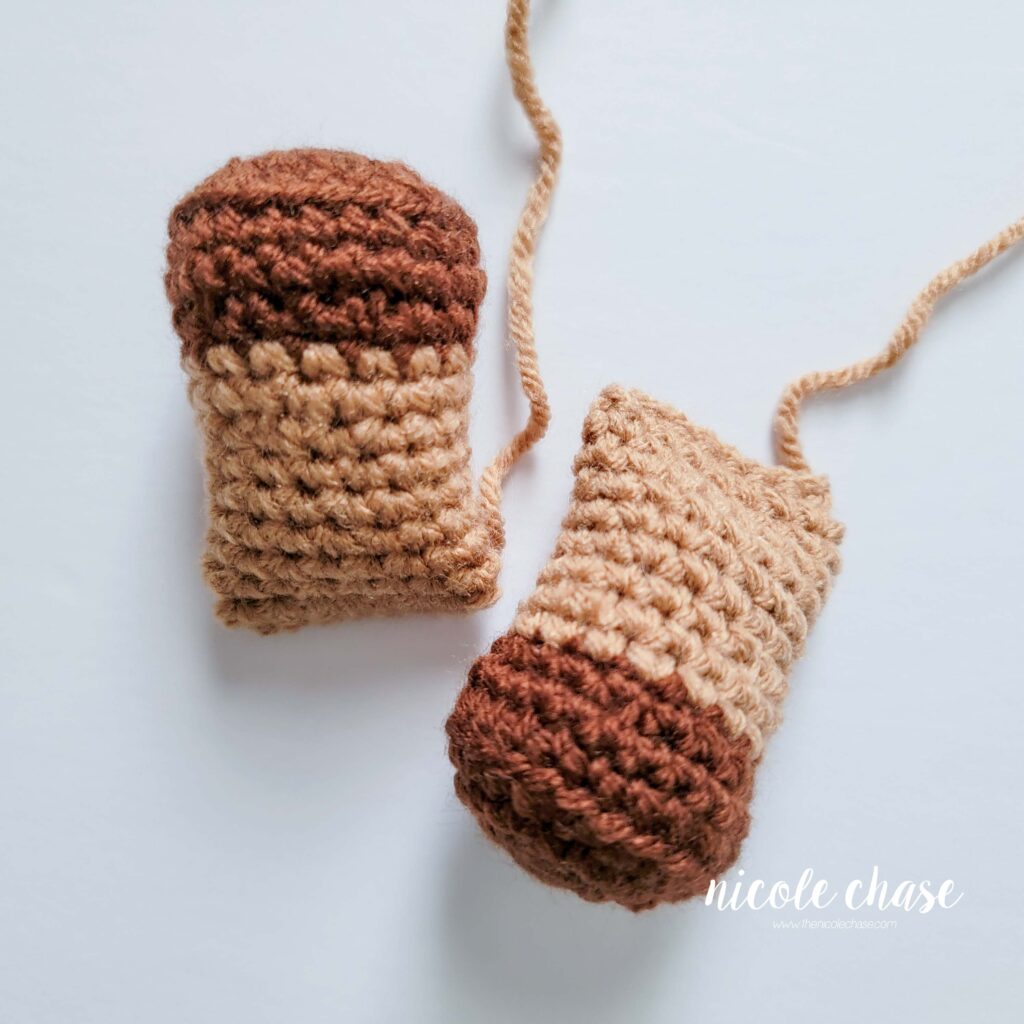
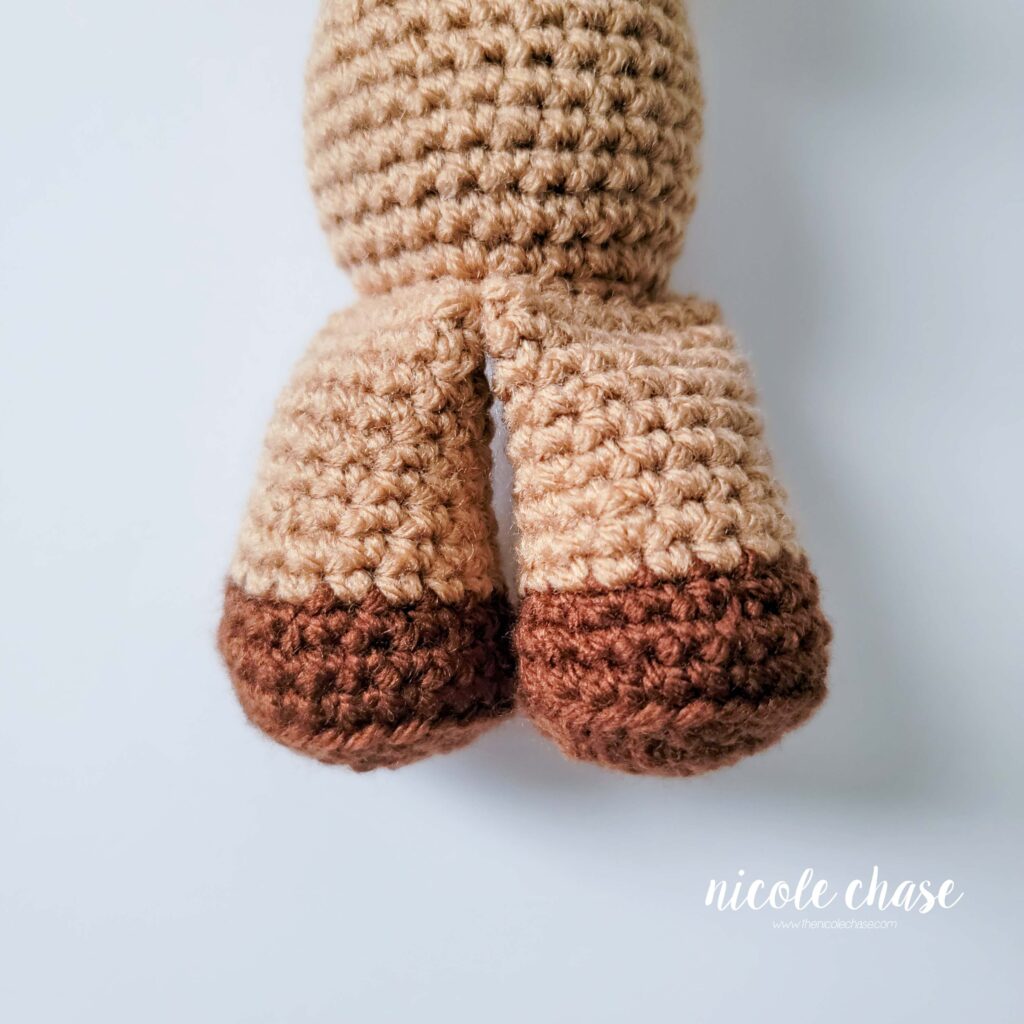
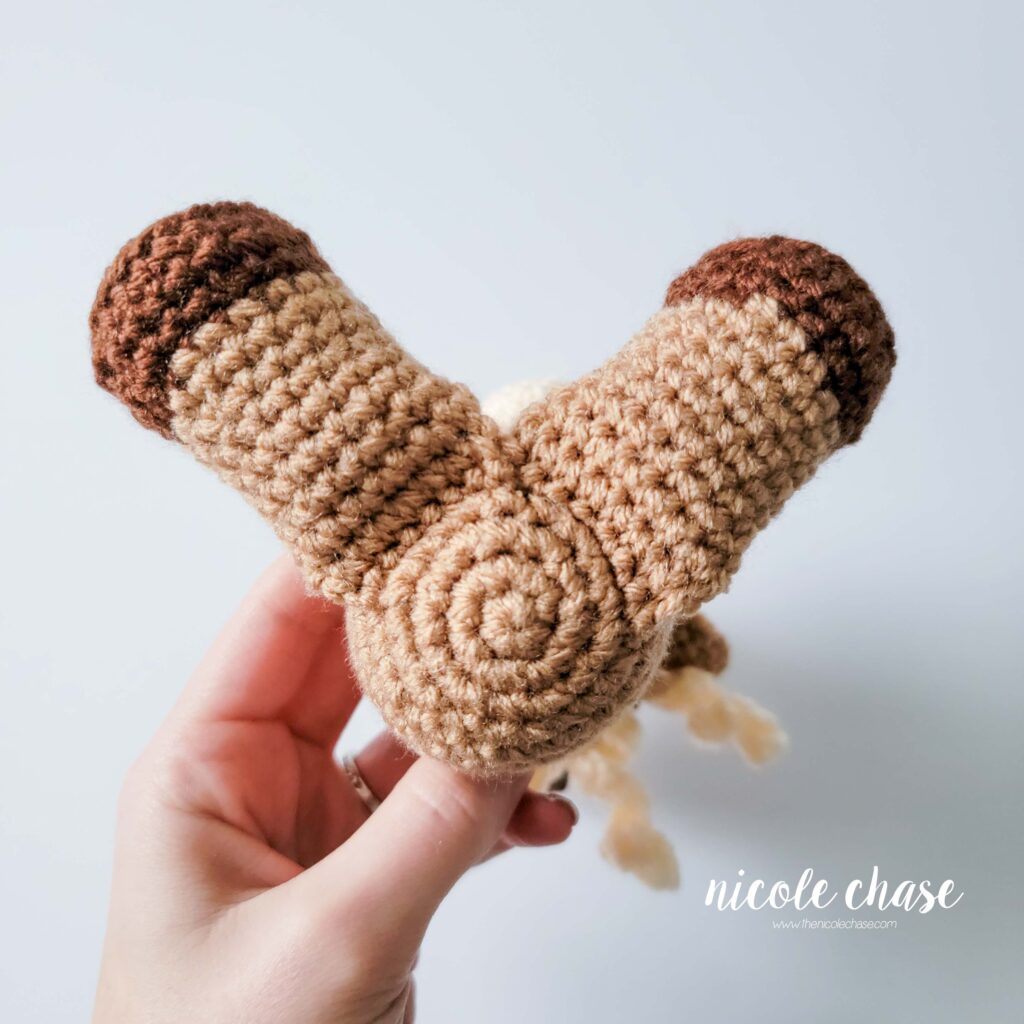
Legs (make 2)
Using color C (shown as dark brown):
R1: Begin with 6 SC in a magic ring. (6 sts)
R2: 2 SC in each st around. (12 sts)
R3: *2 SC in next st, 1 SC in next st. Repeat from * around. (18 sts)
R4: *2 SC in next st, 1 SC in each of the next 2 sts. Repeat from * around. (24 sts)
R5: work in the back loops only, 1 SC in each st around. (24 sts)
R6: 1 SC in each st around. (24 sts)
R7: *SC2tog, 1 SC in each of the next 2 sts. Repeat from * around. (18 sts)
Using color A (shown as brown):
R8-9: 1 SC in each st around. (18 sts)
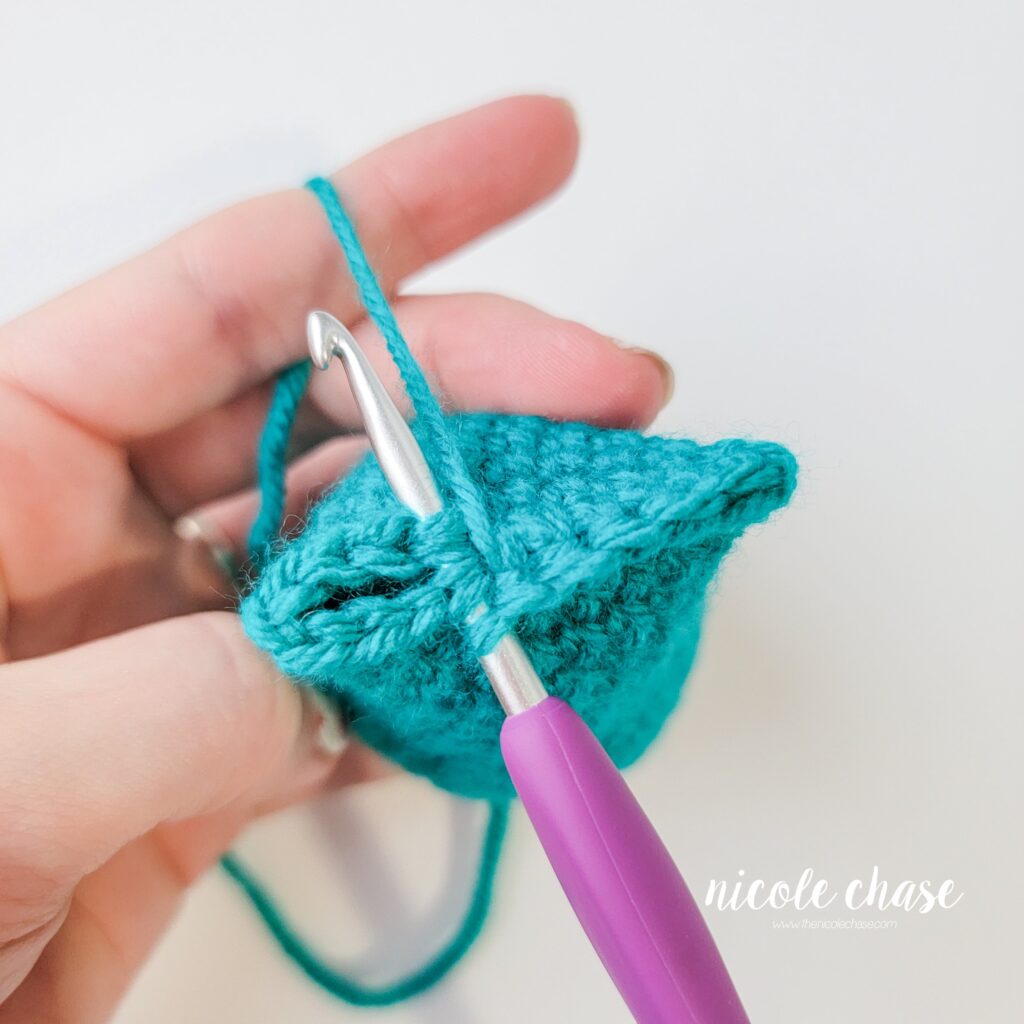
R10: *SC2tog, 1 SC in each of the next 7 sts. Repeat from * around. (16 sts)
R11-15: 1 SC in each st around. (16 sts)
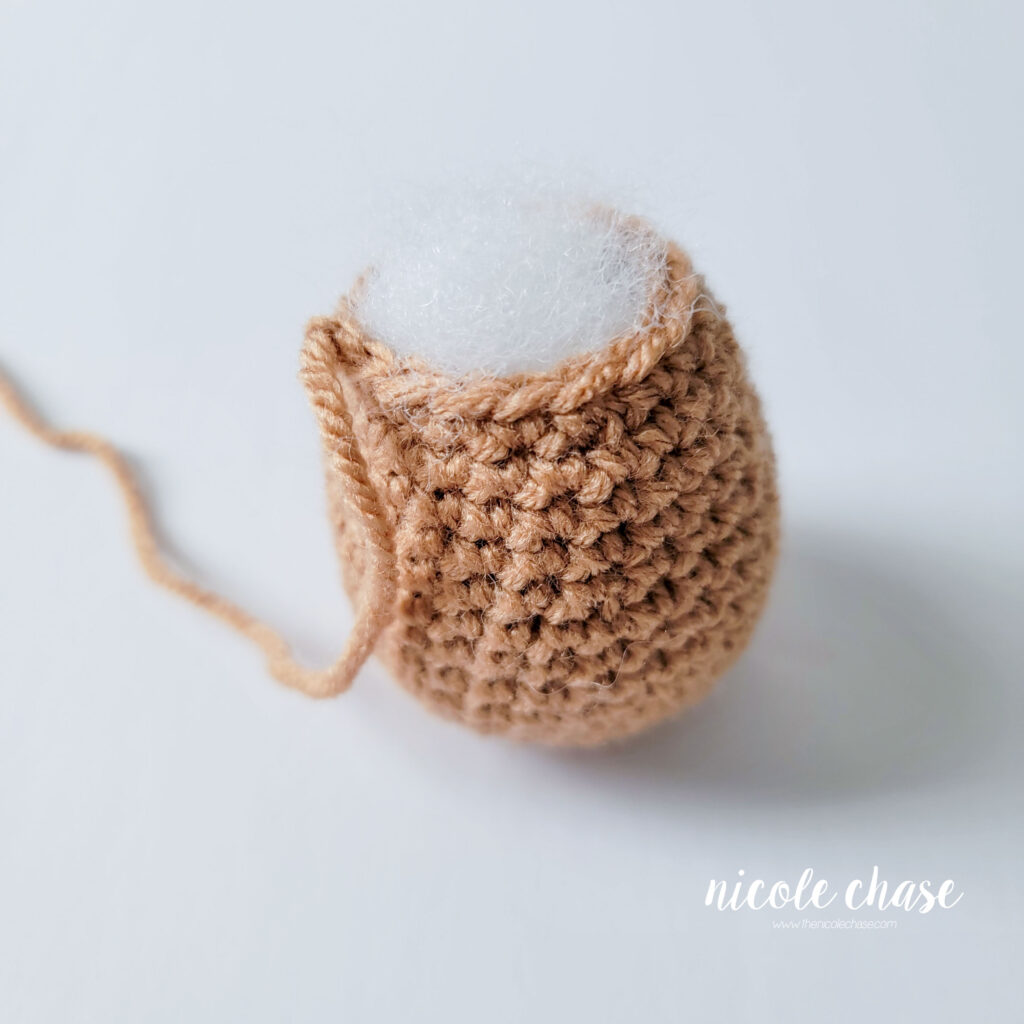
Fill with stuffing.
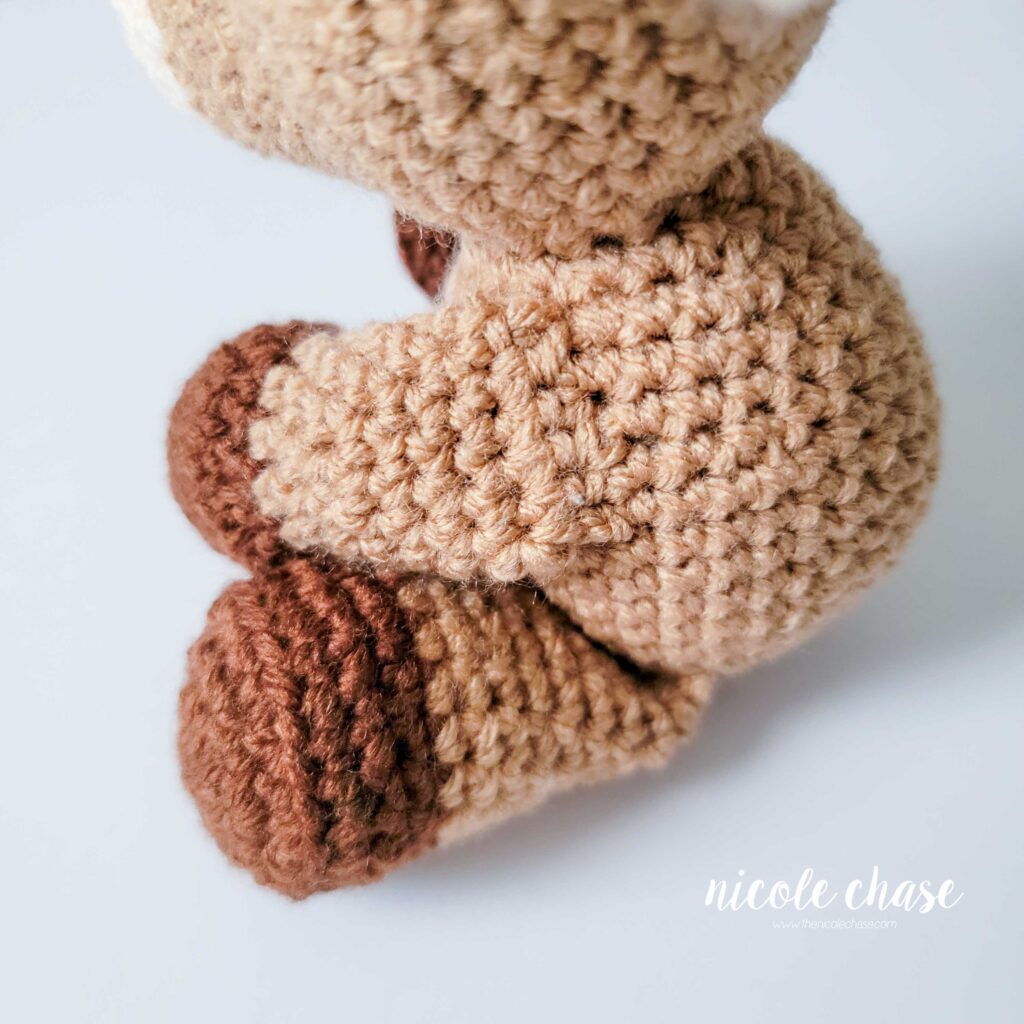
R16: Fold the leg closed. Working through both sides, 1 SC in each st across, leaving 1 unworked st on each side. See tutorial photos. (7 sts)
Cut yarn, leaving long strand for sewing.
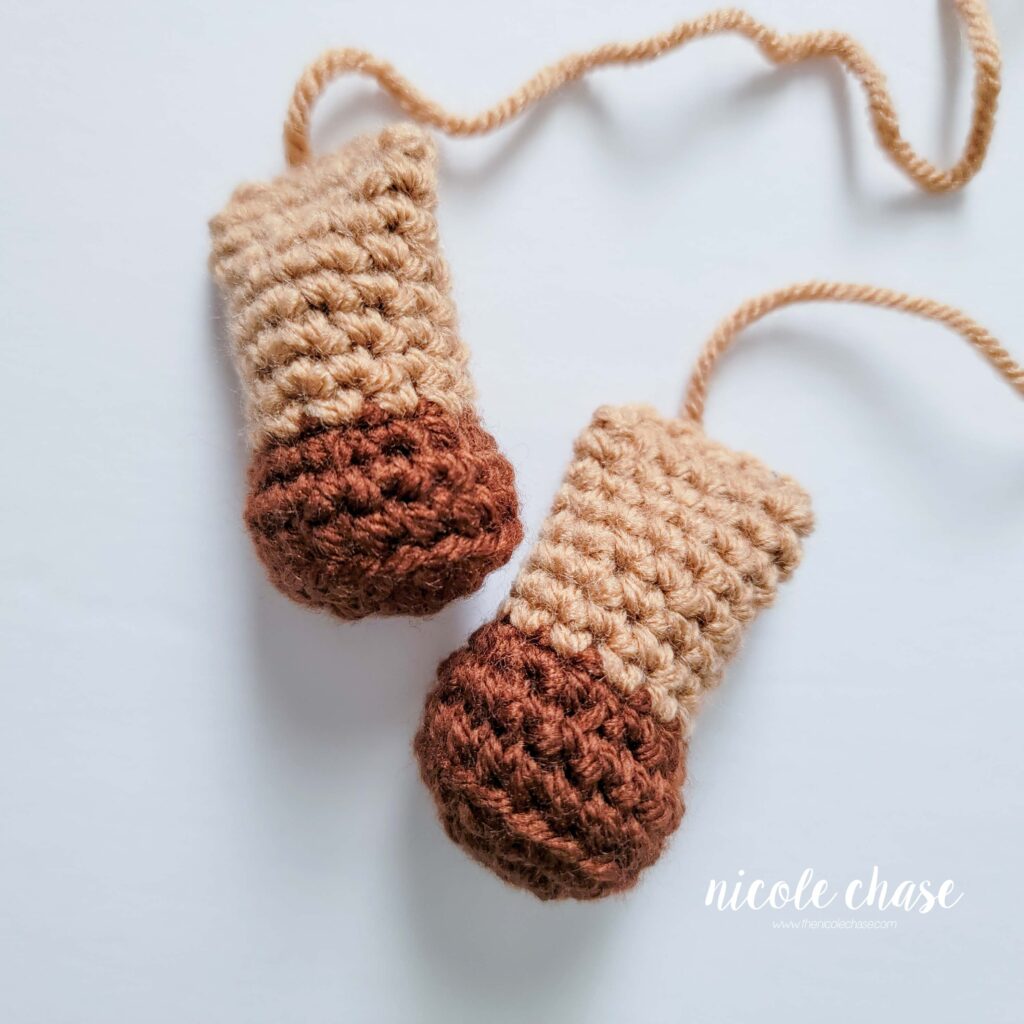
Arms (make 2)
Using 4.0mm (G) hook:
Using color C (shown as dark brown):
R1: Begin with 6 SC in a magic ring. (6 sts)
R2: 2 SC in each st around. (12 sts)
R3: *2 SC in next st, 1 SC in next st. Repeat from * around. (18 sts)
R4: Work in the back loops only, 1 SC in each st around. (18 sts)
R5: 1 SC in each st around. (18 sts)
R6: *SC2tog, 1 SC in next st. Repeat from * around. (12 sts)
Using color A (shown as brown):
R7-13: 1 SC in each st around. (12 sts)
Fill with stuffing.
R14: Fold the arm closed. Working through both sides, 1 SC in each st across, leaving 1 unworked st on each side. See tutorial photos. (5 sts)
Cut yarn, leaving long strand for sewing.
Assembly & Finishing
See tutorial photos.
Using color B (shown as cream), embroider nostrils over R4-5 of the head of your crochet horse.
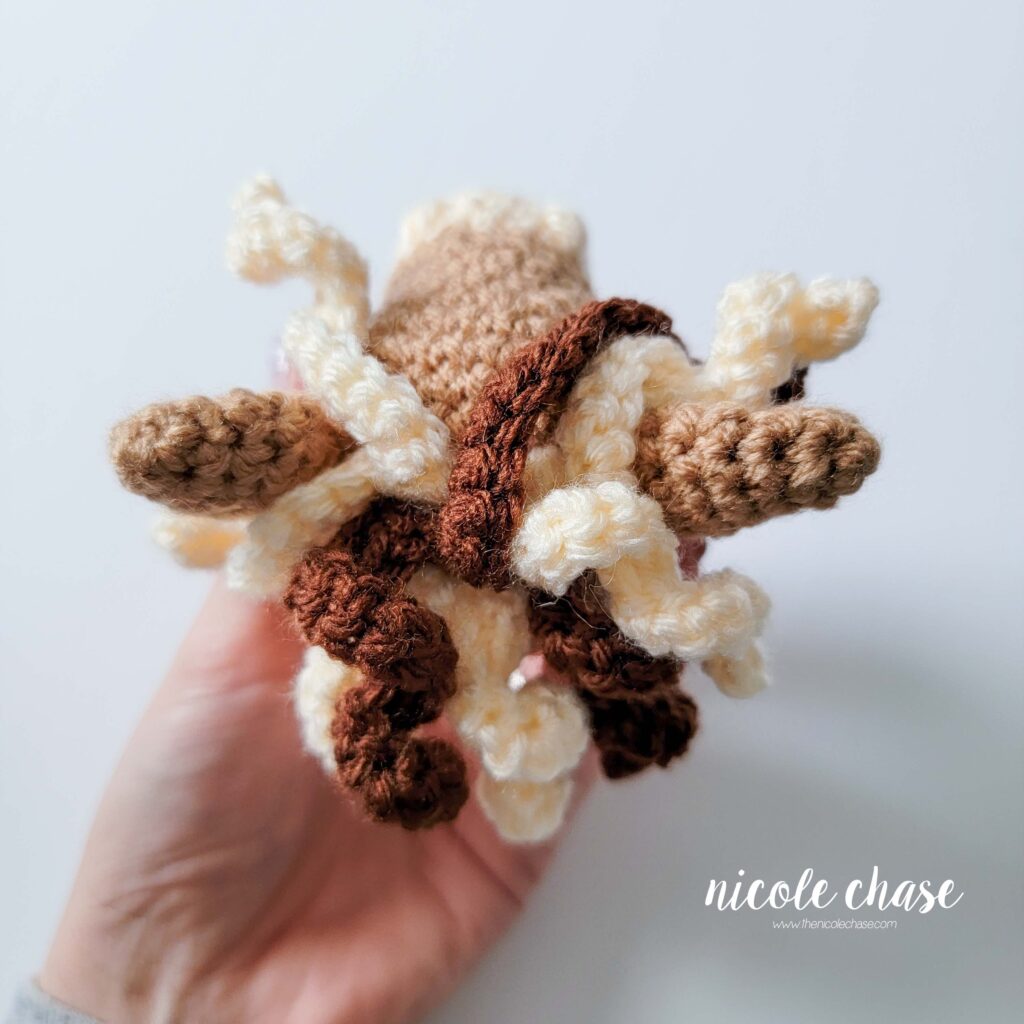
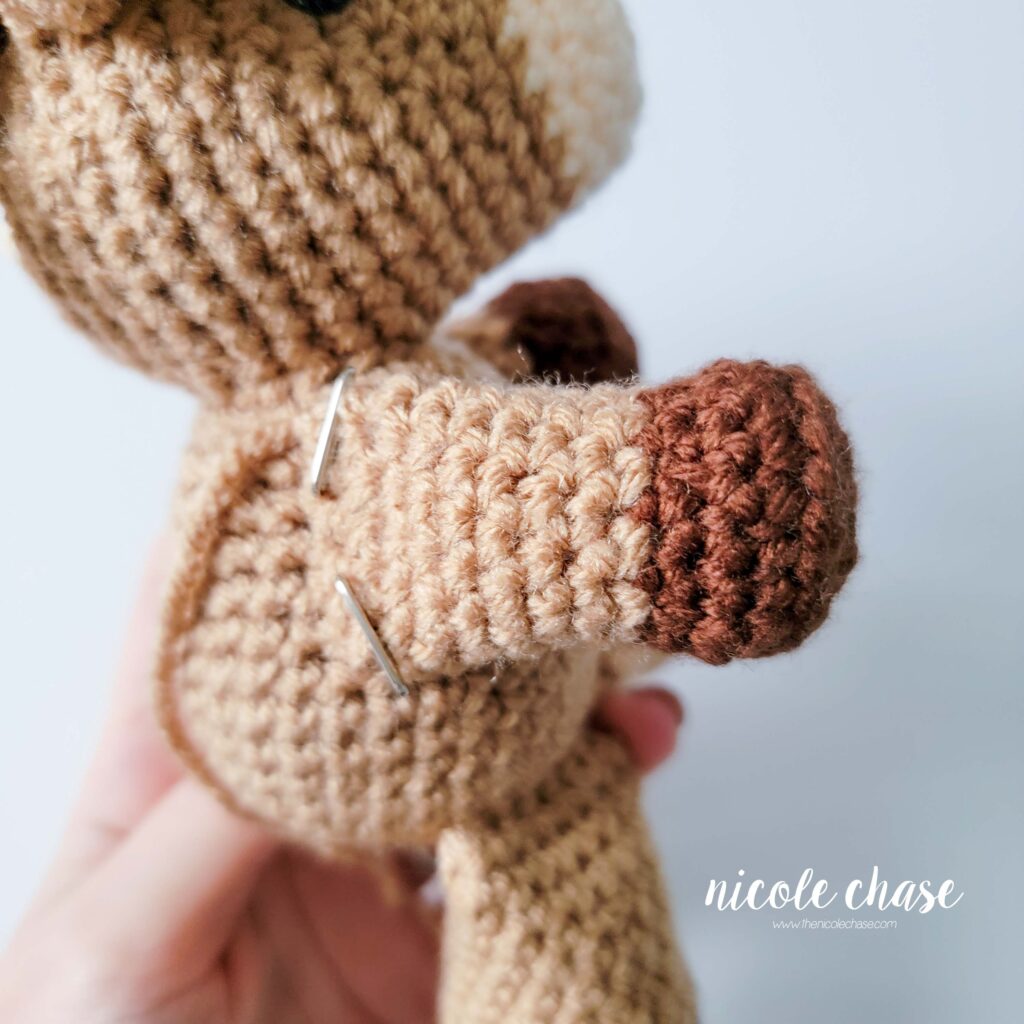
Attach each ear on the top of the head over R14-15, leaving about 10 sts between each ear.

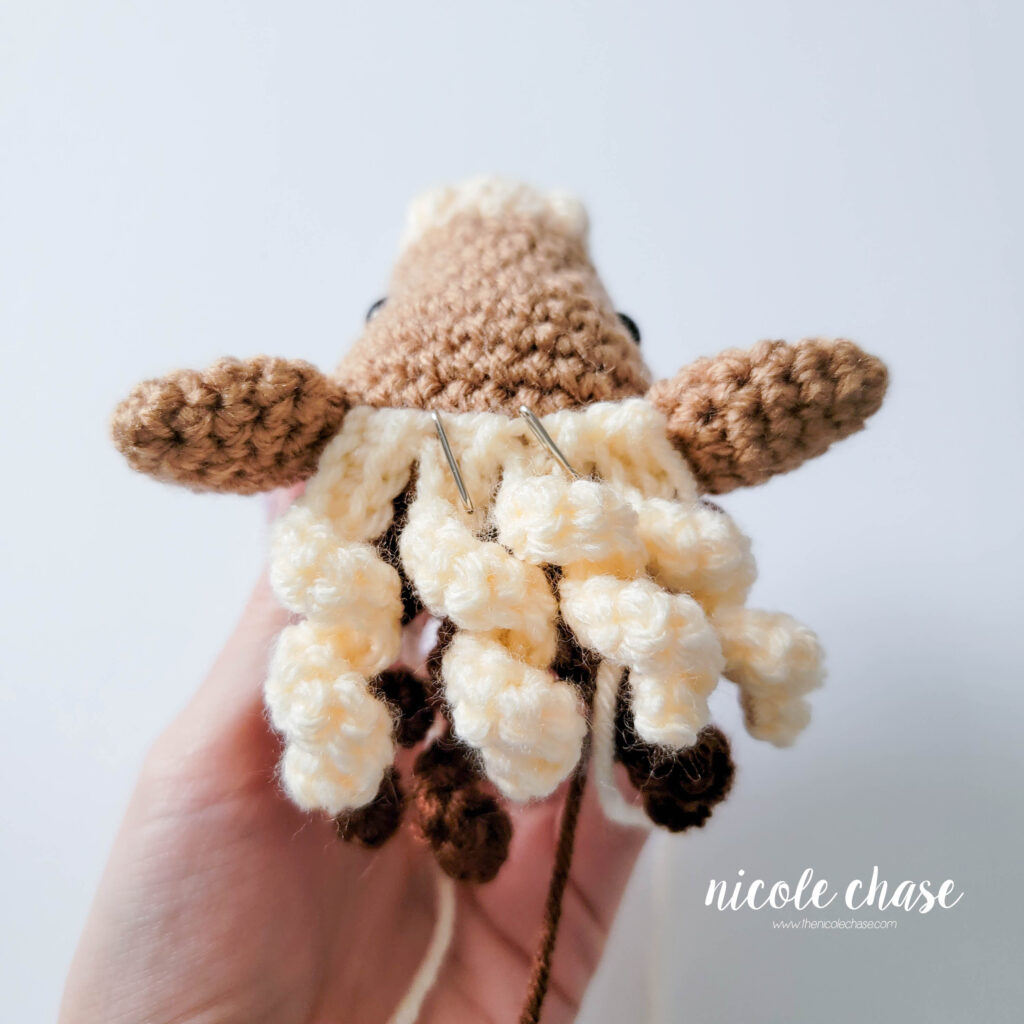
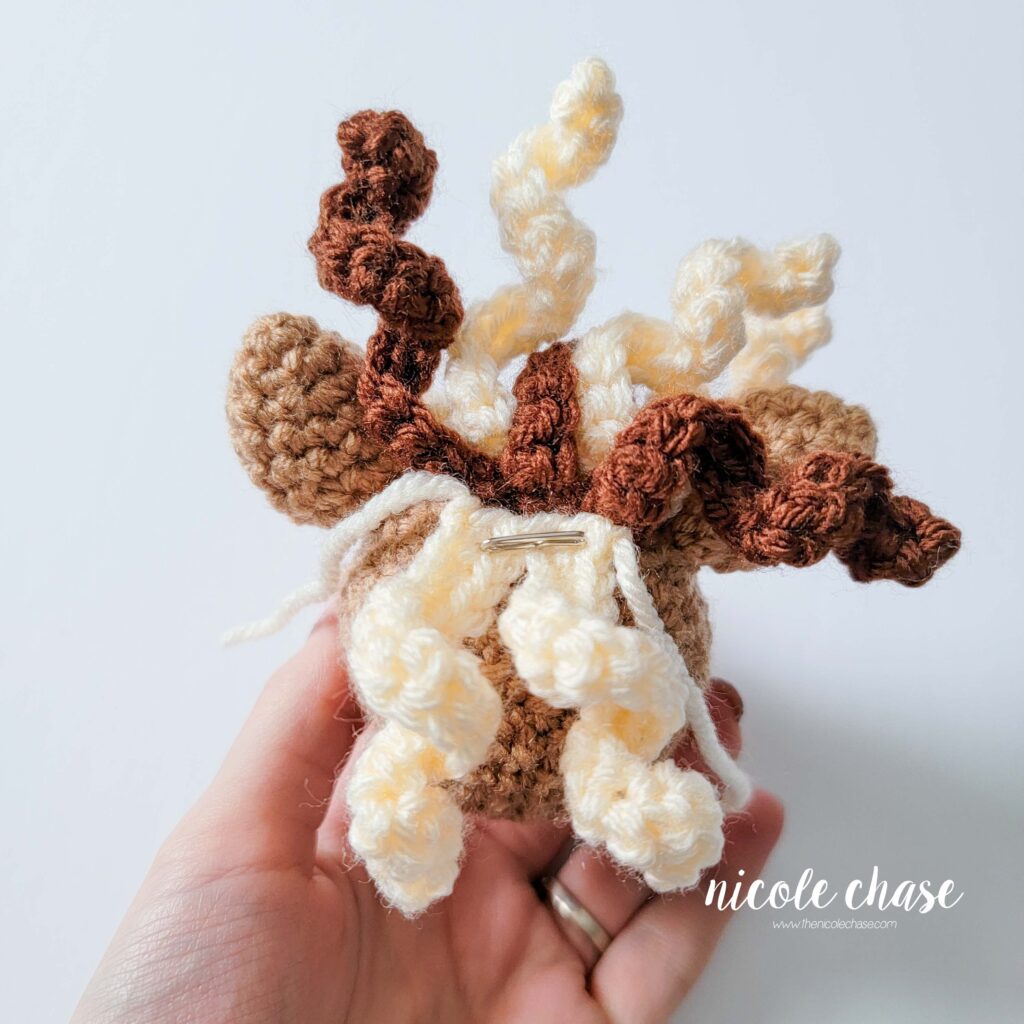
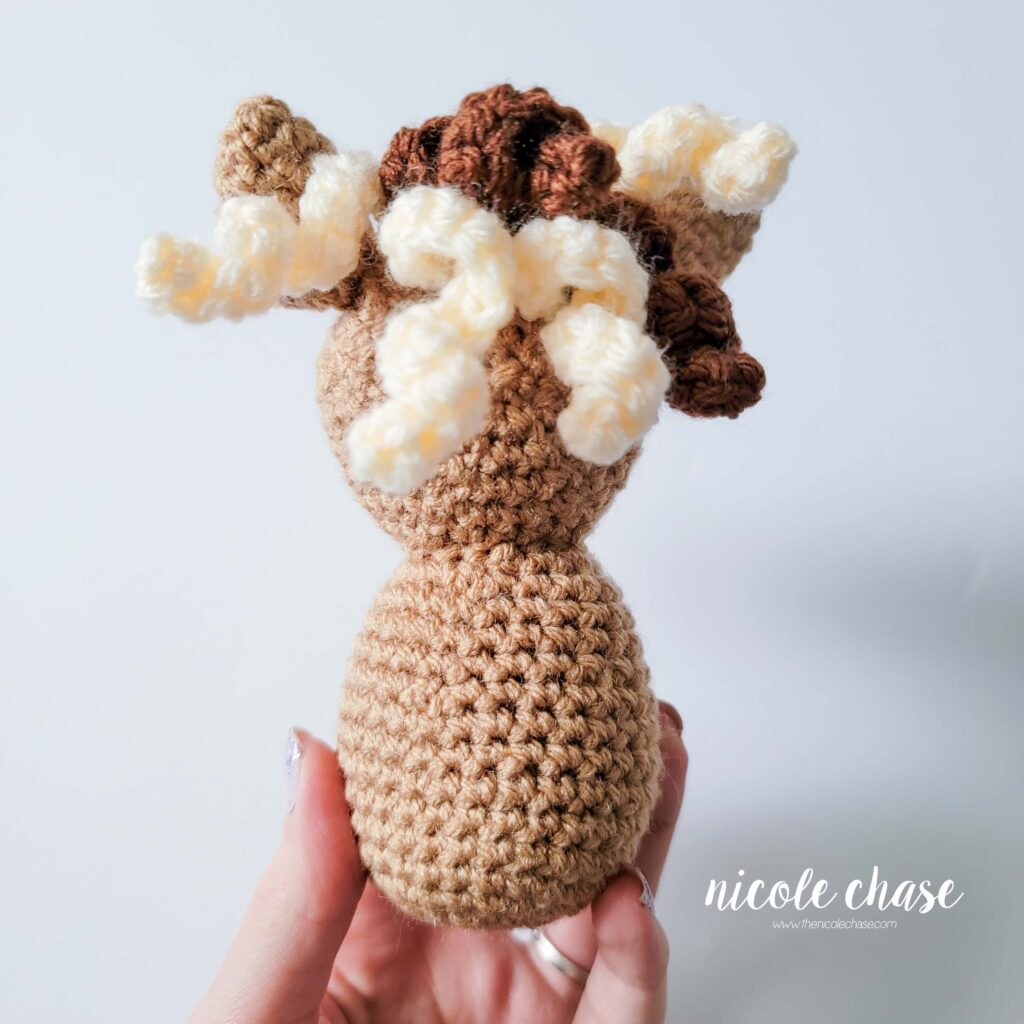
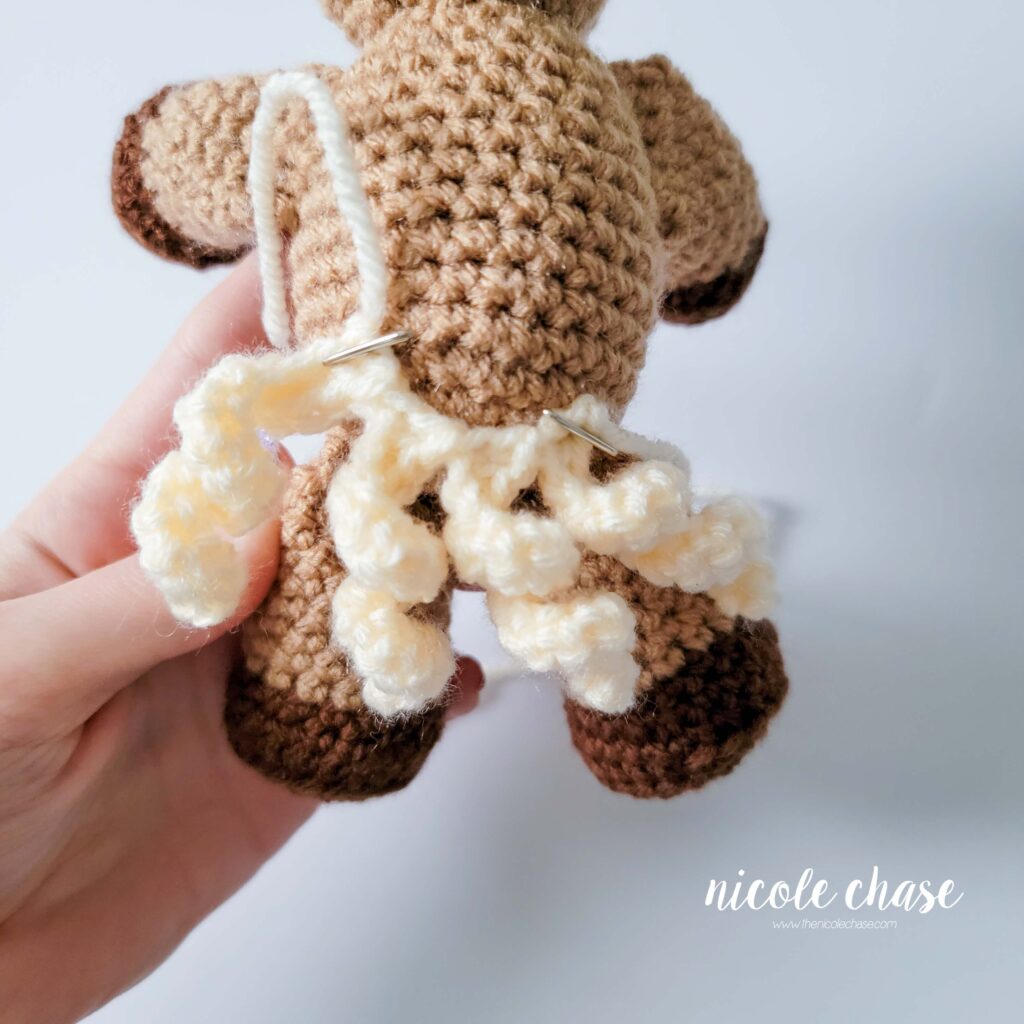
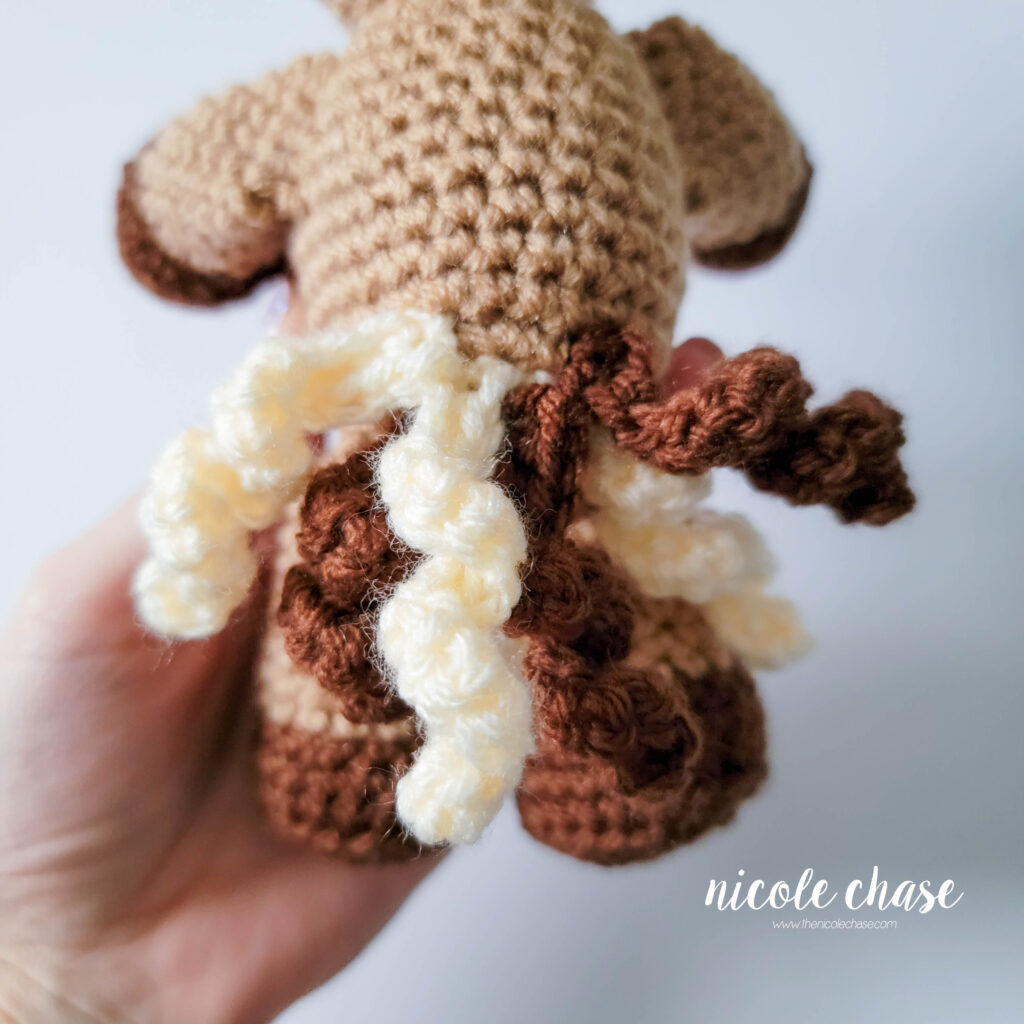
Attach the mane to your crochet horse using one of each hair curl A, B, and C to the head in layers, beginning at approximately R14 behind the ears with curl A, followed by curl B at approximately R15, and curl C at approximately R16. Arrange the curls around each other so that the colors are evenly distributed.

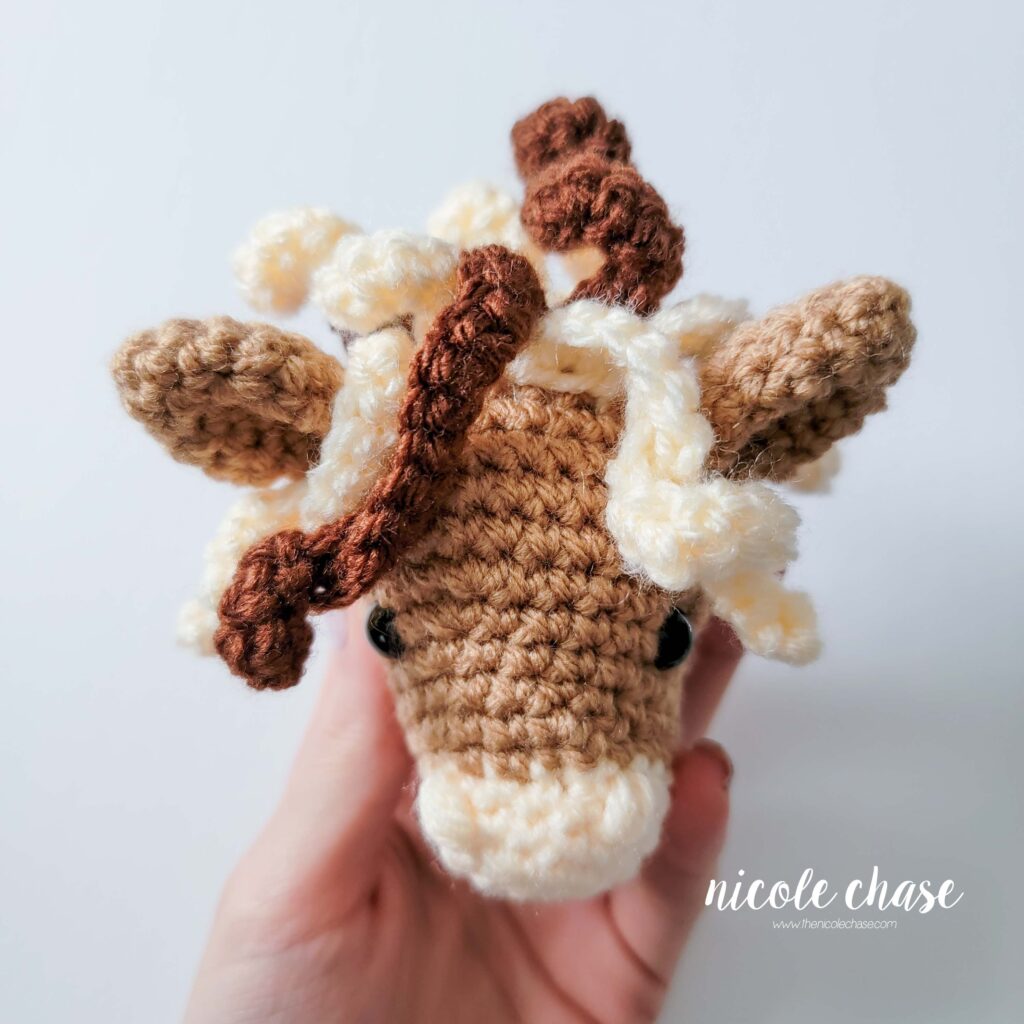
Attach head to the crochet horse body so that the snout is facing straight out, attaching body to approximately R12-16 of the bottom of the head.
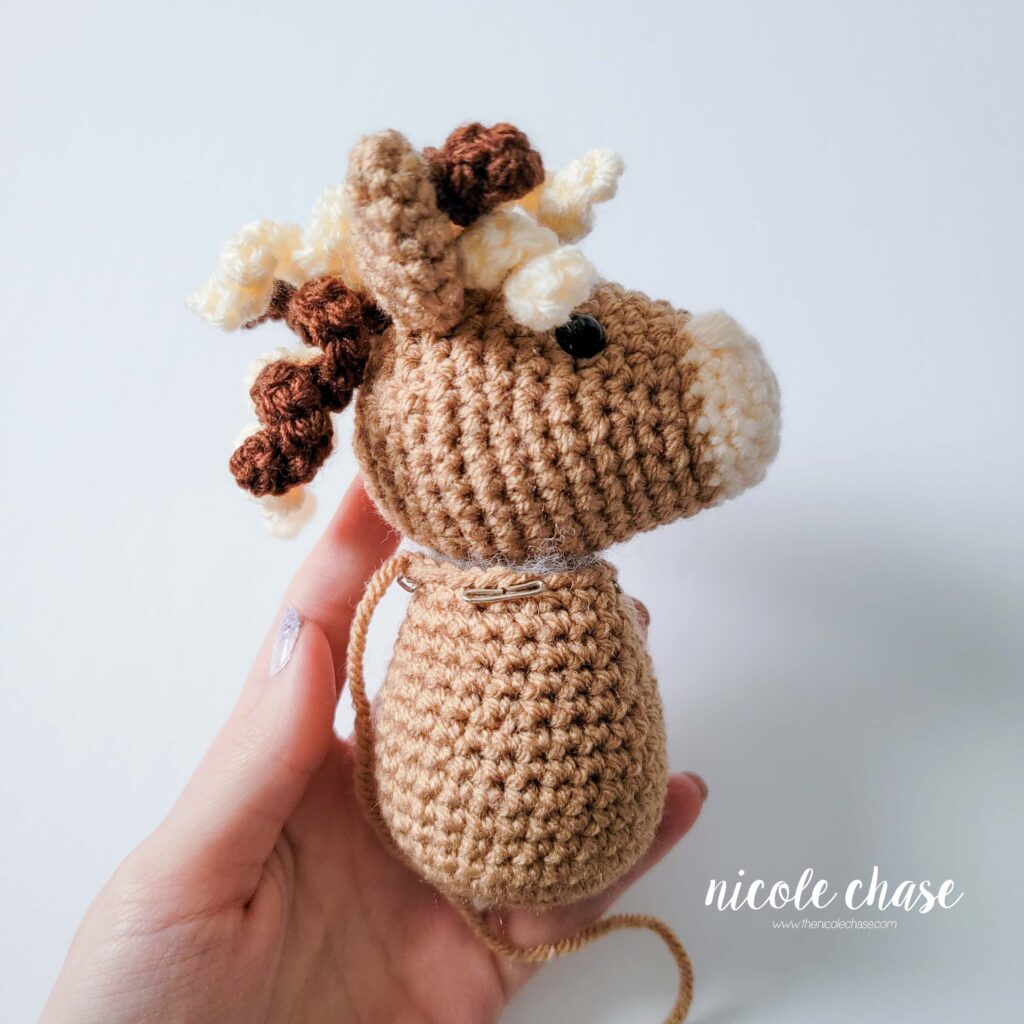
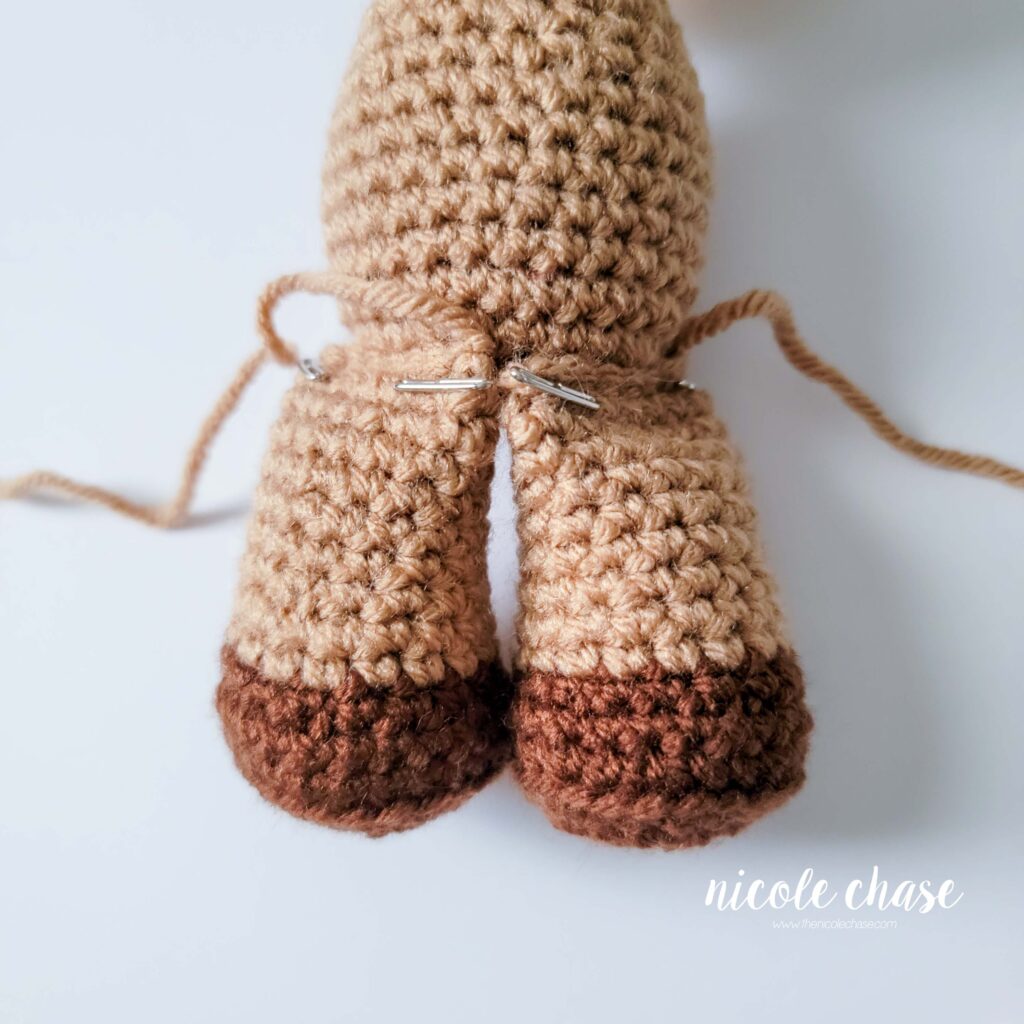
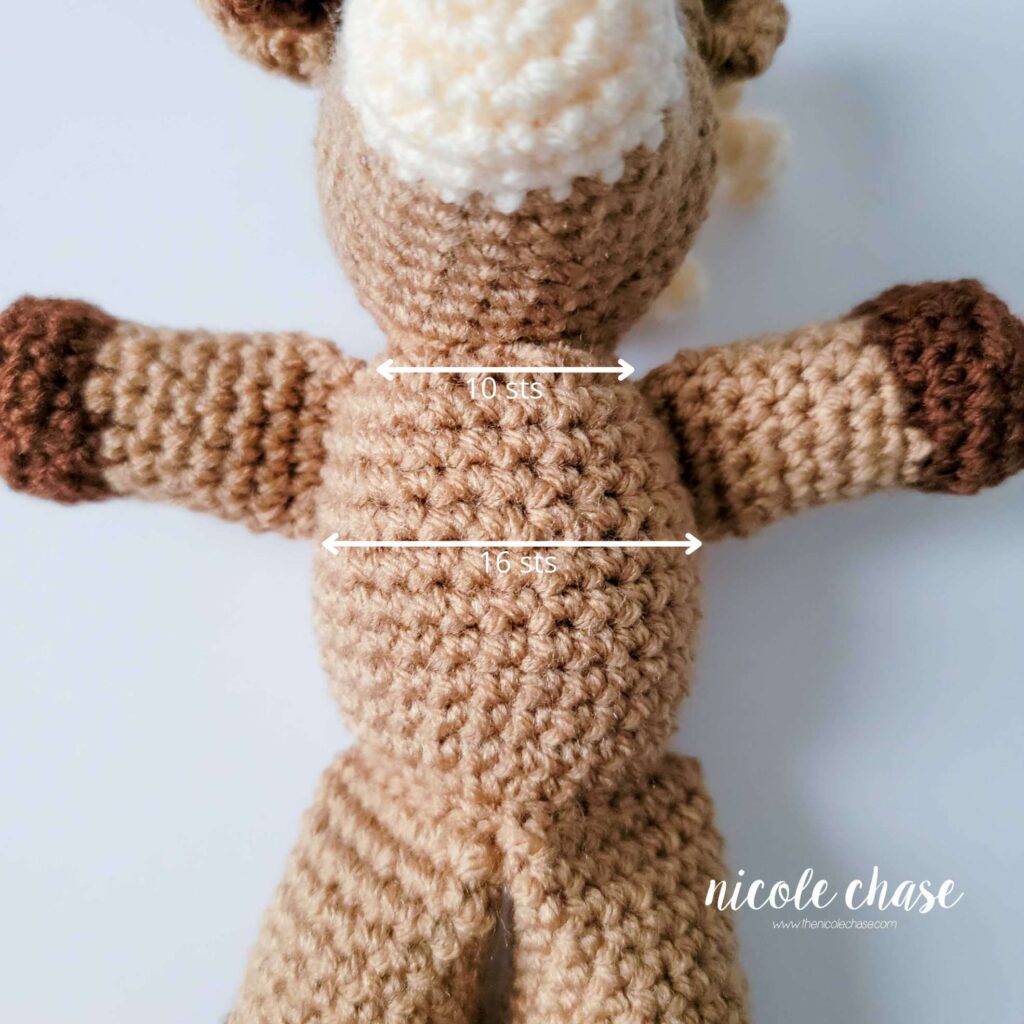
Attach legs over R4-5 of the body, with each inside end of the legs touching in the middle.
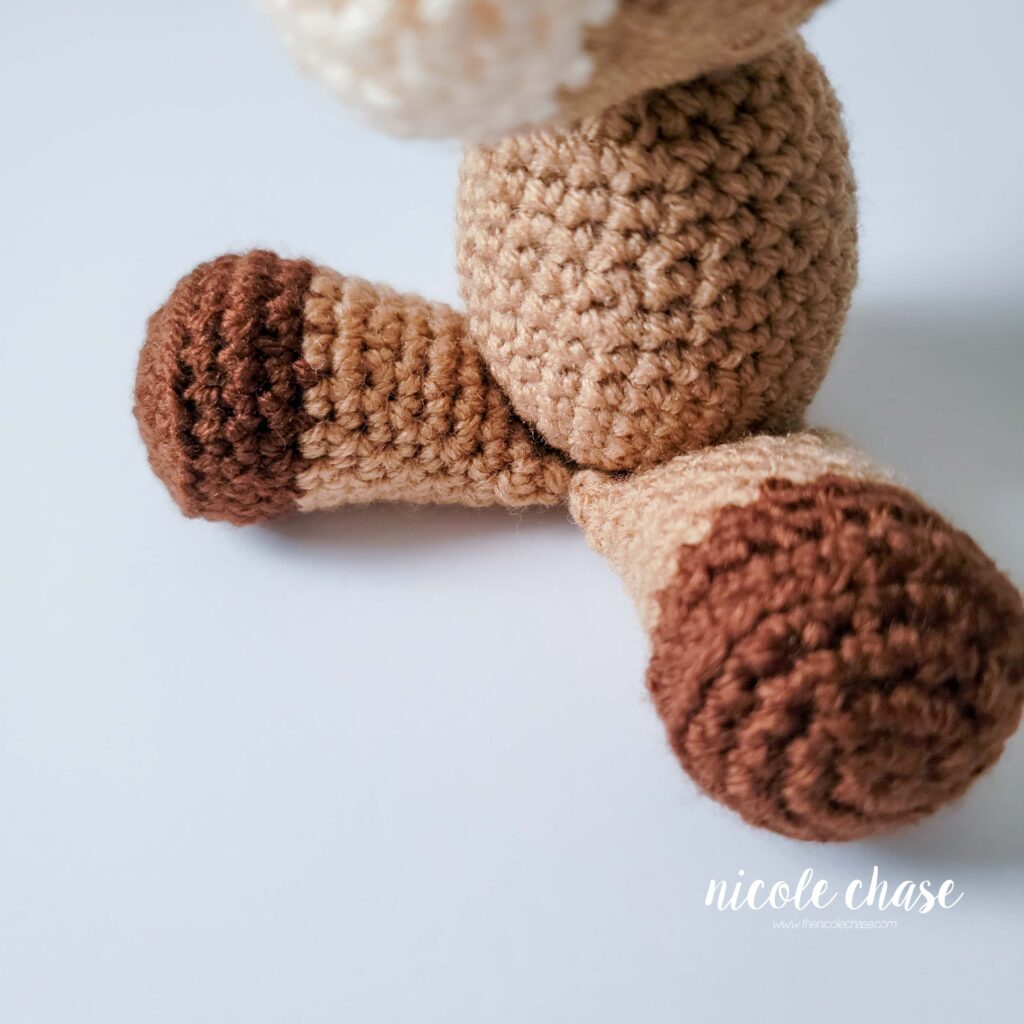
Attach arms over R11-15 on each side of the body. At the top of the arms, leave approximately 10 sts between each arm across the front of the body. At the bottom of the arms, leave approximately 16 sts between each arm across the front of the body.

Attach the tail using the remaining hair curls A and B to the back of the body, at approximately R5-6 in the shape of an X, crossing over each other. Arrange the curls around each other so that the colors are evenly distributed.


Ad-Free PDF Pattern for Hailey the Horse
Tips & Tricks
- Use pins to hold the pieces of your free horse crochet pattern in place as you are sewing. This keeps everything from moving around and helps to ensure proper placement on your finished crochet horse.
- For more tips on improving your crochet horse and other projects, be sure to check out my list of amigurumi tips.
Alterations
- I love using larger plush yarns (such as chenille or blanket yarn) to make my amigurumi animals. To do so, simply adjust your yarn and hook size accordingly. There is no need to make any further adjustments to the pattern itself.
- If you make this free horse crochet pattern in a thicker yarn and larger hook size, keep in mind that your finished crochet horse will be larger than what is noted here.
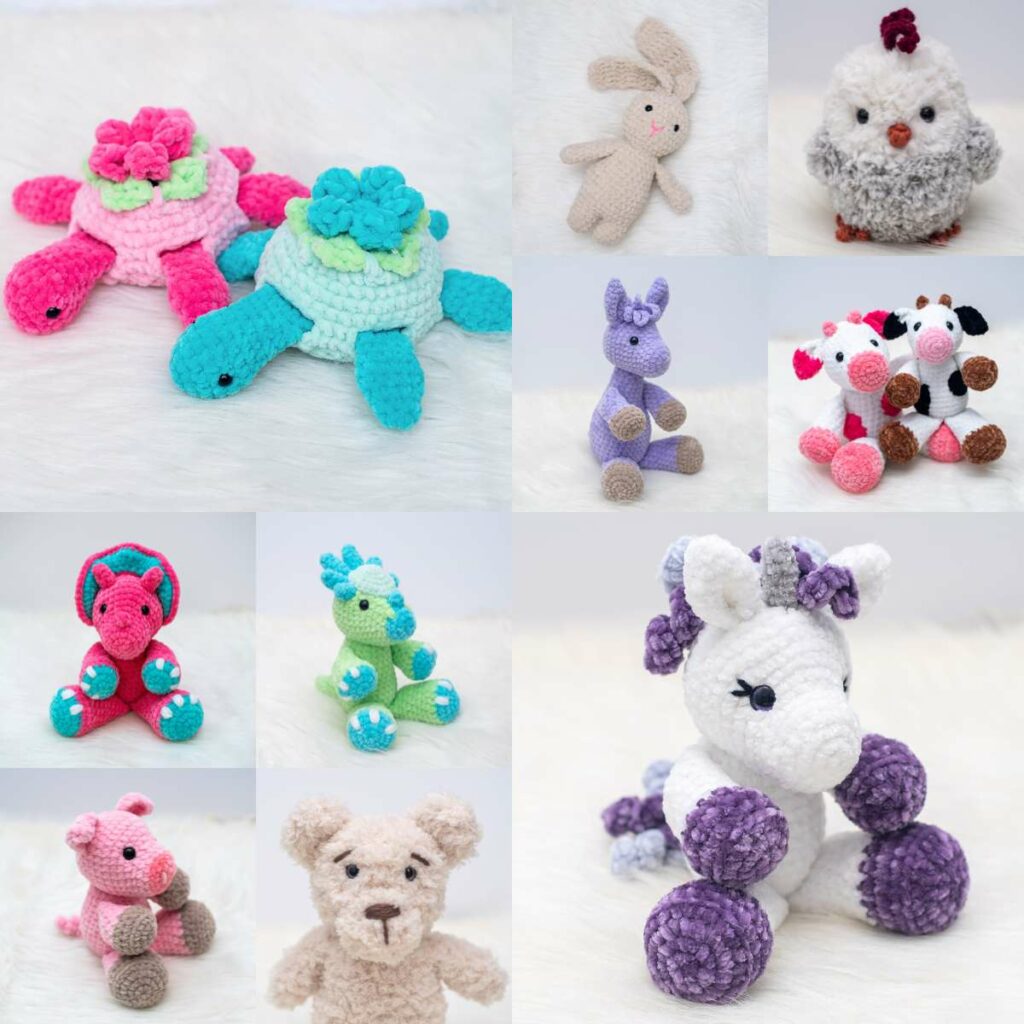
More Free Farm Animal Crochet Patterns
Did you enjoy this horse crochet pattern? Want to add more farm animals to your collection? After you finish this free horse crochet pattern, be sure to check out my other amigurumi farm animals. You may especially like my free cow crochet pattern, free highland cow crochet pattern, or my free pig crochet pattern. Looking for more? Browse my full list of crochet animal patterns for more ideas!


I hope you enjoyed this pattern! If you make it, leave me a comment below.
Want to see more from me? Be sure to subscribe to my email newsletter so that you never miss a pattern!
Follow along with me on Instagram for daily updates and a behind the scenes look at my designs.
I’d love to see what you make with this tutorial! Don’t forget to share your finished work with me: on social media by tagging me @thenicolechase, in your Ravelry projects, or post over in my Facebook group!
Thanks for stopping by! Happy crafting!
Nicole
PATTERN COPYRIGHT © 2026 NICOLE CHASE. ALL RIGHTS RESERVED.
PATTERN MAY NOT BE ALTERED, COPIED, REDISTRIBUTED OR SOLD AS YOUR OWN PATTERN.
YOU MAY SELL THE FINISHED PRODUCT ON A SMALL SCALE. PATTERN/DESIGN CREDIT GIVEN TO WWW.THENICOLECHASE.COM IS APPRECIATED. PERMISSION TO SELL DOES NOT INCLUDE MASS PRODUCTION. LARGE SCALE PRODUCTION IS PROHIBITED.
PHOTOGRAPHY COPYRIGHT © 2026 NICOLE CHASE. ALL RIGHTS RESERVED.
PHOTOS MAY NOT BE ALTERED, COPIED, REDISTRIBUTED OR SOLD AS YOUR OWN.
This post may contain affiliate links. If you make a purchase through links on our site, we may earn a commission.
Oh my gosh, I did not know that. Thank you so much this pattern and and all of your patterns are so amazing.
I love this horse pattern. It’s so cute and adorable! AlthoughI had a question. Can you make it into a unicorn by adding a horn and if so, how do you make the horn? I’m curious because I’m making my little sisters Christmas presents and they love unicorns.
I’m so glad that you like it! I actually have a free unicorn pattern that is this same size. You could either make that, or just use the horn from it. You can find it here: Mini Poppy the Unicorn.
Love this pattern..thanks 4 posting
I’m so glad that you’ve enjoyed it!
Thank you so much for this adorable horse pattern. You made it very easy to understand and follow. This is my second amigurumi project. I really appreciate you sharing your pattern!
I’m so glad you enjoyed it, thank you!