How to Read a Yarn Label
This post may contain affiliate links. If you make a purchase through links on our site, we may earn a commission.
Have you ever brought home what you thought was the perfect yarn, only to realize your project turned out a completely different size than the pattern promised? Learning how to read a yarn label is the ultimate secret weapon for any beginner crocheter. Beyond just the color and the brand, that little paper sleeve holds critical details: from deciphering mysterious yarn label symbols to tracking down the exact dye lot number so your project doesn’t end up with accidental mismatched stripes.
In this tutorial I’m breaking down every abbreviation and care icon step-by-step so you can confidently choose the right yarn for your next crochet project.

Table of Contents
Why Should I Know How to Read a Yarn Label?
Learning how to read a yarn label is about more than just matching a color to a pattern: it’s about protecting your time, money, and sanity. Every skein of yarn has specific structural properties, and ignoring them completely changes how your project behaves.
When you know exactly what to look for on that little paper sleeve, you avoid the most common beginner pitfalls:
- Stuffing Leaking Out of Amigurumi: If you pick a yarn that is thinner than what the pattern calls for without downsizing your hook, your stitches will be loose. For plush toys, this means your fiberfill stuffing will peek through or leak out entirely.
- Garments That Don’t Fit: Different fiber contents and weights drape and stretch differently. A sweater made of 100% content will stretch out and sag heavily under its own weight over time, whereas an acrylic or wool blend will hold its shape much better.
- Running Out of Yarn Mid-Project: Looking only at the physical size of a skein is deceiving. Two balls of yarn can look identical in size, but because of different fiber densities, one might have 150 yards while the other has 300 yards.
Taking the extra time to read the label ensures your hard work turns out how you intend. If you are brand new to the craft, mastering this skill goes hand-in-hand with learning crochet basics for beginners to give your projects a flawless, professional finish.
Anatomy of a Yarn Label
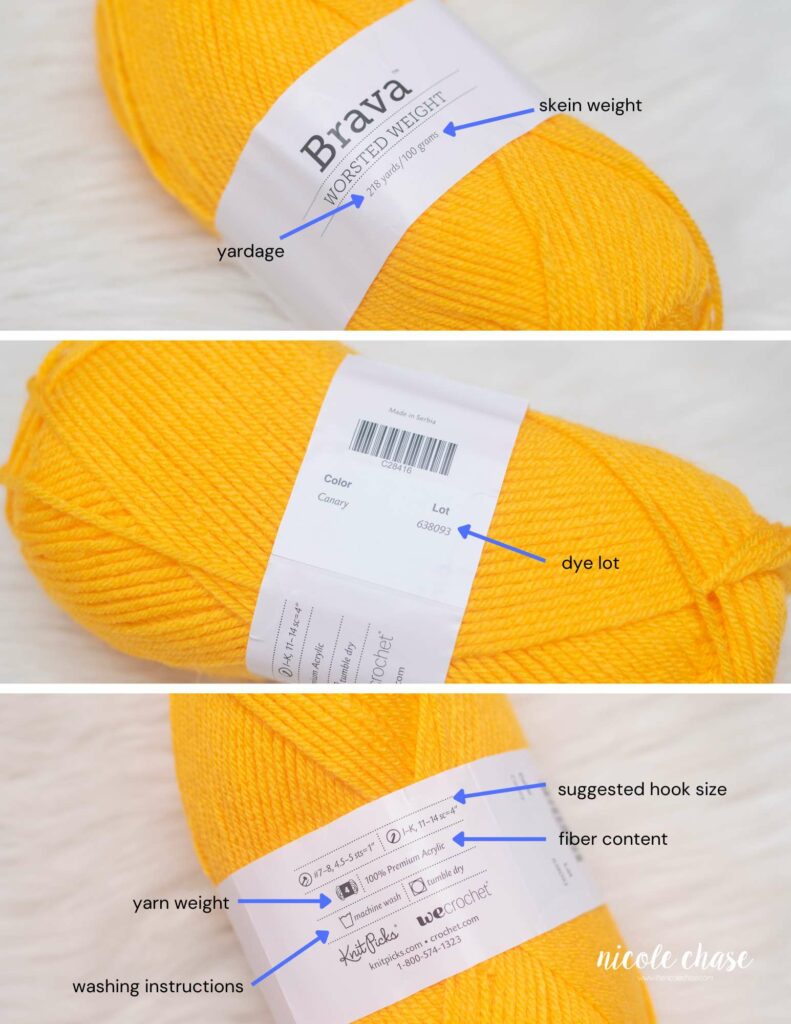
While every brand designs their packaging a little bit differently, almost all manufacturers include the same core technical details on a yarn sleeve. If you know where to look, you can find everything you need to evaluate a skein for your project in just a few seconds.
The primary parts of a yarn label we will cover include:
- Yarn Weight: The thickness of the yarn strand.
- Yardage & Skein Weight: Exactly how much material is in the ball.
- Fiber Content & Dye Lots: What the yarn is made of and its color batch number.
- Washing & Care Instructions: How to clean your finished project without ruining it.
- Suggested Hook Size: The manufacturer’s recommended size for your crochet hook.
Take a look at the diagram below to see exactly how these technical elements are laid out on a real label.

Video Walkthrough: How to Read a Yarn Label
If you prefer a visual guide, grab a skein from your stash and follow along with me in this quick video as I break down a real yarn label step-by-step.
This video is also available on YouTube. Watch this video: How to Read a Yarn Label on YouTube.
Understanding Yarn Weight
The strand thickness, or yarn weight, is a universal standard categorized by the Craft Yarn Council. If you are wondering how to tell weight of yarn on label, look for a small yarn skein icon with a number from 0 to 7 stamped right inside it.
A common size for beginners is worsted weight yarn, which is identified by a number 4 or classified as medium. For a complete breakdown of every single category, the Craft Yarn Council offers a very detailed overview of the yarn weight system.

Most crochet patterns will explicitly state what weight the designer used. Matching this detail is vital depending on what you are making:
- For Garments and Accessories: If you are crocheting a sweater, beanie, or mittens that need to fit a specific body size, you must use the exact yarn weight provided by the pattern (or appropriately match the gauge). Swapping number 4 medium yarn for a number 3 light yarn will leave you with a garment that is drastically too small.
- For Amigurumi and Plush Toys: If you are making a stuffed animal, the final proportions usually aren’t critical, meaning you have much more freedom to experiment with different sizes! However, keep this golden rule in mind: if you change the yarn weight, you must adjust your crochet hook size to suit that chosen yarn. If you scale down to a finer yarn, but use a large hook, your fabric will have large gaps, causing your poly-fil stuffing to leak through. Conversely, scaling up to a bulky blanket yarn requires a much larger hook to keep your stitches smooth and pliable.
Decoding Care and Washing Instructions
When learning how to read a yarn label, checking the care instructions is vital to ensuring your hard work doesn’t shrink, felt, or completely fall apart the first time it needs washed.
Manufacturers use standard washing symbols for yarn to communicate exactly how to handle the finished item. These care symbols on yarn will tell you:
Washing Instructions
- Do Not Wash: This item cannot be submerged in water safely. You will need to rely strictly on spot cleaning or professional dry cleaning.
- Machine Wash: Safe to clean in a standard household washing machine using a regular cycle.
- Water Temperature: Dictates the maximum heat seating allowed. A 30°C marking means you should use a cold water cycle to prevent color bleeding or fiber shrinkage.
- Machine Wash, Delicate: The double underline indicates that the yarn cannot handle a rough agitation cycle. You must use the delicate or gentle cycle to prevent friction damage and fuzzing.
- Hand Wash: Do not put this in a washing machine. Gently wash the item by hand in a sink or basin with a mild detergent, taking care not to wring or twist the wet fibers.

Drying Instructions
- Do Not Tumble Dry: This yarn cannot handle the heat or friction of a clothes dryer. Putting it in the machine will likely cause the fibers to shrink, felt, or distort.
- Tumble Dry: It is safe to dry this item in a standard clothes dryer using a regular cycle setting.
- Low Heat: The single dot inside the circle means you must use a low temperature or delicate setting on your dryer. Excessive heat can damage acrylic fibers, making them lose their elasticity and texture permanently.
- Dry Flat: Do not hang this item up or put it in the dryer. The heavy weight of wet yarn will stretch out your stitches if hung. Instead, reshape the item and lay it flat on a clean towel or a mesh drying rack to air dry.

Spot Cleaning Only
If you see a yarn label that explicitly states “Spot Clean Only”, it means that the yarn cannot survive being submerged in water or put through any machine cycle. This is incredibly common with highly textured novelty yarns, delicate metallics, faux fur yarns, or structural fibers like raffia.
When caring for a project made with these specialty yarns, use this expert method to clean them safely:
- Target the Stain directly: Mix a tiny drop of mild detergent with cool water.
- Dab, Don’t Rub: Dip a clean, soft cloth into the soapy water and gently dap at the soiled area. Agressive scrubbing will cause textured or fuzzy yarns to distort, mat, or pill.
- Rinse Carefully: Use a separate cloth dampened with plain cool water to press into the spot and lift out any leftover soap.
- Air Dry: Lay the item flat in a well-ventilated area away from direct heat or sunlight.
Always check your label before washing any finished project. As a designer, my golden rule is to always care for the project based on the most delicate fiber used. For example, if you crochet an amigurumi toy using a machine-washable acrylic yarn, but sew on a mane or details using a delicate wool, you cannot toss that toy in the washing machine. Doing so will ruin the wool components.
Suggested Hook Size
Yarn labels feature a small icon shaped like a crochet hook with a recommended hook size (or range of sizes) listed right beside or inside it. This measurement (usually provided in millimeters and US letter/number sizes) gives you the perfect starting point if you are working with a specific yarn for the first time.
However, how you use this recommendation depends entirely on what you are making:
- For General Projects (Blankets, Garments, Scarves): The suggested hook size on the label is designed to give the yarn its ideal drape and flexibility. If you use the recommend hook, your fabric will be soft, stretchy, and true to standard measurements.
- For Amigurumi and Stuffed Toys: You will almost always want to disregard the recommended hook size and drop down two to three sizes smaller than what the yarn label suggests.
Why Do You Downsize Your Hook for Amigurumi?
Manufacturers recommend hook sizes based on standard garment tension. If you use that same hook to make a stuffed toy, your stitches will be too loose and flexible. When you stuff the toy with poly-fil, the fabric will stretch open, exposing the stuffing or letting it leak out completely.
Choosing a smaller hook forces your stitches to stay tight, dense, and rigid. This creates a solid fabric that completely hides your stuffing and helps your amigurumi hold its shape perfectly over time. You can dive deeper into choosing the perfect hook in my guide on amigurumi hook sizes here.
Fiber Content
The fiber content tells you exactly what materials were spun together to create the yarn strand. It is typically printed right alongside the percentage breakdowns near the yarn weight icon, looking something like:
100% Acrylic
or
95% Acrylic / 5% Wool
Paying attention to fiber content is essential for three major reasons:
- Durability and Washing: If your finished item needs to be tossed in the wash frequently (like baby blankets or children’s toys), synthetic fibers like 100% acrylic or super wash wool blends are excellent choices because they withstand regular laundering without shrinking or felting.
- Drape and Weight: Plant-based fibers like bamboo and cotton have a heavier, fluid drape that is perfect for summer garments, whereas wool has structural elasticity and warmth ideal for winter wear.
- Allergies and Sensitivities: Checking this section ensure you don’t accidentally gift a project made with animal fibers (like wool or alpaca) to someone with a skin sensitivity or allergy.
How to Find the Dye Lot Number on Yarn
If you are working on a project that requires more than a single ball of yarn, checking the dye lot number is the most critical step you can take before leaving the craft store.
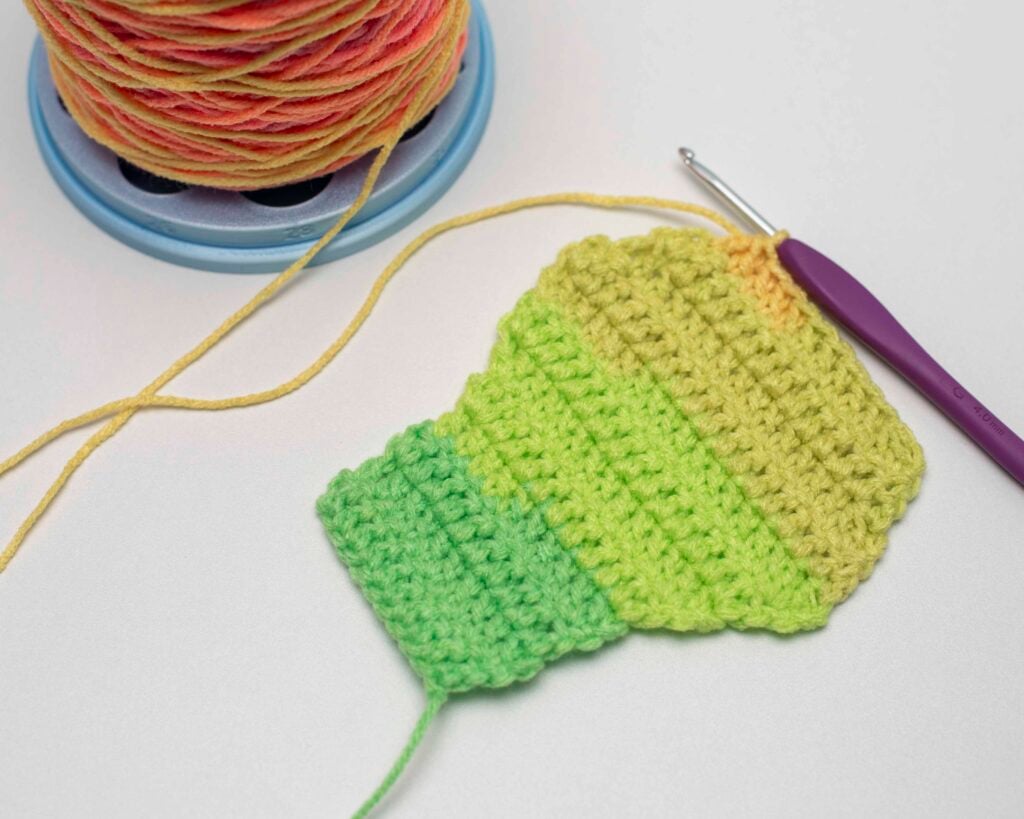
A dye lot number is a unique code assigned to a specific batch of yarn that was made with the same exact vat of dye at the same time. Because water temperature, chemical balance, and fiber absorption vary slightly from batch to bath, different dye lots will have incredibly subtle color variations. While two skeins of a solid red yarn might look identical under harsh craft store lighting, the slight shift in shade will become obvious as a line right through the middle of your finished crochet project.
To find the dye lot on a label, look right next to the color name or color number barcode. It is usually clearly labeled with the word Lot followed by a string of numbers.

What if You Can’t Match Your Dye Lots?
If you are working on a small amigurumi project that only takes one skein, you do not need to worry about the dye lot at all. However, if you are working on a large blanket or garment and realize mid-project that you have to use mismatched dye lots, use this technique to hid the color transition:
The Blending Trick: Do not just finish one skein and start the next. Instead, alternate rows between the two different dye lots for a few inches. This breaks up the solid line of color variation, blending the two distinct batches together so the shift isn’t noticeable.
Yardage vs. Skein Weight
The next step in mastering your yarn label is identifying exactly how much material is inside the skein. This section is usually listed as a combination of yardage (the length of the strand) and skein weight (the physical weight of the ball).
Depending on the brand you are looking at, these measurements might be displayed in imperial units, metric units, or both. For example, a label will generally look like one of these standard layouts:
- 218 yards / 100 grams
- 236 yds / 215m and 5 oz / 141g
Here is exactly what those numbers represent:
- Yardage (Length): Indicates the total length of the yarn strand in yards and/or meters (abbreviated as yds or m).
- Skein Weight (Mass): Indicates how heavy the physical ball of yarn is in ounces and/or grams (abbreviated as oz or g).

Why Physical Weight Can Be Deceiving
The relationship between a yarn’s length and its physical weight is highly technical. A heavy, dense fiber like 100% cotton weighs much more than a fluffy, lightweight fiber like 100% acrylic.
This means that two skeins of yarn can weigh exactly the same (for example, 100 grams), but the acrylic skein might give you 300 yards of working yarn, while the heavy cotton skein might only give you 150 yards.
Designer Pro Tip: When shopping for a crochet pattern, always buy your yarn based on the total yardage required, rather than the number of skeins. If a pattern says you need 400 yards of worsted weight yarn, check the exact yardage on your chosen label. Relying purely on the physical weight or size of the ball can leave you running completely out of yarn right before finishing your project!
Real-World Yarn Label Examples
The location of these markings will look slightly different depending on the brand of yarn you buy. However, once you know what the core icons and terminology look like, you will be able to read a yarn label for any brand you choose!
Below is a direct comparison showing how two popular brands layout these exact same elements on their packaging.

Save this Guide for Later!
Don’t let a a mysterious icon stall your next project. Pin this post to your favorite crochet board so you can easily reference these care symbols and yarn weight charts the next time you’re standing in the yarn aisle!


Frequently Asked Questions
What is a Dye Lot?
A dye lot is a unique number assigned to a specific batch of yarn dyed at the same time. Checking this code ensures all your skeins match perfectly, preventing any sudden color shifts across your rows.
How many yards is in one skein of yarn?
You can easily find the total yardage printed on your yarn label. The yardage (length) and skein weight (mass) are typically displayed together. They may be written in formats like 218 yds / 100 g or 236 yds / 215 m and 5 oz / 141 g.
How to wash crochet items?
Always look closely at your yarn label for its specific washing symbols. The manufacturer’s icons will tell you exactly whether the yarn can handle a standard washing machine, requires a delicate cycle, or should be washed by hand and laid flat to dry.
Ready to Master Amigurumi?
Learning how to read a yarn label is an important step on your crochet journey! If your ultimate goal is to create adorable plush toys, check out my comprehensive, and free, Amigurumi for Beginners Course. This step-by-step program is designed to take you from a complete beginner to confidently reading patterns, perfecting your tension, and seamlessly assembling your very first stuffed animals without any of the stress.
Learn How to Crochet Amigurumi!
Sign up for my free amigurumi for beginners course and learn everything you need to know to make your own crochet plush!
To see what is included, check out the course summary page!
More Crochet Tutorials and Resources
If you are brand new to crocheting, mastering the basics is so important. Dive into my step-by-step tutorials on how to crochet a chain and how to single crochet to build your foundation.
For those diving into plush toys, don’t miss my essential guide on identifying the right side vs. wrong side of amigurumi so your pieces never look inside out, or explore my complete collection of amigurumi tips and tricks to level up your toy-making skills!
I hope you enjoyed this post! Be sure to leave me a comment below to let me know what you think.
Want to see more from me? Be sure to subscribe to my email newsletter so that you never miss a post!
Follow along with me on Instagram for daily updates and a behind the scenes look at my designs.
I’d love to see what you make with this tutorial! Don’t forget to share your finished work with me: on social media by tagging me @thenicolechase, in your Ravelry projects, or post over in my Facebook group!
Thanks for stopping by! Happy crafting!
Nicole
PATTERN COPYRIGHT © 2026 NICOLE CHASE. ALL RIGHTS RESERVED.
PATTERN MAY NOT BE ALTERED, COPIED, REDISTRIBUTED OR SOLD AS YOUR OWN PATTERN.
YOU MAY SELL THE FINISHED PRODUCT ON A SMALL SCALE. PATTERN/DESIGN CREDIT GIVEN TO WWW.THENICOLECHASE.COM IS APPRECIATED. PERMISSION TO SELL DOES NOT INCLUDE MASS PRODUCTION. LARGE SCALE PRODUCTION IS PROHIBITED.
PHOTOGRAPHY COPYRIGHT © 2026 NICOLE CHASE. ALL RIGHTS RESERVED.
PHOTOS MAY NOT BE ALTERED, COPIED, REDISTRIBUTED OR SOLD AS YOUR OWN.
This post may contain affiliate links. If you make a purchase through links on our site, we may earn a commission.