Marley Lace Top – Free Crochet Pattern
This post may contain affiliate links. If you make a purchase through links on our site, we may earn a commission.
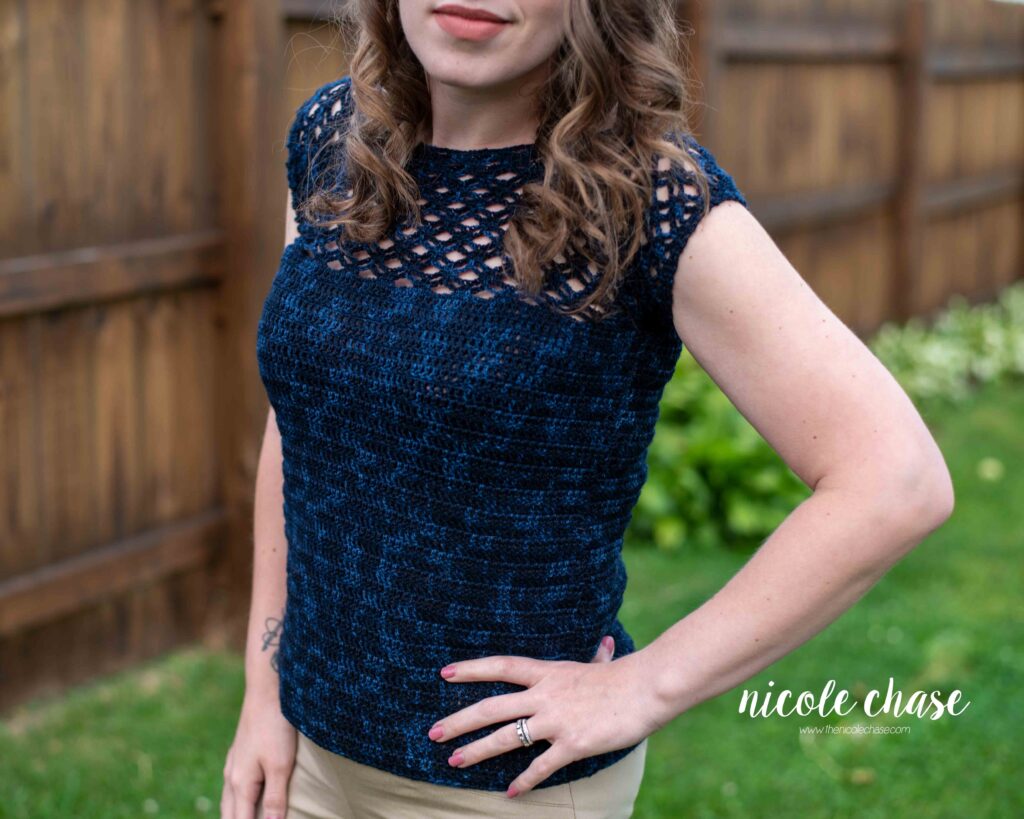
I am so excited to finally be sharing my Marley Lace Top pattern with you! This crochet summer top design has had a few firsts for me: my first time working with a fingering weight yarn, my first time using a hank, and also my first garment pattern design! I hope you enjoy this free top crochet pattern!
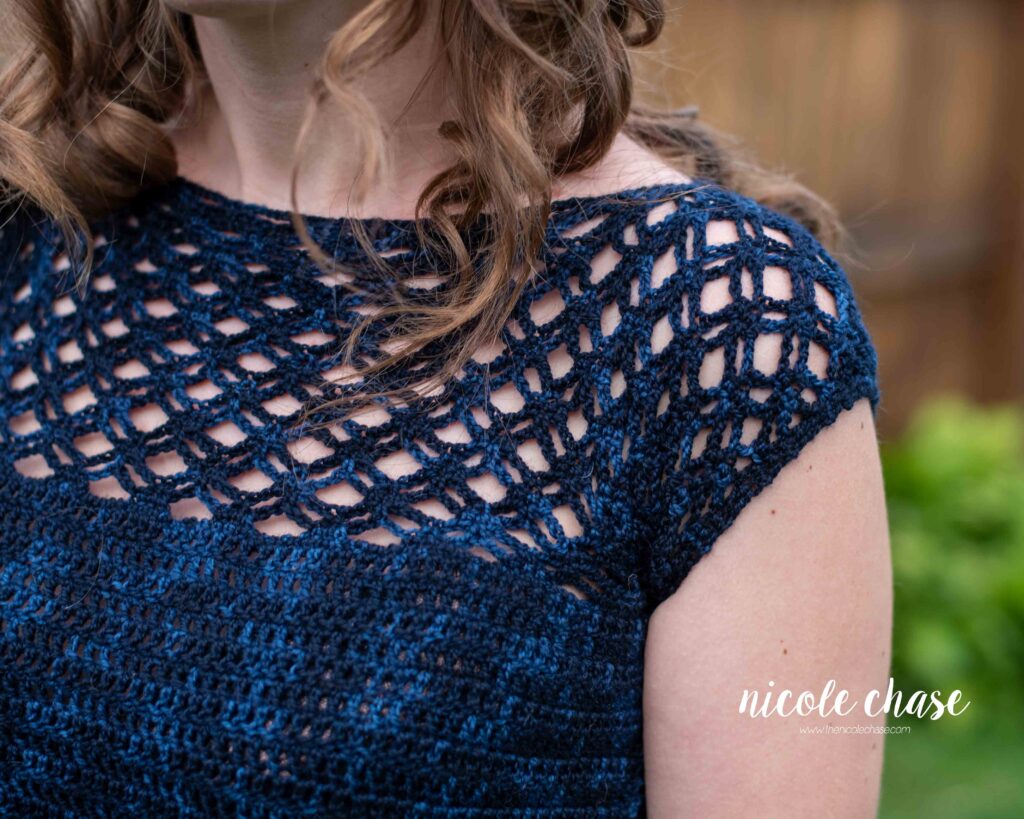
Table of Contents
I would classify this crochet summer top pattern as “intermediate” skill level.
I hope you enjoy this free crochet pattern available here on my blog! An ad-free, formatted PDF version of this crochet pattern is also available for purchase here:
Save this free top crochet pattern to your Ravelry favorites.
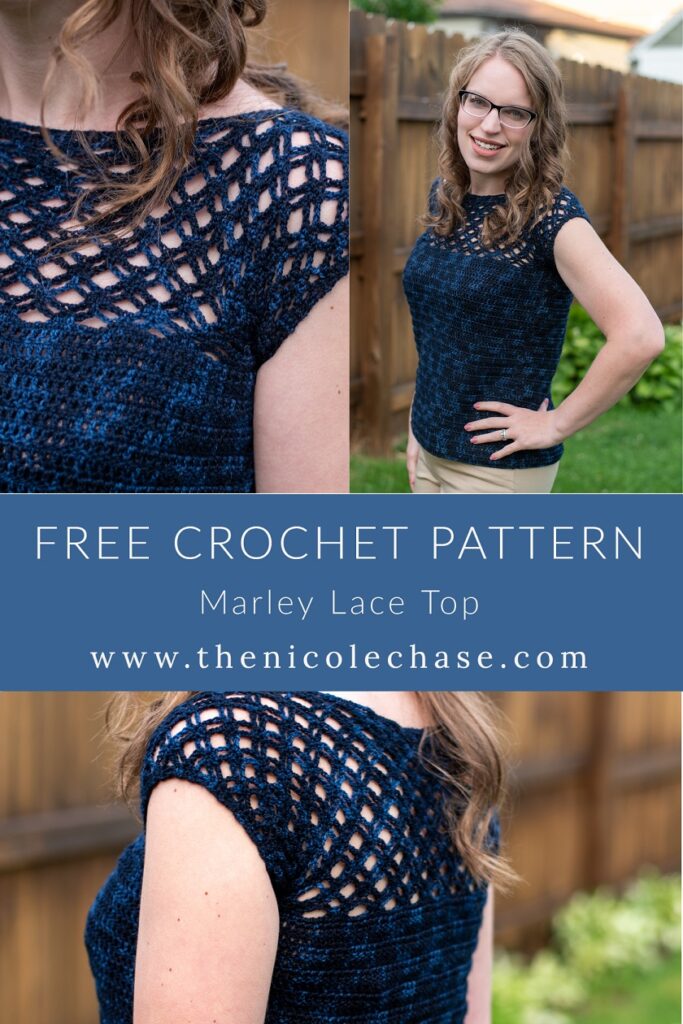
Pin this crochet summer top pattern for later.
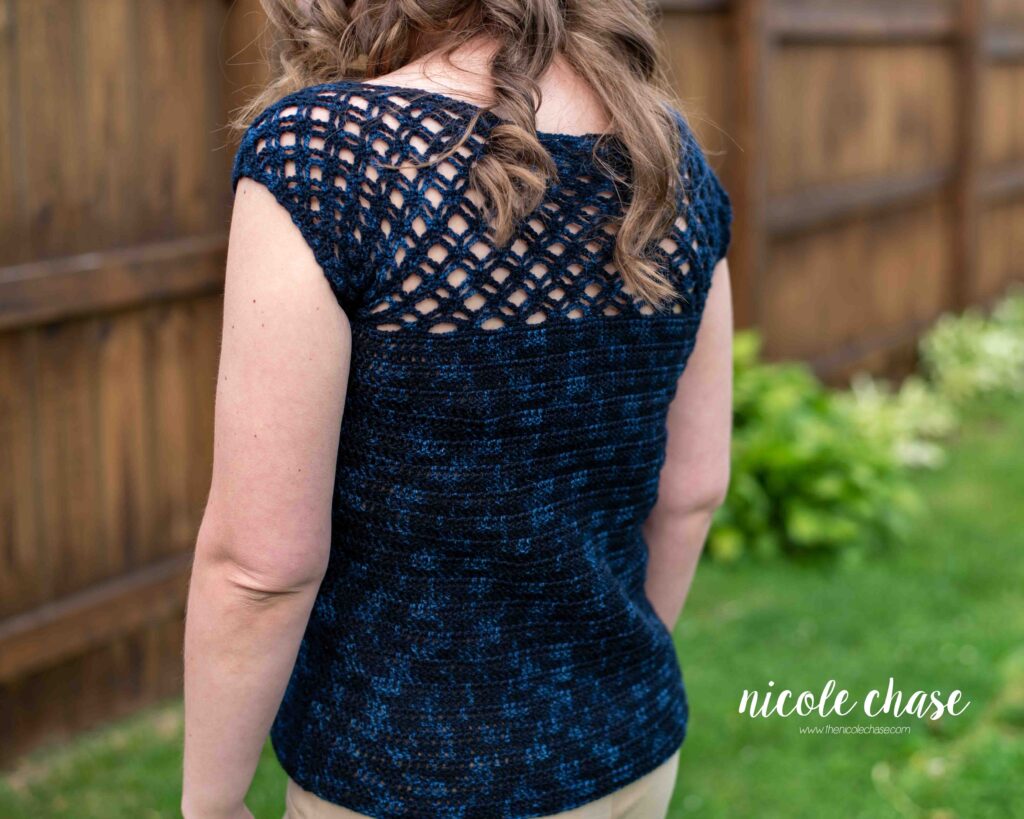
This free top crochet pattern is worked as one piece, with only minimal seaming required, which is a win in my book! I used this beautiful Hawthorne yarn from WeCrochet for this crochet summer top, which comes in some amazing colorways! I think that this top shows off the Midwinter Kettle Dye perfectly!
Free Crochet Pattern for Marley Lace Top

Pattern Specifics
Sizes: XS, S, M, L, XL, 2X, 3X, 4X, 5X
Gauge: 2” = 9 DC sts and 6 DC rows; see approximate lengths for each size
Hook Size: 3.5mm (E) crochet hook
Other Tools: tapestry needle, stitch markers, scissors
Yarn Weight: Super Fine (1), Fingering
Yarn Used: Hawthorne Kettle Dye Yarn
Approximate Yardage: XS- 608 yds, S- 700 yds, M- 786 yds, L- 874 yds, XL- 963 yds, 2X- 1055 yds, 3X-1136 yds, 4X-1242 yds, 5X- 1325 yds
Other Materials: n/a
Stitch Abbreviations
st = stitch
sl st = slip stitch
ch = chain
tch = turning chain
SC = single crochet
DC = double crochet
Notes
- Note that your yarn choice, hook size, and tension will affect the sizing of this project. Please check your gauge prior to starting this pattern. If you do not compare your gauge to that of the design, it is possible that your sizing will be affected.
- Note that your choice of fiber will impact the fit and drape of your top. For best results, I recommend using a yarn with minimal stretch.
- Chain 1 at the beginning of each row does NOT count as a stitch (unless otherwise specified).
- Chain 3 at the beginning of each lace row DOES count as a stitch (unless otherwise specified).
- Chain 2 at the beginning of each body row does NOT count as a stitch (unless otherwise specified).
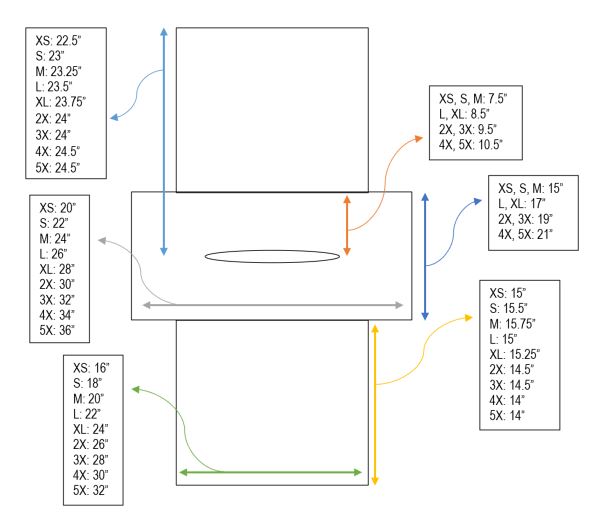
- Approximate schematic measurements for each size are what the piece should comfortably stretch to (the actual measurements will be shorter).
- If you need to adjust the width of the lace piece to meet measurements, be sure to do so by adding or removing multiples of 6 to your starting chain. Starting chain should be a multiple of 6, plus 4 chains, with an even number of multiples.
- See tutorial diagram.
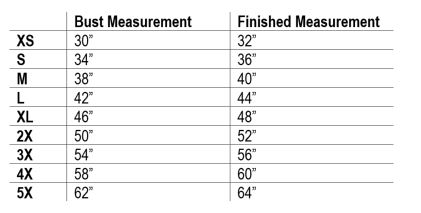
Sizing
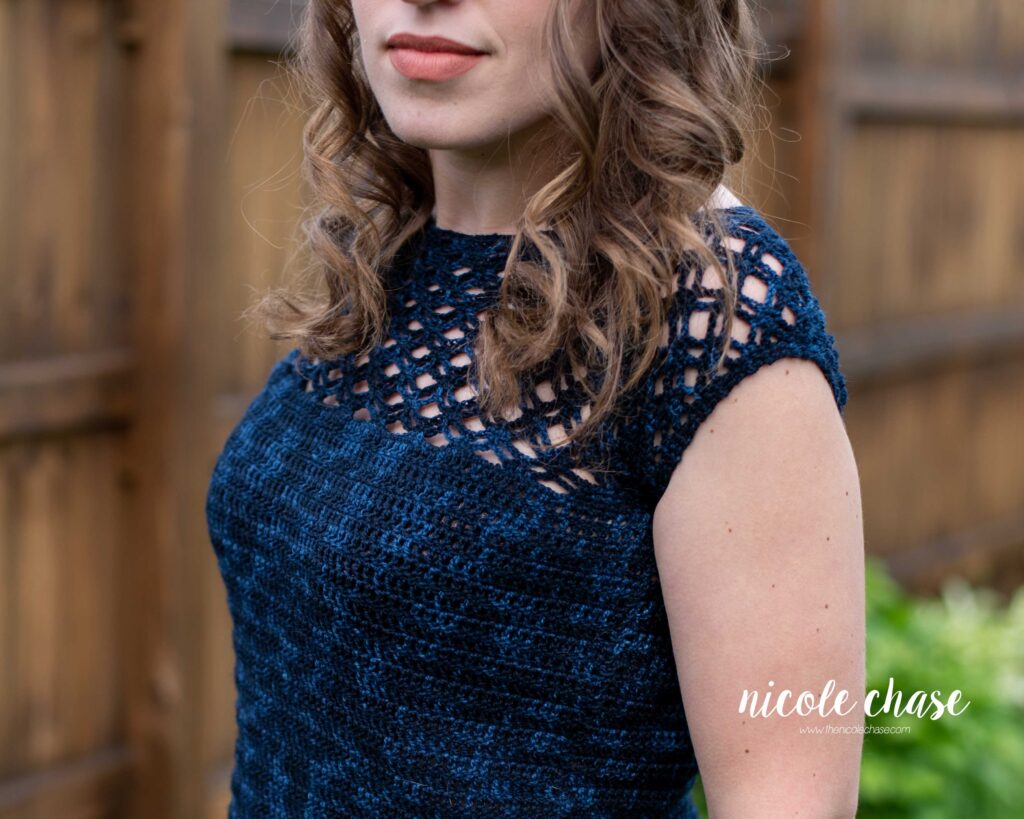
This pattern is sized based on your bust measurement (see below). It is intended to have a “classic” fit, with approximately 2” positive ease.
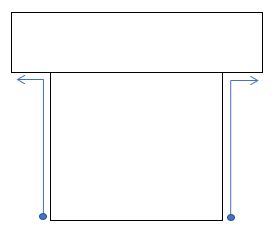
Schematics
Pattern
Part 1a (Lace front)
XS: Ch 88
S: Ch 100
M: Ch 112
L: Ch 124
XL: Ch 136
2X: Ch 148
3X: Ch 160
4X: Ch 172
5X: Ch 184
For all sizes:
R1: Work 1 SC in 2nd ch from hook. 1 SC in each of the next 2 sts. *Ch 5, skip next 3 sts, 1 SC in each of the next 3 sts. Repeat from * across. Turn.
R2: Ch 1. 1 SC in each of the first 2 SC. *Ch 3, skip next SC, 1 SC in 3rd ch of the next ch5 space, ch 3, skip next SC, 1 SC in next SC. Repeat from * across. 1 SC in last st. Turn.
R3: Ch 3 (counts as DC). Skip first SC, 1 DC in next SC. Ch 2. *1 SC in 3rd ch of next ch3 space, 1 SC in next SC, 1 SC in first ch of next ch3 space**. Ch 5. Skip next SC. Repeat from * across, ending last repeat at **. Ch 2, 1 DC in each of the last 2 SC sts. Turn.
R4: Ch 1. SC in each of the first 2 DC. *Ch 3, Skip next SC, 1 SC in next SC, Ch 3**, Skip next SC, 1 SC in 3rd ch of next ch5 space. Repeat from * across, ending last repeat at **. 1 SC in next DC, 1 SC in top of tch. Turn.
R5: Ch 1. 1 SC in each of the first 2 SC, 1 SC in first ch of the next ch3 space. *Ch 5, skip next SC, 1 SC in 3rd ch of next ch3 space, 1 SC in next SC**, 1 SC in first ch of next ch3 space. Repeat from * across, ending last repeat at **. 1 SC in last SC. Turn.
Stitch Tutorial Diagram

R6-21: Repeat R2-5.
For sizes XS, S, or M size, move on to part 1b.
R22-25: Repeat R2-5.
For sizes L, or XL, move on to part 1b.
R26-29: Repeat R2-5.
For sizes 2X, or 3X, move on to part 1b.
R30-33: Repeat R2-5.
For sizes 4X, or 5X, move on to part 1b.
Part 1b (Neck hole and lace back)
R22(26, 30, 34): Continue with R2 pattern across the specified number of ch spaces.
XS: 3 ch spaces (making 5 new ch 3 spaces)
S: 4 ch spaces (making 7 new ch 3 spaces)
M, L: 5 ch spaces (making 9 new ch 3 spaces)
XL, 2X: 6 ch spaces (making 11 new ch 3 spaces)
3X-4X: 7 ch spaces (making 13 new ch 3 spaces)
5X: 8 ch spaces (making 15 new ch 3 spaces)
Next you will ch the specified amount below.
XS, S, M: Ch 62 (skipping 8 ch spaces)
L, XL: Ch 76 (skipping 10 ch spaces)
2X, 3X: ch 90 (skipping 12 ch spaces)
4X, 5X: Ch 104 (skipping 14 ch spaces)
Continue with R2 pattern in the next ch space, working in the remaining 3 / 4 / 5 / 6 / 7 / 8 ch spaces.
R23(27, 31, 35): Continue with R3 pattern creating:
XS: 1 ch 2 space and 2 ch 5 spaces
S: 1 ch 2 space and 3 ch 5 spaces
M, L: 1 ch 2 space and 4 ch 5 spaces
XL, 2X: 1 ch 2 space and 5 ch 5 spaces
3X, 4X: 1 ch 2 space and 6 ch 5 spaces
5X: 1 ch 2 space and 7 ch 5 spaces
With the final SC of your 3 SC sequence ending on the first ch stitch of the ch 62 / 76 / 90 / 104 from previous row. *Ch 5, skip the next 4 ch sts, 1 SC in each of the next 3 chs. Repeat from * with the first SC of your 3 SC sequence starting in your final ch st, and the remaining 2 SCs worked in the SC and ch st from previous row. (9 / 11 / 13 / 15) new ch 5 spaces created).
Continue with R3 pattern creating:
XS: 1 ch 2 space and 2 ch 5 spaces
S: 1 ch 2 space and 3 ch 5 spaces
M, L: 1 ch 2 space and 4 ch 5 spaces
XL, 2X: 1 ch 2 space and 5 ch 5 spaces
3X, 4X: 1 ch 2 space and 6 ch 5 spaces
5X: 1 ch 2 space and 7 ch 5 spaces
R24(28, 32, 36)-25(29, 33, 37): Repeat R4-5.
R26(30, 34, 38)-41: Repeat R2-5.
For sizes XS, S, or M size, fasten off and move on to part 2.
R42-49: Repeat R2-5.
For sizes L, or XL, fasten off and move on to part 2.
R50-57: Repeat R2-5.
For sizes 2X, or 3X, fasten off and move on to part 2.
R58-65: Repeat R2-5.
For sizes 4X, or 5X, fasten off and move on to part 2.
Part 2 (Body front)
You will begin working part 2 on the beginning chain that started part 1. Attach yarn to:
XS, S, M: 13th ch st of the beginning ch, in line with the beginning of a 3 SC sequence in R1.
L, XL: 16th ch st of the beginning ch, in line with the beginning of a ch 5 space in R1.
2X, 3X: 19th ch st of the beginning ch, in line with the beginning of a 3 SC sequence in R1.
4X, 5X: 22nd ch st of the beginning ch, in line with the beginning of a ch 3 space in R1.
R1: Ch 1. 1 SC in each stitch across, working 3 SC in the chs in line with the ch 5 spaces, until you’ve reached the specified number of SC sts.
XS: 63 sts (leaving 12 ch sts unworked)
S: 75 sts (leaving 12 ch sts unworked)
M: 87 sts (leaving 12 ch sts unworked)
L: 93 sts (leaving 15 ch sts unworked)
XL: 105 sts (leaving 15 ch sts unworked)
2X: 117 sts (leaving 18 ch sts unworked)
3X: 129 sts (leaving 18 ch sts unworked)
4X: 141 sts (leaving 21 ch sts unworked)
5X: 153 sts (leaving 21 ch sts unworked)
R2-39: Turn. Ch 2. 1 DC in each st across. (63 / 75 / 87 / 93 / 105 / 117 / 129 / 141 / 153 sts)
For sizes 4X, or 5X, fasten off and move on to part 3.
R40-41: Repeat R2.
For sizes 2X, or 3X, fasten off and move on to part 3.
R42: Repeat R2.
For sizes XS, or L, fasten off and move on to part 3.
R43: Repeat R2.
For sizes S, or XL, fasten off and move on to part 3.
R44: Repeat R2.
For size M, fasten off and move on to part 3.
Part 3 (Body back):
You will begin working part 3 on the last row of part 1. Attach yarn to:
XS, S, M: 7th SC stitch, in line with the beginning of a 3 SC sequence.
L, XL: Beginning of the 3rd ch 5 space.
2X, 3X: 10th SC stitch, in line with the beginning of a 3 SC sequence.
4X, 5X: Beginning of the 4th ch 5 space.
R1: Ch 1. 1 SC in each stitch across, working 3 SC in the ch 5 spaces, until you’ve reached the specified number of SC sts.
XS: 63 sts (leaving 12 ch sts unworked)
S: 75 sts (leaving 12 ch sts unworked)
M: 87 sts (leaving 12 ch sts unworked)
L: 93 sts (leaving 15 ch sts unworked)
XL: 105 sts (leaving 15 ch sts unworked)
2X: 117 sts (leaving 18 ch sts unworked)
3X: 129 sts (leaving 18 ch sts unworked)
4X: 141 sts (leaving 21 ch sts unworked)
5X: 153 sts (leaving 21 ch sts unworked)
R2-39: Turn. Ch 2. 1 DC in each st across. (63 / 75 / 87 / 93 / 105 / 117 / 129 / 141 / 153 sts)
For sizes 4X, or 5X, fasten off and move on to finishing.
R40-41: Repeat R2.
For sizes 2X, or 3X, fasten off and move on to finishing.
R42: Repeat R2.
For sizes XS, or L, fasten off and move on to finishing.
R43: Repeat R2.
For sizes S, or XL, fasten off and move on to finishing.
R44: Repeat R2.
For size M, fasten off and move on to finishing.
Finishing
Weave in ends.
Fold the top in half, with right sides together. Seam each side of your top from the bottom edge of the body to the end of the sleeve.
Turn top right side out.

Ad-Free PDF Pattern for Marley Lace Top
Tips & Tricks
- Compare your typical size with the schematics of this crochet summer top to ensure that you are selecting the proper size.
- Be sure to check your gauge before beginning this free top crochet pattern to ensure that your finished crochet summer top will meet the intended measurements.
- I recommend using a yarn with minimal stretch, as the choice of fiber will impact the fit and drape of your crochet summer top.
More Free Wearable Crochet Patterns
I hope you enjoyed this pattern! If you make it, leave me a comment below.
Want to see more from me? Be sure to subscribe to my email newsletter so that you never miss a pattern!
Follow along with me on Instagram for daily updates and a behind the scenes look at my designs.
I’d love to see what you make with this tutorial! Don’t forget to share your finished work with me: on social media by tagging me @thenicolechase, in your Ravelry projects, or post over in my Facebook group!
Thanks for stopping by! Happy crafting!
Nicole
PATTERN COPYRIGHT © 2026 NICOLE CHASE. ALL RIGHTS RESERVED.
PATTERN MAY NOT BE ALTERED, COPIED, REDISTRIBUTED OR SOLD AS YOUR OWN PATTERN.
YOU MAY SELL THE FINISHED PRODUCT ON A SMALL SCALE. PATTERN/DESIGN CREDIT GIVEN TO WWW.THENICOLECHASE.COM IS APPRECIATED. PERMISSION TO SELL DOES NOT INCLUDE MASS PRODUCTION. LARGE SCALE PRODUCTION IS PROHIBITED.
PHOTOGRAPHY COPYRIGHT © 2026 NICOLE CHASE. ALL RIGHTS RESERVED.
PHOTOS MAY NOT BE ALTERED, COPIED, REDISTRIBUTED OR SOLD AS YOUR OWN.
This post may contain affiliate links. If you make a purchase through links on our site, we may earn a commission.
Hi! I just finished the lace section (size S, no problems, love your diagram) and 2 rows of body DC, and am trying it on with temporary seams. All my measurements correspond to a small, and it goes on with no fuss, but the armholes are soooooo tiny! I can see it getting really uncomfortable over a whole day. Any suggestions for improving fit that don’t involve redoing the whole thing? Thanks in advance!
Hello! You could try blocking, specifically at the arm holes, to make the opening a bit wider. Hope that helps!
I ended up doing another repeat of the lace (4 rows) and it worked perfectly. Finished the piece today so now all I have to do is block it and find a good undertank! Thanks again!
Hi and thank you for a nice pattern! But I’m a bit confused, I make size XS and have done the first part, and it looks great, but I have 27 ch5 spaces and its 40″, I started with 88ch and that gives me 14 ch5 spaces after row 1, so it’s impossible for me to have 16 ch5 spaces at round 21.
Have I started with wrong number of chains?
Appreciate the help, thanks!
Without seeing it, it is hard to say for sure. It sounds like as you were crocheting, you added extra ch spaces along the way. 40″ for an extra small is too large. Also, note that there are both ch 5 and ch 3 spaces noted in different parts of the pattern. 88 is the correct number of chains. I’d recommend looking at the stitch tutorial diagram and referencing that for each row. It can also be helpful to write down the rows you need to do and cross them off as you go, since the repeating stitches, while slightly different, are similar enough that they could easily be confused. Hope that helps!
Thank you! Yes it was my bad! I don’t know what I did, but yeah I was adding stitches. The diagram was really helpful!!
also wonder about the end of the front/back piece; repeating R2, is it ch3 over ch3 from previous row and SC in the sc from previous row?
Thanks!