Adaleigh Beanie – Free Crochet Pattern
This post may contain affiliate links. If you make a purchase through links on our site, we may earn a commission.
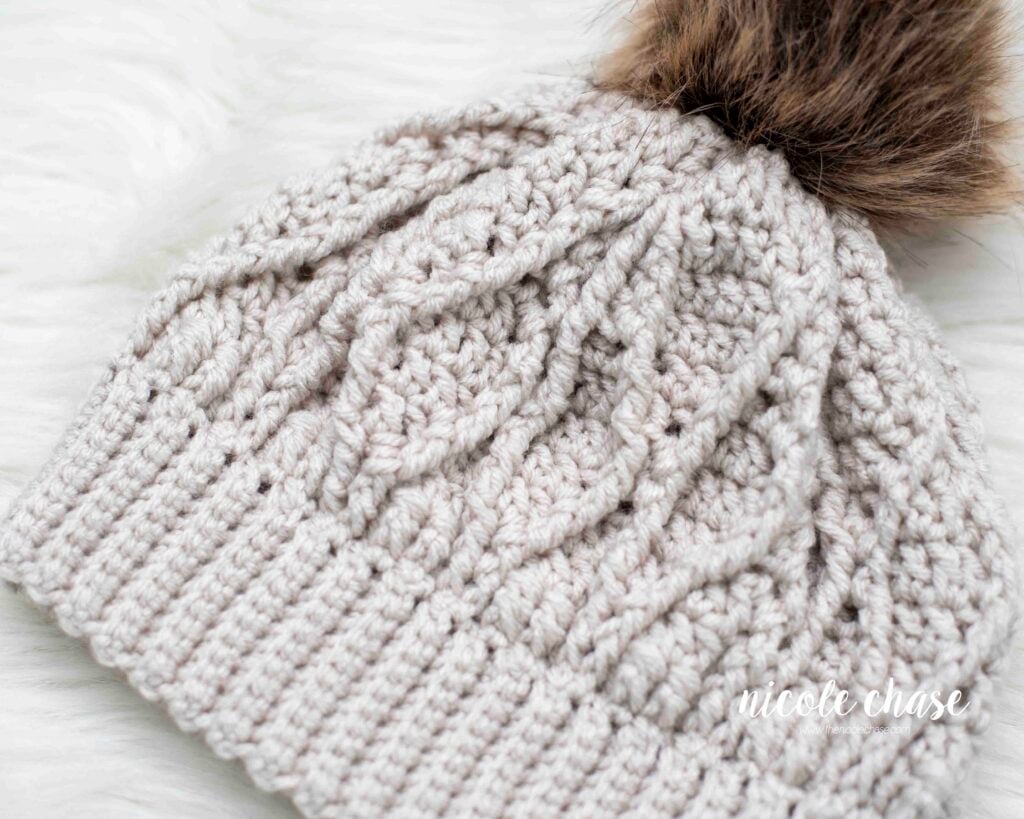
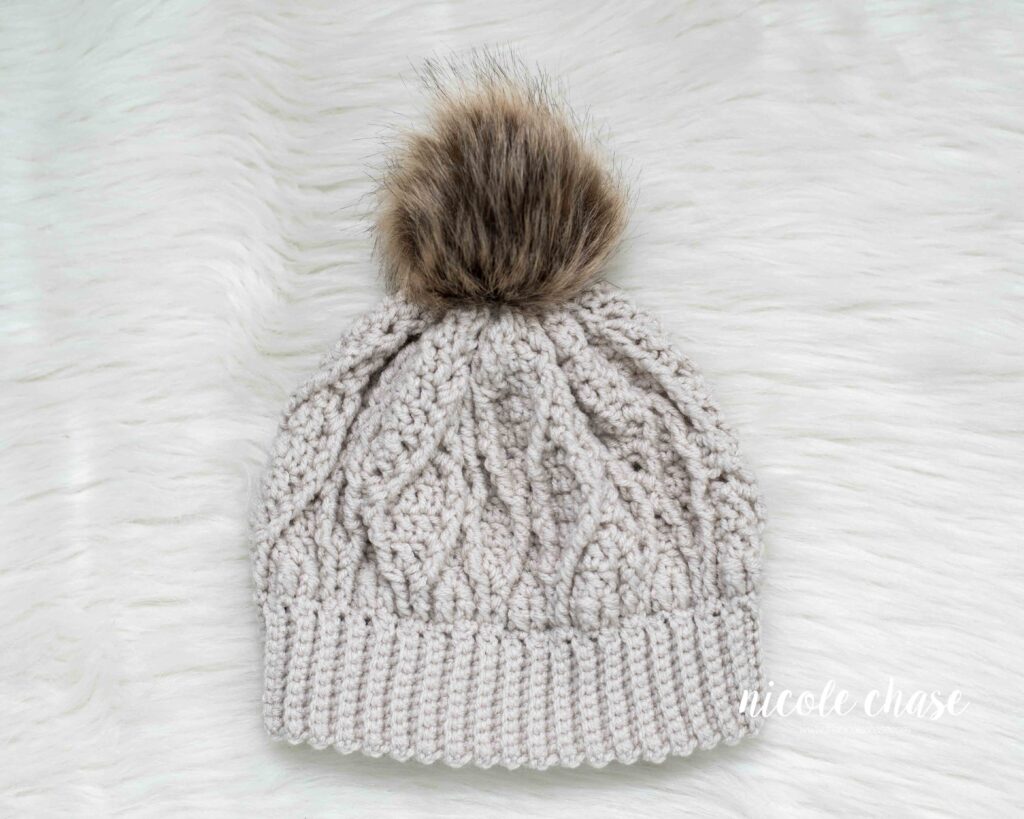
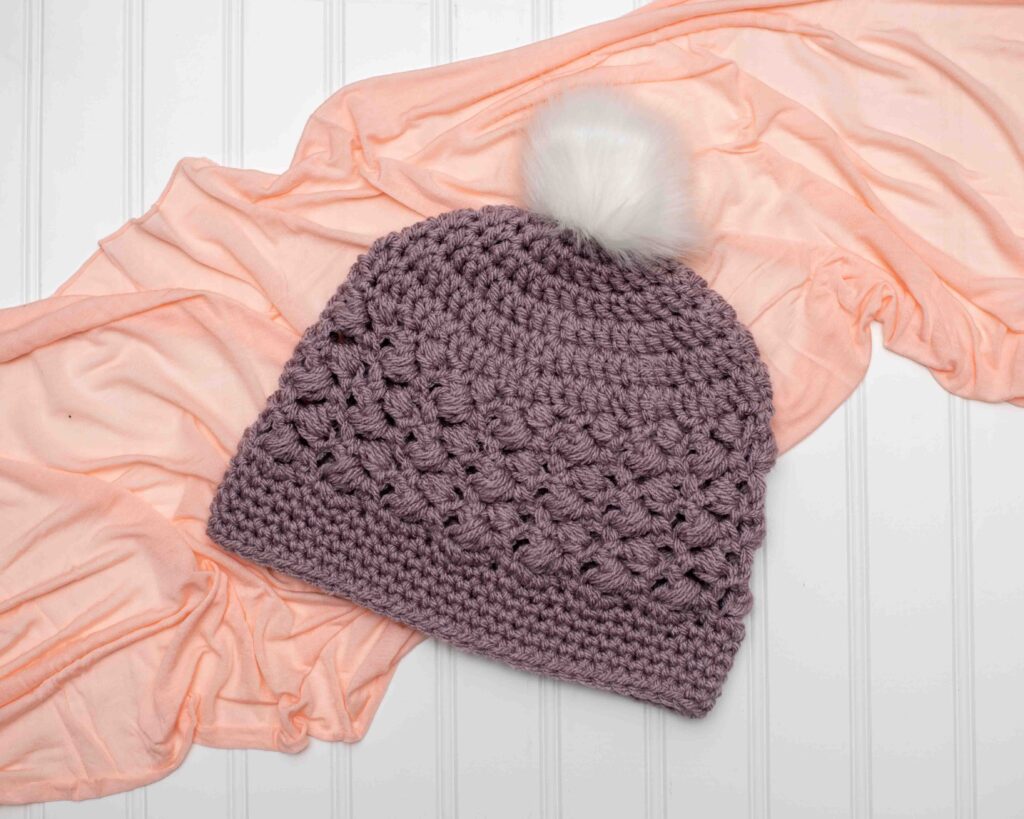
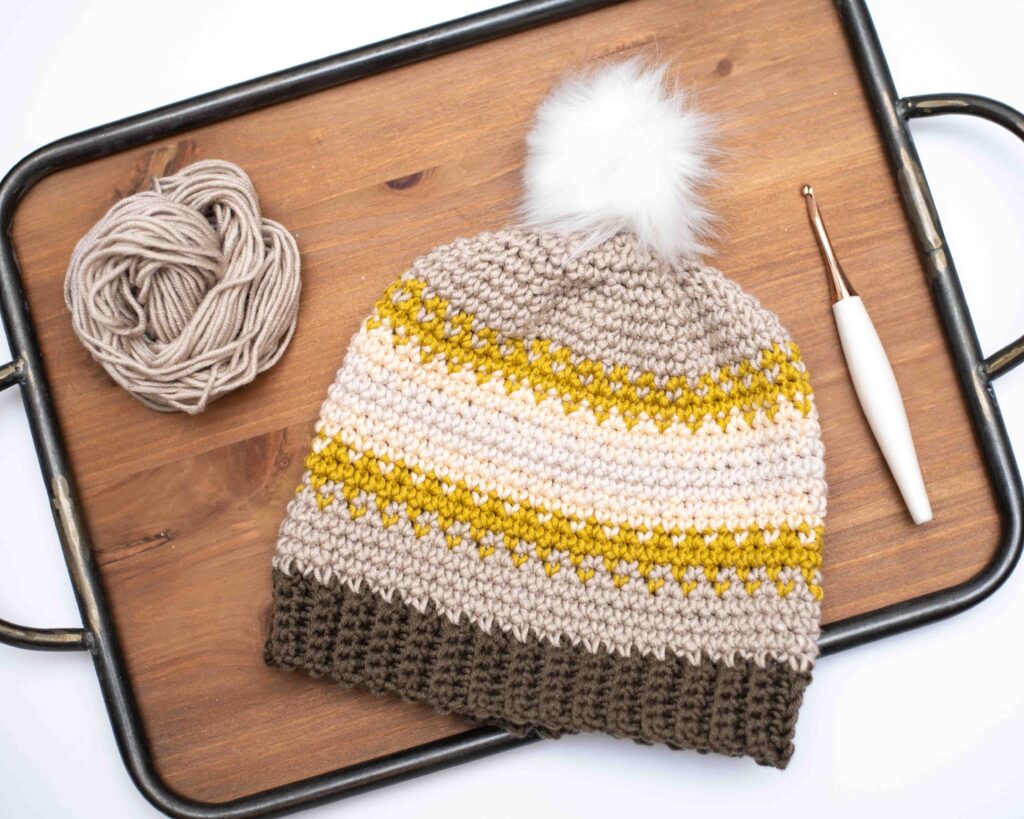
The Adaleigh Beanie is a classic free crochet beanie pattern featuring a beautiful crochet cable texture that is far less intimidating than it looks! Originally designed for my daughter using a rainbow faux fur pom pom, I’ve updated this post to include all sizes from baby to adult for free here on the blog.
Whether you call it a beanie or a free crochet toque pattern, this design works up beautifully in any worsted weight yarn. I personally recommend lighter colors to make those stitches shine. If you’re new to cables, be sure to check out the video tutorial below!
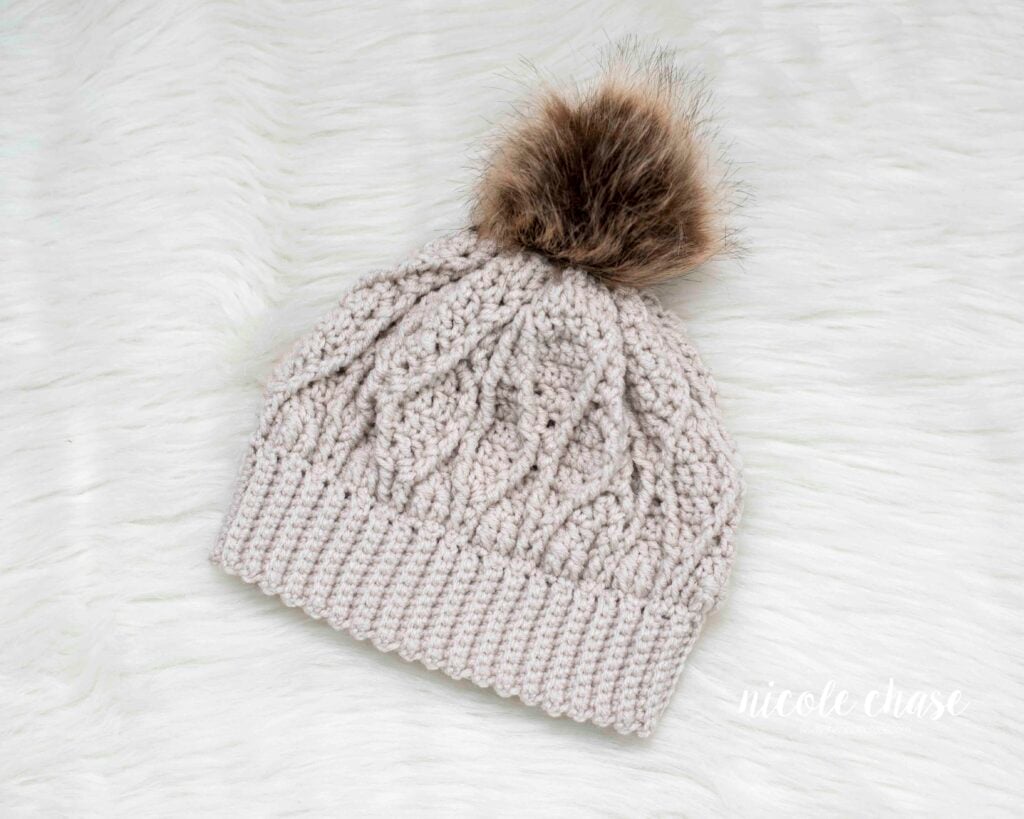
Table of Contents
I would classify this free crochet beanie pattern as “advanced beginner”. It would be helpful to have had some experience with amigurumi before creating this project.
I hope you enjoy this free crochet pattern available here on my blog! An ad-free, formatted PDF version of this crochet pattern is also available for purchase here:
Love this pattern? Save it for later!
- Pin it: Add this free crochet beanie pattern to your favorite boards on Pinterest.
- Ravelry: Favorite or queue the Adaleigh Beanie on Ravelry to keep this crochet cable hat pattern in your project library.
Free Crochet Pattern for Adaleigh Beanie
Pattern Specifics

Sizes: 0-3 months, 3-6 months, 6-12 months, toddler, child, teen, adult
Gauge: 2” = 9 SC rows of band, unstretched, and 2” = 4 DC rows (see approximate circumference/length for each size)
Hook Size: 4.0mm (G) crochet hook, 5.0mm (H) crochet hook
Other Tools: tapestry needle, scissors
Yarn Weight: Medium (4) Worsted Weight
Yarn Used: WeCrochet/Knit Picks Brava Worsted
Yardage: up to 200 yds
Other Materials: faux fur pom pom
Abbreviations
st = stitch
sl st = slip stitch
ch = chain
SC = single crochet
DC = double crochet
FPDC = front post double crochet
FPTC = front post triple crochet
FPDC3cluster = front post double crochet 3 stitches together in 1 stitch.
FPDC2tog = front post double crochet 2 stitches together
Special Stitches
FPDC3cluster = work a front post double crochet 3 stitches together around the post of 1 stitch (rather than joining 3 stitches together); Working around the post of only 1 stitch, yarn over, from the front of your work, insert the hook around the back of the post and around to the other side, draw up a loop. Yarn over, draw through the first 2 loops on hook (leaving 2 loops left on hook). Yarn over, again working around the same st, draw up a loop. Yarn over, draw through the first 2 loops on hook (leaving 3 loops left on hook). Yarn over, again working around the same st, draw up a loop. Yarn over, draw through the first 2 loops on hook (leaving 4 loops left on hook). Yarn over. Draw through all remaining loops on hook.
FPDC2tog: Yarn over. Insert hook around the post of the first stitch. Draw up a loop. Yarn over, draw through the first 2 loops on hook (leaving 2 loops left on hook). Yarn over. Insert hook around the post of the second stitch. Draw up a loop. Yarn over, draw through the first 2 loops on hook (leaving 3 loops left on hook). Yarn over. Draw through all remaining loops on hook.
Notes
- Note that your yarn choice, hook size, and tension will affect the sizing of this project. Please check your gauge prior to starting this pattern. If you do not compare your gauge to that of the design, it is possible that your sizing will be affected.
- Approximate circumference for each size is the measurement that your hat will comfortably stretch to. The actual width of the hat may be slightly shorter.
- Note that age-based sizes are the average measurements for that size, based on the standards set forth by the Craft Yarn Council. It is always best to base your sizing on the actual head circumference.
- Chain 1 at the beginning of each row does NOT count as a stitch (unless otherwise specified).
- Chain 2 at the beginning of each round does NOT count as a stitch (unless otherwise specified).
- See tutorial photos.
Pattern
0-3 Months
Approx. circumference: 13” / Approx. length: 5”
Ribbed Band
Using 4.0mm (G) hook:
R1: Ch 7, SC in second ch from hook and each st to end of row. (6 sts)
R2-48: Ch 1, turn, working in the back loops of previous round, SC in each st across. (6 sts)
Bring both ends of band together and join with a sl st to the top of first row. Sl st the two ends of the band together.
Do not fasten off.
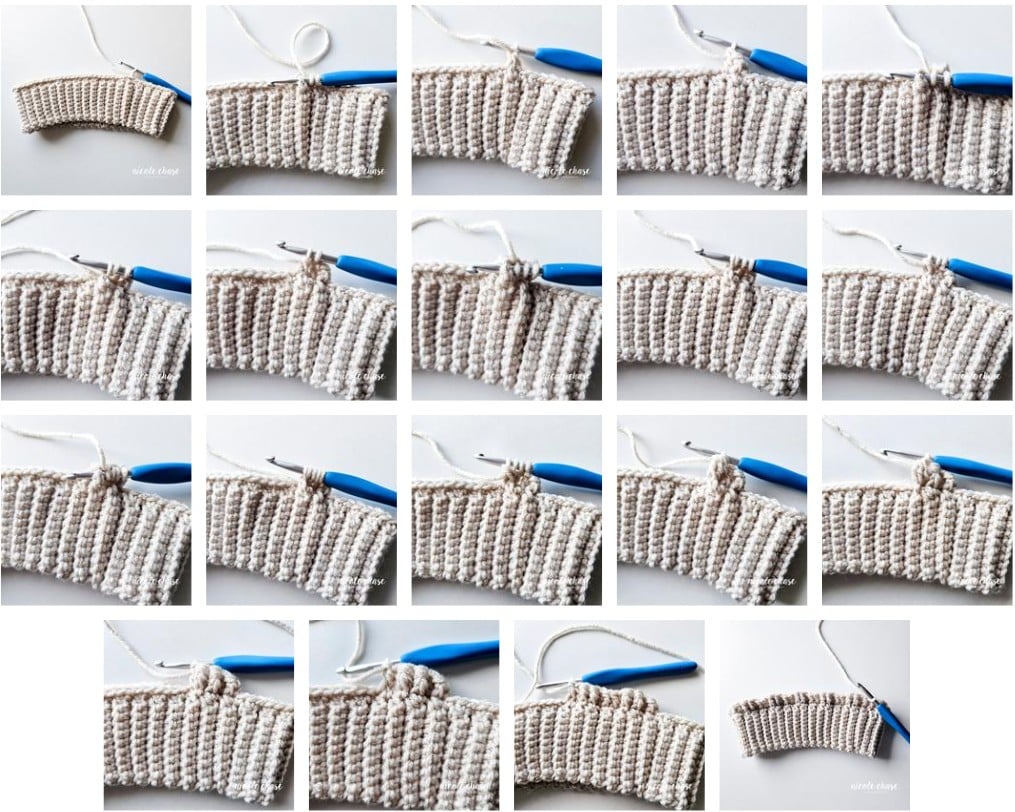
Hat Body
Using 5.0mm (H) hook:
R1: Ch 1. Work 1 SC along the top of each row in the ribbed band. Join with a sl st to beginning SC. (48 sts)
R2: Ch 2. *1 FPDC, 1 DC, 1 FPDC3cluster around the post of the next stitch, FPDC3cluster around the post of the next st, 1 DC, 1 FPDC. Repeat from * around. Join with a sl st to beginning. (48 sts)
R3: Ch 2. *1 FPDC, 1 DC in each of the next 4 sts, 1 FPDC. Repeat from * around. Join with a sl st to beginning (48 sts)
R4: Ch 2. *Skip the first st. 1 DC in the next st. Working in front of the DC just made, 1 FPTC around the post of the skipped st. 1 DC in each of the next 2 sts. Skip the next st. 1 FPTC around the post of the next st. Working behind the FPTC just made, 1 DC in the skipped st. Repeat from * around. Join with a sl st to beginning. (48 sts)
R5: Ch 2. *1 DC. Skip the next st. 1 DC in the next st. Working in front of the DC just made, 1 FPTC around the post of the skipped st. Skip the next st. 1 FPTC around the post of the next st. Working behind the FPTC just made, 1 DC in the skipped st. 1 DC. Repeat from * around. Join with a sl st to beginning. (48 sts)
R6: Ch 2. *1 DC in each of the next 2 sts. 1 FPDC around the post of each of the next 2 sts. 1 DC in each of the next 2 sts. Repeat from * around. Join with a sl st to beginning. (48 sts)
R7: Ch 2. *1 DC. Skip the next st. 1 FPTC around the post of the next st. Working behind the FPTC just made, DC in the skipped st. Skip the next st. 1 DC in the next st. Working in front of the DC just made, 1 FPTC around the post of the skipped st. 1 DC. Repeat from * around. Join with a sl st to beginning. (48 sts)
R8: Ch 2. *Skip the next st. 1 FPTC around the post of the next st. Working behind the FPTC just made, 1 DC in the skipped st. 1 DC in each of the next 2 sts. Skip the next st. 1 DC in the next st. Working in front of the DC just made, 1 FPTC around the post of the skipped st. Repeat from * around. Join with a sl st to beginning. (48 sts)
R9: Ch 2. Join the 2 FPDCs from previous row by working around the post of the last st from the previous row and the post of the first st from the previous row with 1 FPDC2tog. 1 DC in each of the next 4 sts. *Join the next 2 FPDCs by working around the post of the next 2 sts with 1 FPDC2tog. 1 DC in each of the next 4 sts. Repeat from * around. Join with a sl st to beginning. (40 sts)
Leave long tail for finishing. Fasten off.
Finishing
To close the top of your hat, weave tails of yarn through every other stitch from your last round with your tapestry needle. Pull tightly and sew hole shut. Fasten off. Weave in ends.
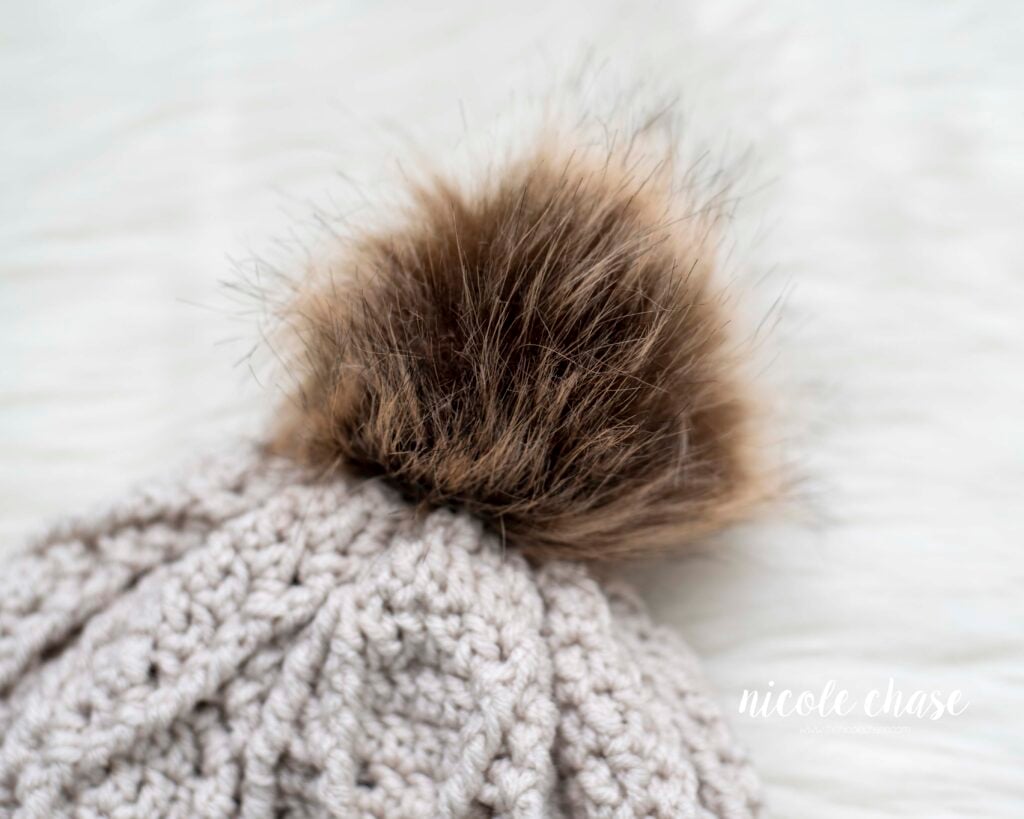
If desired, attach fur pom to the top of the hat.
3-6 Months
Approx. circumference: 14” / Approx. length: 5.5”
Ribbed Band
Using 4.0mm (G) hook:
R1: Ch 7, SC in second ch from hook and each st to end of row. (6 sts)
R2-54: Ch 1, turn, working in the back loops of previous round, SC in each st across. (6 sts)
Bring both ends of band together and join with a sl st to the top of first row. Sl st the two ends of the band together.
Do not fasten off.
Hat Body
Using 5.0mm (H) hook:
R1: Ch 1. Work 1 SC along the top of each row in the ribbed band. Join with a sl st to beginning SC. (54 sts)
R2: Ch 2. *1 FPDC, 1 DC, 1 FPDC3cluster around the post of the next stitch, FPDC3cluster around the post of the next st, 1 DC, 1 FPDC. Repeat from * around. Join with a sl st to beginning. (54 sts)
R3: Ch 2. *1 FPDC, 1 DC in each of the next 4 sts, 1 FPDC. Repeat from * around. Join with a sl st to beginning (54 sts)
R4: Ch 2. *Skip the first st. 1 DC in the next st. Working in front of the DC just made, 1 FPTC around the post of the skipped st. 1 DC in each of the next 2 sts. Skip the next st. 1 FPTC around the post of the next st. Working behind the FPTC just made, 1 DC in the skipped st. Repeat from * around. Join with a sl st to beginning. (54 sts)
R5: Ch 2. *1 DC. Skip the next st. 1 DC in the next st. Working in front of the DC just made, 1 FPTC around the post of the skipped st. Skip the next st. 1 FPTC around the post of the next st. Working behind the FPTC just made, 1 DC in the skipped st. 1 DC. Repeat from * around. Join with a sl st to beginning. (54 sts)
R6: Ch 2. *1 DC in each of the next 2 sts. 1 FPDC around the post of each of the next 2 sts. 1 DC in each of the next 2 sts. Repeat from * around. Join with a sl st to beginning. (54 sts)
R7: Ch 2. *1 DC. Skip the next st. 1 FPTC around the post of the next st. Working behind the FPTC just made, DC in the skipped st. Skip the next st. 1 DC in the next st. Working in front of the DC just made, 1 FPTC around the post of the skipped st. 1 DC. Repeat from * around. Join with a sl st to beginning. (54 sts)
R8: Ch 2. *Skip the next st. 1 FPTC around the post of the next st. Working behind the FPTC just made, 1 DC in the skipped st. 1 DC in each of the next 2 sts. Skip the next st. 1 DC in the next st. Working in front of the DC just made, 1 FPTC around the post of the skipped st. Repeat from * around. Join with a sl st to beginning. (54 sts)
R9: Ch 2. *1 FPDC, 1 DC in each of the next 4 sts, 1 FPDC. Repeat from * around. Join with a sl st to beginning. (54 sts)
R10: Ch 2. Join the 2 FPDCs from previous row by working around the post of the last st from the previous row and the post of the first st from the previous row with 1 FPDC2tog. 1 DC in each of the next 4 sts. *Join the next 2 FPDCs by working around the post of the next 2 sts with 1 FPDC2tog. 1 DC in each of the next 4 sts. Repeat from * around. Join with a sl st to beginning. (45 sts)
Leave long tail for finishing. Fasten off.
Finishing
To close the top of your hat, weave tails of yarn through every other stitch from your last round with your tapestry needle. Pull tightly and sew hole shut. Fasten off. Weave in ends.
If desired, attach fur pom to the top of the hat.
6-12 Months
Approx. circumference: 16” / Approx. length: 6”
Ribbed Band
Using 4.0mm (G) hook:
R1: Ch 7, SC in second ch from hook and each st to end of row. (6 sts)
R2-60: Ch 1, turn, working in the back loops of previous round, SC in each st across. (6 sts)
Bring both ends of band together and join with a sl st to the top of first row. Sl st the two ends of the band together.
Do not fasten off.
Hat Body
Using 5.0mm (H) hook:
R1: Ch 1. Work 1 SC along the top of each row in the ribbed band. Join with a sl st to beginning SC. (60 sts)
R2: Ch 2. *1 FPDC, 1 DC, 1 FPDC3cluster around the post of the next stitch, FPDC3cluster around the post of the next st, 1 DC, 1 FPDC. Repeat from * around. Join with a sl st to beginning. (60 sts)
R3: Ch 2. *1 FPDC, 1 DC in each of the next 4 sts, 1 FPDC. Repeat from * around. Join with a sl st to beginning (60 sts)
R4: Ch 2. *Skip the first st. 1 DC in the next st. Working in front of the DC just made, 1 FPTC around the post of the skipped st. 1 DC in each of the next 2 sts. Skip the next st. 1 FPTC around the post of the next st. Working behind the FPTC just made, 1 DC in the skipped st. Repeat from * around. Join with a sl st to beginning. (60 sts)
R5: Ch 2. *1 DC. Skip the next st. 1 DC in the next st. Working in front of the DC just made, 1 FPTC around the post of the skipped st. Skip the next st. 1 FPTC around the post of the next st. Working behind the FPTC just made, 1 DC in the skipped st. 1 DC. Repeat from * around. Join with a sl st to beginning. (60 sts)
R6: Ch 2. *1 DC in each of the next 2 sts. 1 FPDC around the post of each of the next 2 sts. 1 DC in each of the next 2 sts. Repeat from * around. Join with a sl st to beginning. (60 sts)
R7: Ch 2. *1 DC. Skip the next st. 1 FPTC around the post of the next st. Working behind the FPTC just made, DC in the skipped st. Skip the next st. 1 DC in the next st. Working in front of the DC just made, 1 FPTC around the post of the skipped st. 1 DC. Repeat from * around. Join with a sl st to beginning. (60 sts)
R8: Ch 2. *Skip the next st. 1 FPTC around the post of the next st. Working behind the FPTC just made, 1 DC in the skipped st. 1 DC in each of the next 2 sts. Skip the next st. 1 DC in the next st. Working in front of the DC just made, 1 FPTC around the post of the skipped st. Repeat from * around. Join with a sl st to beginning. (60 sts)
R9: Ch 2. *1 FPDC, 1 DC in each of the next 4 sts, 1 FPDC. Repeat from * around. Join with a sl st to beginning. (60 sts)
R10: Repeat R9. (60 sts)
R11: Ch 2. Join the 2 FPDCs from previous row by working around the post of the last st from the previous row and the post of the first st from the previous row with 1 FPDC2tog. 1 DC in each of the next 4 sts. *Join the next 2 FPDCs by working around the post of the next 2 sts with 1 FPDC2tog. 1 DC in each of the next 4 sts. Repeat from * around. Join with a sl st to beginning. (50 sts)
Leave long tail for finishing. Fasten off.
Finishing
To close the top of your hat, weave tails of yarn through every other stitch from your last round with your tapestry needle. Pull tightly and sew hole shut. Fasten off. Weave in ends.
If desired, attach fur pom to the top of the hat.
Toddler
Approx. circumference: 18” / Approx. length: 7”
Ribbed Band
Using 4.0mm (G) hook:
R1: Ch 9, SC in second ch from hook and each st to end of row. (8 sts)
R2-66: Ch 1, turn, working in the back loops of previous round, SC in each st across. (8 sts)
Bring both ends of band together and join with a sl st to the top of first row. Sl st the two ends of the band together.
Do not fasten off.
Hat Body
Using 5.0mm (H) hook:
R1: Ch 1. Work 1 SC along the top of each row in the ribbed band. Join with a sl st to beginning SC. (66 sts)
R2: Ch 2. *1 FPDC, 1 DC, 1 FPDC3cluster around the post of the next stitch, FPDC3cluster around the post of the next st, 1 DC, 1 FPDC. Repeat from * around. Join with a sl st to beginning. (66 sts)
R3: Ch 2. *1 FPDC, 1 DC in each of the next 4 sts, 1 FPDC. Repeat from * around. Join with a sl st to beginning (66 sts)
R4: Ch 2. *Skip the first st. 1 DC in the next st. Working in front of the DC just made, 1 FPTC around the post of the skipped st. 1 DC in each of the next 2 sts. Skip the next st. 1 FPTC around the post of the next st. Working behind the FPTC just made, 1 DC in the skipped st. Repeat from * around. Join with a sl st to beginning. (66 sts)
R5: Ch 2. *1 DC. Skip the next st. 1 DC in the next st. Working in front of the DC just made, 1 FPTC around the post of the skipped st. Skip the next st. 1 FPTC around the post of the next st. Working behind the FPTC just made, 1 DC in the skipped st. 1 DC. Repeat from * around. Join with a sl st to beginning. (66 sts)
R6: Ch 2. *1 DC in each of the next 2 sts. 1 FPDC around the post of each of the next 2 sts. 1 DC in each of the next 2 sts. Repeat from * around. Join with a sl st to beginning. (66 sts)
R7: Ch 2. *1 DC. Skip the next st. 1 FPTC around the post of the next st. Working behind the FPTC just made, DC in the skipped st. Skip the next st. 1 DC in the next st. Working in front of the DC just made, 1 FPTC around the post of the skipped st. 1 DC. Repeat from * around. Join with a sl st to beginning. (66 sts)
R8: Ch 2. *Skip the next st. 1 FPTC around the post of the next st. Working behind the FPTC just made, 1 DC in the skipped st. 1 DC in each of the next 2 sts. Skip the next st. 1 DC in the next st. Working in front of the DC just made, 1 FPTC around the post of the skipped st. Repeat from * around. Join with a sl st to beginning. (66 sts)
R9: Ch 2. *1 FPDC, 1 DC in each of the next 4 sts, 1 FPDC. Repeat from * around. Join with a sl st to beginning. (66 sts)
R10: Repeat R9. (66 sts)
R11: Ch 2. Join the 2 FPDCs from previous row by working around the post of the last st from the previous row and the post of the first st from the previous row with 1 FPDC2tog. 1 DC in each of the next 4 sts. *Join the next 2 FPDCs by working around the post of the next 2 sts with 1 FPDC2tog. 1 DC in each of the next 4 sts. Repeat from * around. Join with a sl st to beginning. (55 sts)
R12: Ch 2. *1 FPDC, 1 DC in each of the next 4 sts. Repeat from * around. Join with a sl st to beginning. (55 sts)
Leave long tail for finishing. Fasten off.
Finishing
To close the top of your hat, weave tails of yarn through every other stitch from your last round with your tapestry needle. Pull tightly and sew hole shut. Fasten off. Weave in ends.
If desired, attach fur pom to the top of the hat.
Child
Approx. circumference: 20” / Approx. length: 7.5”
Ribbed Band
Using 4.0mm (G) hook:
R1: Ch 9, SC in second ch from hook and each st to end of row. (8 sts)
R2-72: Ch 1, turn, working in the back loops of previous round, SC in each st across. (8 sts)
Bring both ends of band together and join with a sl st to the top of first row. Sl st the two ends of the band together.
Do not fasten off.
Hat Body
Using 5.0mm (H) hook:
R1: Ch 1. Work 1 SC along the top of each row in the ribbed band. Join with a sl st to beginning SC. (72 sts)
R2: Ch 2. *1 FPDC, 1 DC, 1 FPDC3cluster around the post of the next stitch, FPDC3cluster around the post of the next st, 1 DC, 1 FPDC. Repeat from * around. Join with a sl st to beginning. (72 sts)
R3: Ch 2. *1 FPDC, 1 DC in each of the next 4 sts, 1 FPDC. Repeat from * around. Join with a sl st to beginning (72 sts)
R4: Ch 2. *Skip the first st. 1 DC in the next st. Working in front of the DC just made, 1 FPTC around the post of the skipped st. 1 DC in each of the next 2 sts. Skip the next st. 1 FPTC around the post of the next st. Working behind the FPTC just made, 1 DC in the skipped st. Repeat from * around. Join with a sl st to beginning. (72 sts)
R5: Ch 2. *1 DC. Skip the next st. 1 DC in the next st. Working in front of the DC just made, 1 FPTC around the post of the skipped st. Skip the next st. 1 FPTC around the post of the next st. Working behind the FPTC just made, 1 DC in the skipped st. 1 DC. Repeat from * around. Join with a sl st to beginning. (72 sts)
R6: Ch 2. *1 DC in each of the next 2 sts. 1 FPDC around the post of each of the next 2 sts. 1 DC in each of the next 2 sts. Repeat from * around. Join with a sl st to beginning. (72 sts)
R7: Ch 2. *1 DC. Skip the next st. 1 FPTC around the post of the next st. Working behind the FPTC just made, DC in the skipped st. Skip the next st. 1 DC in the next st. Working in front of the DC just made, 1 FPTC around the post of the skipped st. 1 DC. Repeat from * around. Join with a sl st to beginning. (72 sts)
R8: Ch 2. *Skip the next st. 1 FPTC around the post of the next st. Working behind the FPTC just made, 1 DC in the skipped st. 1 DC in each of the next 2 sts. Skip the next st. 1 DC in the next st. Working in front of the DC just made, 1 FPTC around the post of the skipped st. Repeat from * around. Join with a sl st to beginning. (72 sts)
R9: Ch 2. *1 FPDC, 1 DC in each of the next 4 sts, 1 FPDC. Repeat from * around. Join with a sl st to beginning. (72 sts)
R10: Repeat R9. (72 sts)
R11: Ch 2. Join the 2 FPDCs from previous row by working around the post of the last st from the previous row and the post of the first st from the previous row with 1 FPDC2tog. 1 DC in each of the next 4 sts. *Join the next 2 FPDCs by working around the post of the next 2 sts with 1 FPDC2tog. 1 DC in each of the next 4 sts. Repeat from * around. Join with a sl st to beginning. (60 sts)
R12: Ch 2. *1 FPDC, 1 DC in each of the next 4 sts. Repeat from * around. Join with a sl st to beginning. (60 sts)
R13: Repeat R12. (60 sts)
Leave long tail for finishing. Fasten off.
Finishing
To close the top of your hat, weave tails of yarn through every other stitch from your last round with your tapestry needle. Pull tightly and sew hole shut. Fasten off. Weave in ends.
If desired, attach fur pom to the top of the hat.
Teen / Adult Small
Approx. circumference: 21” / Approx. length: 8”
Ribbed Band
Using 4.0mm (G) hook:
R1: Ch 11, SC in second ch from hook and each st to end of row. (10 sts)
R2-78: Ch 1, turn, working in the back loops of previous row, SC in each st across. (10 sts)
Bring both ends of band together and join with a sl st to the top of first round. Sl st the two ends of the band together.
Do not fasten off.
Hat Body
Using 5.0mm (H) hook:
R1: Ch 1. Work 1 SC along the top of each row in the ribbed band. Join with a sl st to beginning SC. (78 sts)
R2: Ch 2. *1 FPDC, 1 DC, 1 FPDC3cluster around the post of the next stitch, FPDC3cluster around the post of the next st, 1 DC, 1 FPDC. Repeat from * around. Join with a sl st to beginning. (78 sts)
R3: Ch 2. *1 FPDC, 1 DC in each of the next 4 sts, 1 FPDC. Repeat from * around. Join with a sl st to beginning (78 sts)
R4: Ch 2. *Skip the first st. 1 DC in the next st. Working in front of the DC just made, 1 FPTC around the post of the skipped st. 1 DC in each of the next 2 sts. Skip the next st. 1 FPTC around the post of the next st. Working behind the FPTC just made, 1 DC in the skipped st. Repeat from * around. Join with a sl st to beginning. (78 sts)
R5: Ch 2. *1 DC. Skip the next st. 1 DC in the next st. Working in front of the DC just made, 1 FPTC around the post of the skipped st. Skip the next st. 1 FPTC around the post of the next st. Working behind the FPTC just made, 1 DC in the skipped st. 1 DC. Repeat from * around. Join with a sl st to beginning. (78 sts)
R6: Ch 2. *1 DC in each of the next 2 sts. 1 FPDC around the post of each of the next 2 sts. 1 DC in each of the next 2 sts. Repeat from * around. Join with a sl st to beginning. (78 sts)
R7: Ch 2. *1 DC. Skip the next st. 1 FPTC around the post of the next st. Working behind the FPTC just made, DC in the skipped st. Skip the next st. 1 DC in the next st. Working in front of the DC just made, 1 FPTC around the post of the skipped st. 1 DC. Repeat from * around. Join with a sl st to beginning. (78 sts)
R8: Ch 2. *Skip the next st. 1 FPTC around the post of the next st. Working behind the FPTC just made, 1 DC in the skipped st. 1 DC in each of the next 2 sts. Skip the next st. 1 DC in the next st. Working in front of the DC just made, 1 FPTC around the post of the skipped st. Repeat from * around. Join with a sl st to beginning. (78 sts)
R9: Ch 2. *1 FPDC, 1 DC in each of the next 4 sts, 1 FPDC. Repeat from * around. Join with a sl st to beginning. (78 sts)
R10: Repeat R9. (78 sts)
R11: Ch 2. Join the 2 FPDCs from previous row by working around the post of the last st from the previous row and the post of the first st from the previous row with 1 FPDC2tog. 1 DC in each of the next 4 sts. *Join the next 2 FPDCs by working around the post of the next 2 sts with 1 FPDC2tog. 1 DC in each of the next 4 sts. Repeat from * around. Join with a sl st to beginning. (65 sts)
R12: Ch 2. *1 FPDC, 1 DC in each of the next 4 sts. Repeat from * around. Join with a sl st to beginning. (65 sts)
R13: Repeat R12. (65 sts)
Leave long tail for finishing. Fasten off.
Finishing
To close the top of your hat, weave tails of yarn through every other stitch from your last round with your tapestry needle. Pull tightly and sew hole shut. Fasten off. Weave in ends.
If desired, attach fur pom to the top of the hat.
Adult
Approx. circumference: 23” / Approx. length: 9”
Ribbed Band
Using 4.0mm (G) hook:
R1: Ch 11, SC in second ch from hook and each st to end of row. (10 sts)
R2-84: Ch 1, turn, working in the back loops of previous round, SC in each st across. (10 sts)
Bring both ends of band together and join with a sl st to the top of first row. Sl st the two ends of the band together.
Do not fasten off.
Hat Body
Using 5.0mm (H) hook:
R1: Ch 1. Work 1 SC along the top of each row in the ribbed band. Join with a sl st to beginning SC. (84 sts)
R2: Ch 2. *1 FPDC, 1 DC, 1 FPDC3cluster around the post of the next stitch, FPDC3cluster around the post of the next st, 1 DC, 1 FPDC. Repeat from * around. Join with a sl st to beginning. (84 sts)
R3: Ch 2. *1 FPDC, 1 DC in each of the next 4 sts, 1 FPDC. Repeat from *around. Join with a sl st to beginning (84 sts)
R4: Ch 2. *Skip the first st. 1 DC in the next st. Working in front of the DC just made, 1 FPTC around the post of the skipped st. 1 DC in each of the next 2 sts. Skip the next st. 1 FPTC around the post of the next st. Working behind the FPTC just made, 1 DC in the skipped st. Repeat from * around. Join with a sl st to beginning. (84 sts)
R5: Ch 2. *1 DC. Skip the next st. 1 DC in the next st. Working in front of the DC just made, 1 FPTC around the post of the skipped st. Skip the next st. 1 FPTC around the post of the next st. Working behind the FPTC just made, 1 DC in the skipped st. 1 DC. Repeat from * around. Join with a sl st to beginning. (84 sts)
R6: Ch 2. *1 DC in each of the next 2 sts. 1 FPDC around the post of each of the next 2 sts. 1 DC in each of the next 2 sts. Repeat from * around. Join with a sl st to beginning. (84 sts)
R7: Ch 2. *1 DC. Skip the next st. 1 FPTC around the post of the next st. Working behind the FPTC just made, DC in the skipped st. Skip the next st. 1 DC in the next st. Working in front of the DC just made, 1 FPTC around the post of the skipped st. 1 DC. Repeat from * around. Join with a sl st to beginning. (84 sts)
R8: Ch 2. *Skip the next st. 1 FPTC around the post of the next st. Working behind the FPTC just made, 1 DC in the skipped st. 1 DC in each of the next 2 sts. Skip the next st. 1 DC in the next st. Working in front of the DC just made, 1 FPTC around the post of the skipped st. Repeat from * around. Join with a sl st to beginning. (84 sts)
R9: Ch 2. *1 FPDC, 1 DC in each of the next 4 sts, 1 FPDC. Repeat from * around. Join with a sl st to beginning. (84 sts)
R10: Repeat R9. (84 sts)
R11: Ch 2. Join the 2 FPDCs from previous row by working around the post of the last st from the previous row and the post of the first st from the previous row with 1 FPDC2tog. 1 DC in each of the next 4 sts. *Join the next 2 FPDCs by working around the post of the next 2 sts with 1 FPDC2tog. 1 DC in each of the next 4 sts. Repeat from * around. Join with a sl st to beginning. (70 sts)
R12: Ch 2. *1 FPDC, 1 DC in each of the next 4 sts. Repeat from * around. Join with a sl st to beginning. (70 sts)
R13-15: Repeat R12. (70 sts)
Leave long tail for finishing. Fasten off.
Finishing
To close the top of your hat, weave tails of yarn through every other stitch from your last round with your tapestry needle. Pull tightly and sew hole shut. Fasten off. Weave in ends.
If desired, attach fur pom to the top of the hat.
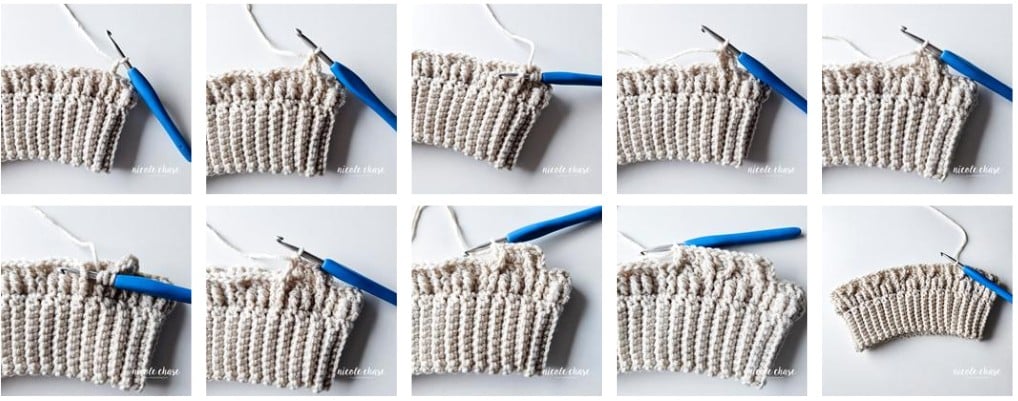
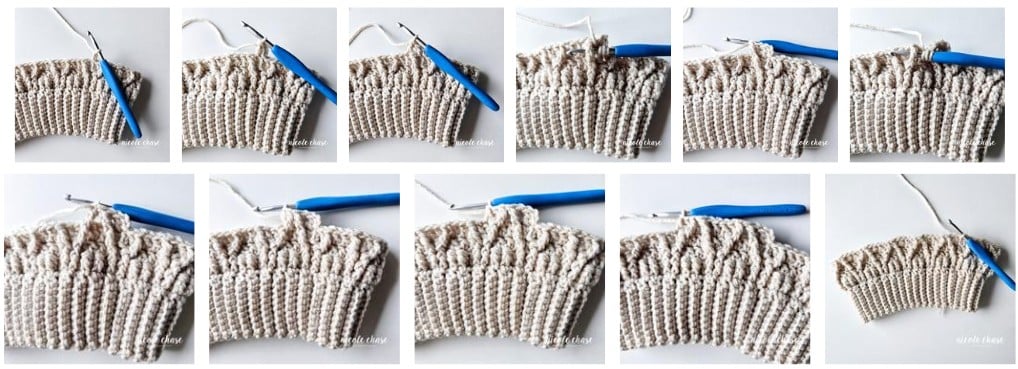
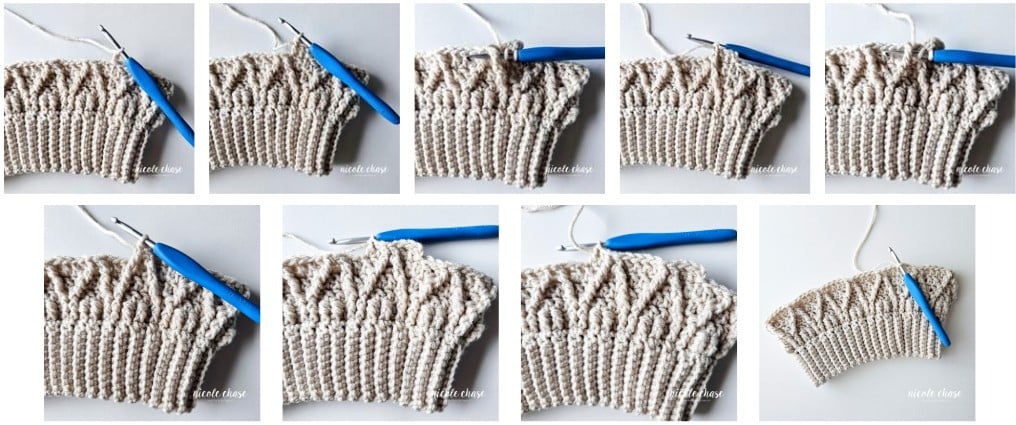
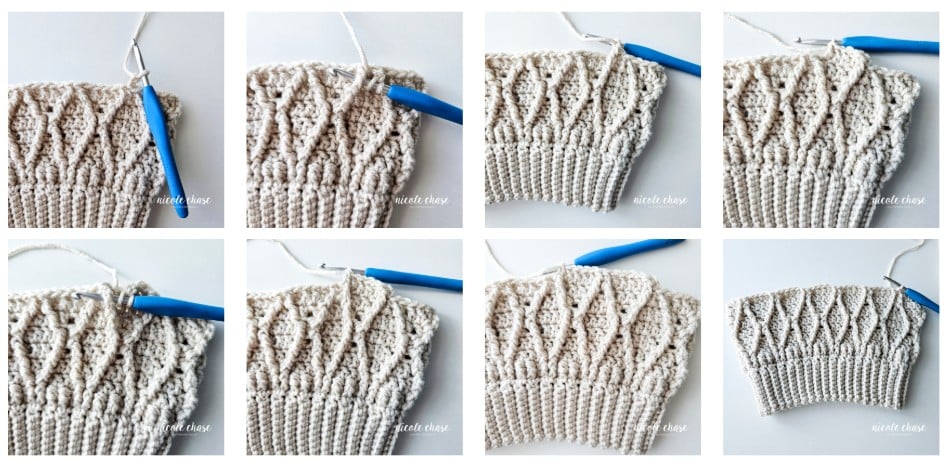
Tutorial Photos
Ribbed Band
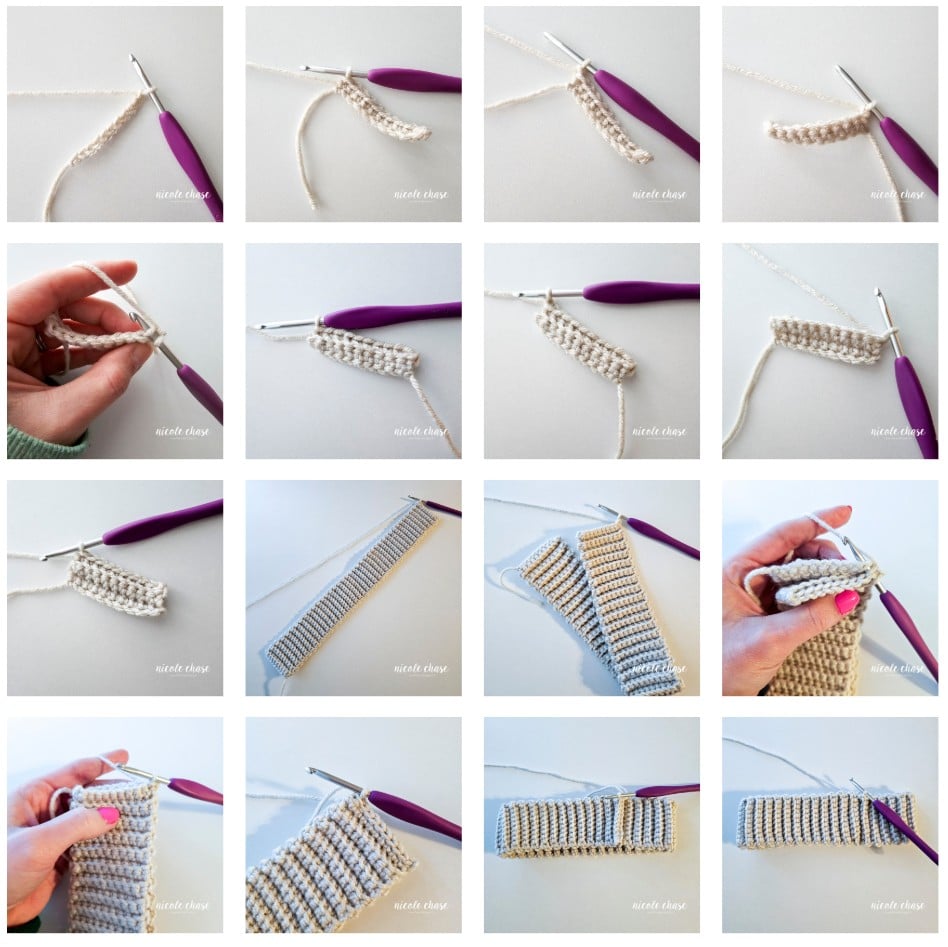
R1

R2
R3
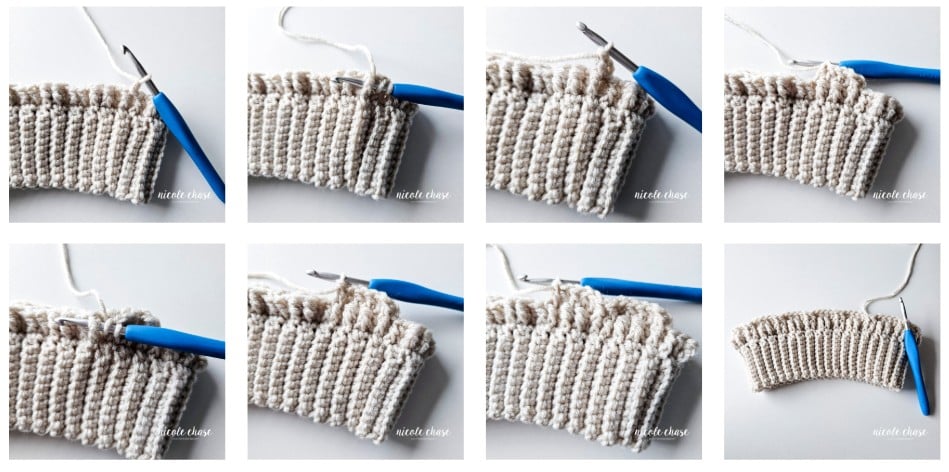
R4
R5
R6
R7
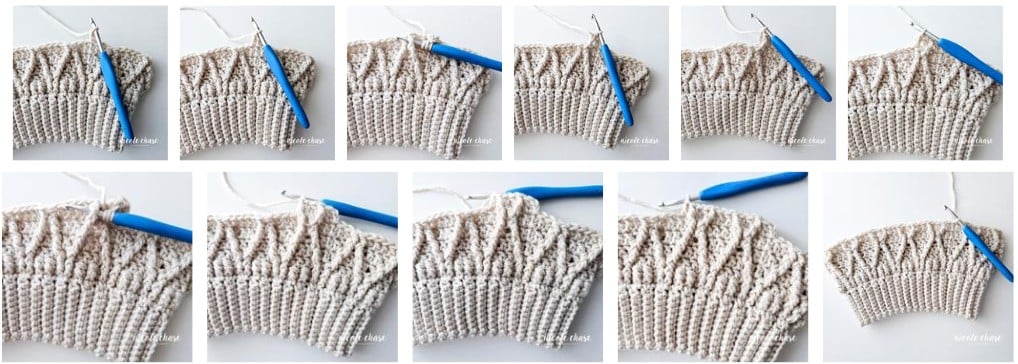
R8
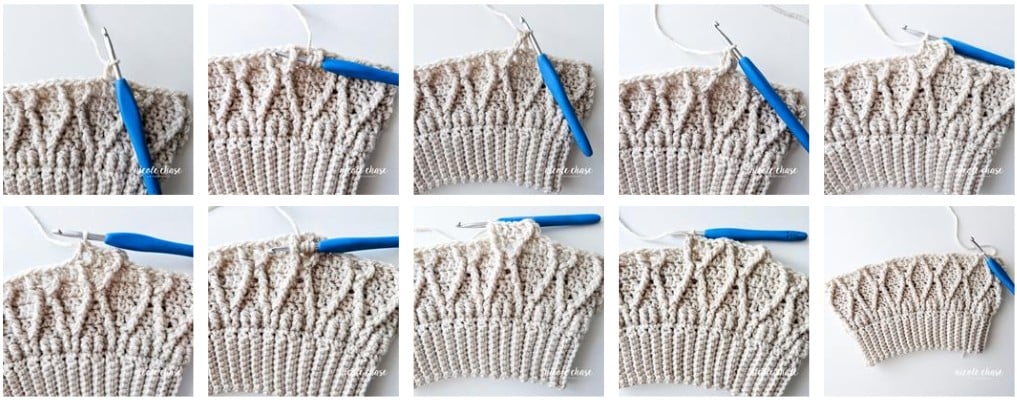
R9 (3-6 months and up)
R10 (6-12 months and up)
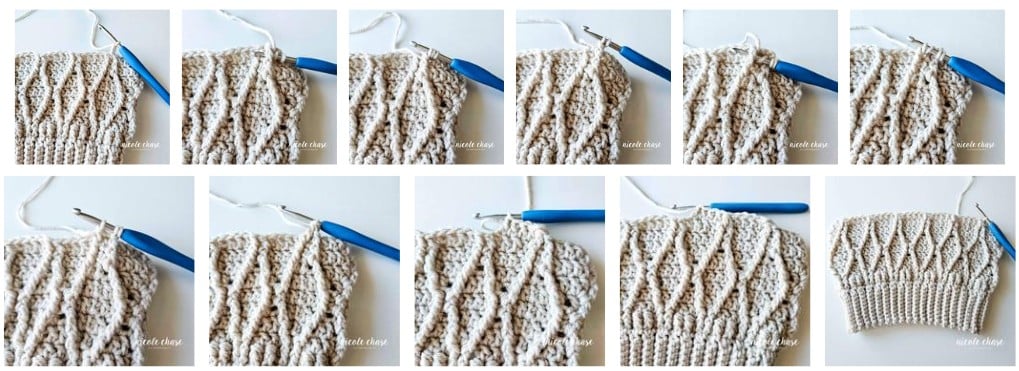
R9 (0-3 months), R10 (3-6 months), R11 (6-12 months and up)
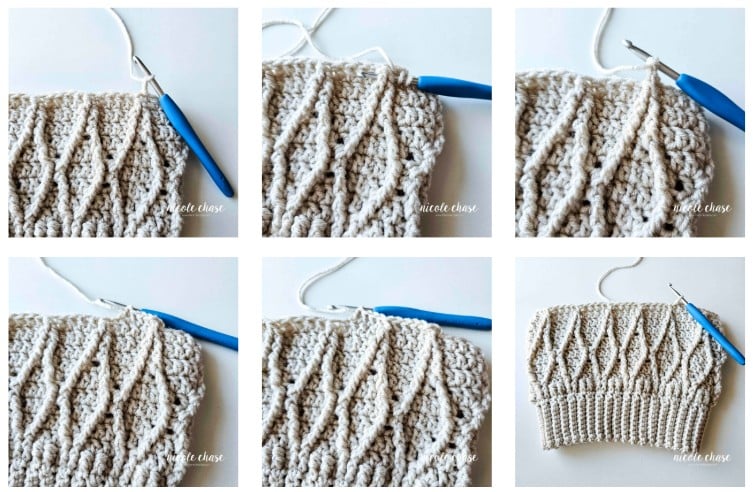
R12-15 (toddler and up)
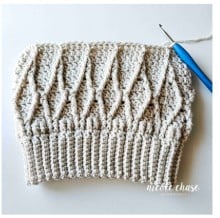
Finishing

Watch the Video Tutorial for the Adaleigh Beanie
While the Adaleigh Beanie is available in 7 sizes, this video tutorial below demonstrates the adult-size construction and the specific cable techniques used throughout the pattern.
This video is also on available on YouTube. Watch this video: Adaleigh Beanie Tutorial on YouTube.
I hope you enjoyed this free beanie crochet pattern! Seeing your finished projects is my favorite part of being a designer. If you made an Adaleigh Beanie, please tag me @thenicolechase on social media so I can see your beautiful work!


Ad-Free PDF Pattern for Adaleigh Beanie
Tips for the Perfect Crochet Cable Beanie
Want to ensure your Adaleigh Beanie turns out exactly how you want? Here are my top tips for success:
- Track Your Rounds with a Stitch Marker: Because the crochet cable pattern repeats, it can be easy to lose your place. Place a stitch marker at the beginning of each repeat if you’re having trouble keeping track.
- Check Your Gauge Early: Don’t wait until the hat is half-finished! After you complete the ribbed band, stop and measure. If your crochet toque is significantly smaller or larger than the measurements in the sizing chart, it’s much easier to restart now with a different hook size, or to adjust the row count.
- Understanding Bottom-Up Construction: This pattern is worked from the bottom up. We start by crocheting the ribbed band, joining it into a circle, and then working the body of the hat directly into the edge of that band. This allows for the most accurate sizing because you can continue to try the hat on as you go.
- Customizing Your Fit: Every head is different! Since this is a free crochet beanie pattern for all sizes, you can easily customize the length.
- For a Slouchier Fit: Simply add extra pattern repeats (Rounds 12-15).
- For a Shorter Fit: If you prefer a cap style, you can subtract repeats from the final rounds.
Choosing the Best Yarn for Crochet Cables
The Adaleigh Beanie features a diamond-like texture that truly shines with the right yarn. Because crochet cables are created using overlapping post stitches, you choice of color and fiber will impact the final look of your crochet toque.
- Stitch Definition: For the cables to pop, I recommend a smooth worsted weight yarn with a good twist. Very fuzzy yarns (like mohair blends) can blur the lines of the cables.
- Lighter Colors: As you can see in my samples, lighter colors highlight the shadows created by the raised stitches. If you choose a very dark yarn, the beautiful crochet cable hat texture may be harder to see.


More Free Crochet Hat Patterns
If you loved making the Adaleigh Beanie, check out these other free crochet hat patterns! Whether you want more texture or a classic fit, these designs are perfect for your next project:
- Simply Slouchy Beanie: The perfect everyday hat with a relaxed fit.
- Spirit Earflap Hat: A cozy and fun choice for extra warmth during the winter months. Kids love this one!
- Simply Wild Beanie: A great pattern with a unique leopard print pattern.
Browse the Library: Want even more? Check out my full collection of free crochet wearable patterns for more beanies, cowls, and scarves.

I hope you enjoyed this pattern! If you make it, leave me a comment below.
Want to see more from me? Be sure to subscribe to my email newsletter so that you never miss a pattern!
Follow along with me on Instagram for daily updates and a behind the scenes look at my designs.
I’d love to see what you make with this tutorial! Don’t forget to share your finished work with me: on social media by tagging me @thenicolechase, in your Ravelry projects, or post over in my Facebook group!
Thanks for stopping by! Happy crafting!
Nicole
PATTERN COPYRIGHT © 2026 NICOLE CHASE. ALL RIGHTS RESERVED.
PATTERN MAY NOT BE ALTERED, COPIED, REDISTRIBUTED OR SOLD AS YOUR OWN PATTERN.
YOU MAY SELL THE FINISHED PRODUCT ON A SMALL SCALE. PATTERN/DESIGN CREDIT GIVEN TO WWW.THENICOLECHASE.COM IS APPRECIATED. PERMISSION TO SELL DOES NOT INCLUDE MASS PRODUCTION. LARGE SCALE PRODUCTION IS PROHIBITED.
PHOTOGRAPHY COPYRIGHT © 2026 NICOLE CHASE. ALL RIGHTS RESERVED.
PHOTOS MAY NOT BE ALTERED, COPIED, REDISTRIBUTED OR SOLD AS YOUR OWN.
This post may contain affiliate links. If you make a purchase through links on our site, we may earn a commission.
Can you tell me where to find the toddler pattern? My daughter is 3 not sure if adult size will be too big. Thanks!
Hi Jackie! The toddler size is available in the PDF on Etsy and Ravelry. Only the adult pattern is free here on my blog. ????
I love the looks of this pattern, but i’m having trouble with it. Do you have a video? Trying to figure-out row 2 if this pattern.
Thank you! I am in the process of filming a video for this pattern actually! If all goes according to plan, I will likely have it posted by the end of the week. 🙂 I’m happy to help in the meantime. You can feel free to send me a message on Facebook or Instagram and I can respond to you directly.
Video has been posted if you still need help!